Access and Conduct Wonders/Maravillas Fluency Checks
Learn how teachers use the Wonders Oral Reading Fluency tool to assess reading rate, accuracy, and fluency progress.
- Literacy
- SSO & Manual-Rostering
- Customer Support
- Online Assessments
- Direct Login & Auto-Rostering
- Wonders 2014
- Maravillas 2020 & 2017
- Core
- Direct Login & Manual-Rostering
- Classroom Teacher
- Wonders Balanced Literacy 2016
- Wonders 2023 2020 2017
- SSO & Auto-Rostering
- PreK-12
- Elementary School
- Tools & Resources
- Middle School
- Kindergarten
- 1st Grade
- 2nd Grade
- 3rd Grade
- 4th Grade
- 5th Grade
- 6th Grade


The Oral Reading Fluency tool allows teachers to administer oral reading fluency assessments from reading passages. The student reads from a specified passage, while the teacher follows along to track the student's progress.
Sections Covered:
Access Oral Reading Fluency Tool
Conduct Fluency Check
Results Screen
Reports Screen
Access Oral Reading Fluency Tool
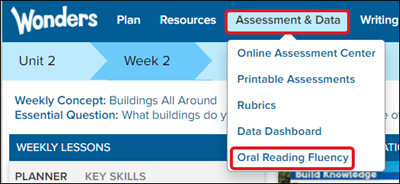
1. To access the Oral Reading Fluency tool, hover over Assessment & Data and select Oral Reading Fluency from the menu.
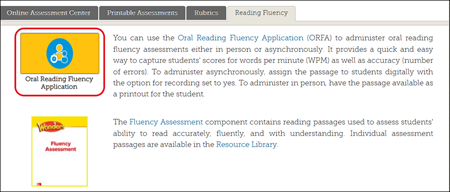
2. From the Reading Fluency tab, click on the Oral Reading Fluency Application to administer oral reading fluency assessments.
The Oral Reading Fluency tool will then open in a secondary tab.
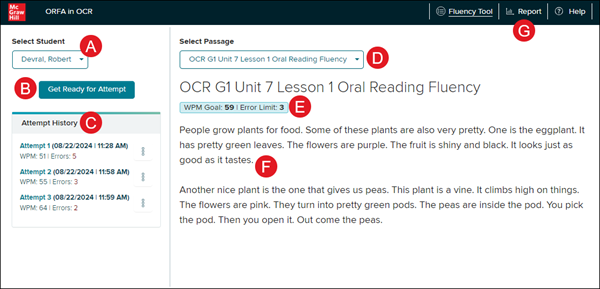
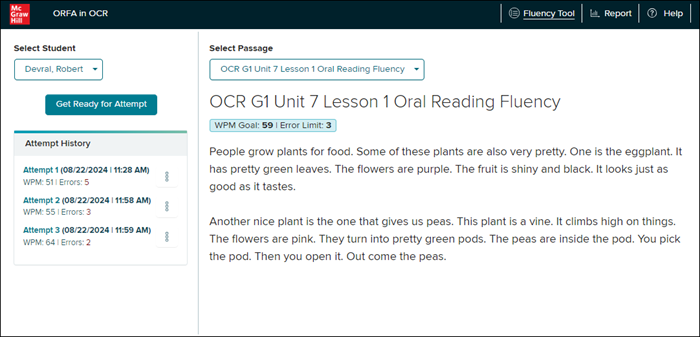
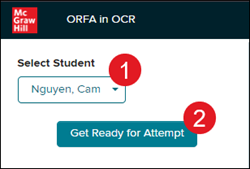
A. Select the student name from the Select Student drop-down list.
B. To start the fluency check, select the Get Ready for Attempt button.
C. The student's Attempt History of reading the selected passage is listed under their name.
D. Select a different reading passage from the Select Passage drop-down list.
E. Each fluency check provides the Words Per Minute (WPM) goal and the suggested Error Limit.
F. The selected passage appears on the right.
G. Click the Reports tab to view Fluency Performance data.
Conduct Fluency Check
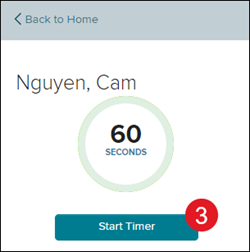
1. Select the student from the Select Student drop-down.
2. Click the Get Ready for Attempt button.
3. Each check includes a 60-second timer. Click the Start Timer button to begin.
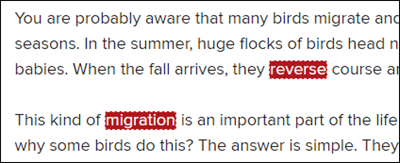
4. As the student reads the passage, select any word to record an error. These will be marked red.
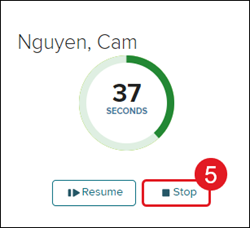
5. Once the student finishes reading the passage, click the Stop button or wait until time has run out.
6. Click the last word that the student read. This will be marked blue.

Results Screen
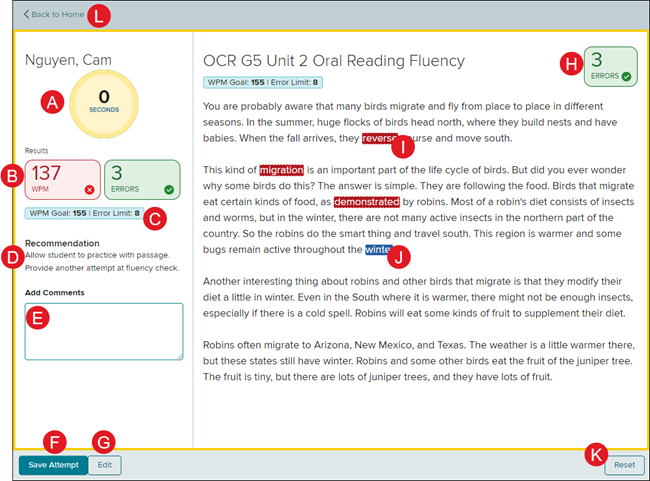
A. The remaining Seconds left in the timer.
B. The student's words-per-minute ( WPM) and number of Errors while reading the passage.
C. The WPM Goal and maximum Error Limit to successfully pass the fluency check.
D. Any Recommendations for completion of future fluency checks.
E. Add any desired teacher Comments for the student.
F. Click the Save Attempt button to record the student's current attempt.
G. Click the Edit button to adjust any comments and selected words.
H. The number of Errors the student had during the reading of the passage.
I. Any words marked in red are marked as errors read by the student.
J. The blue marked word is the last word read by the student.
K. Click the Reset button to remove results and marks for the current fluency attempt.
L. Click the Back to Home link to navigate back to the Fluency Tool homepage.
Report Screen
At the top right of the page, click the Report link to see the student and class performance.

The Fluency Performance Report will generate in the same window.
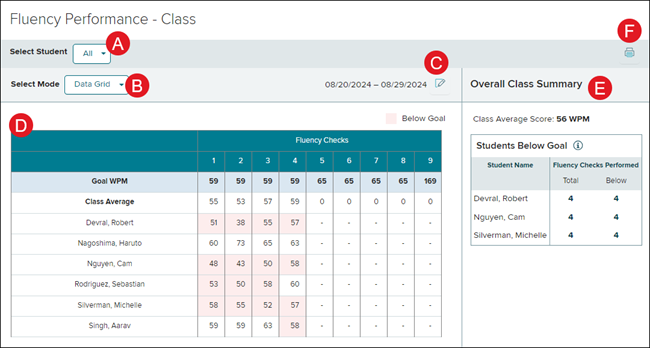
A. Select a student from the Select Student drop-down to view the fluency data for a specific student.
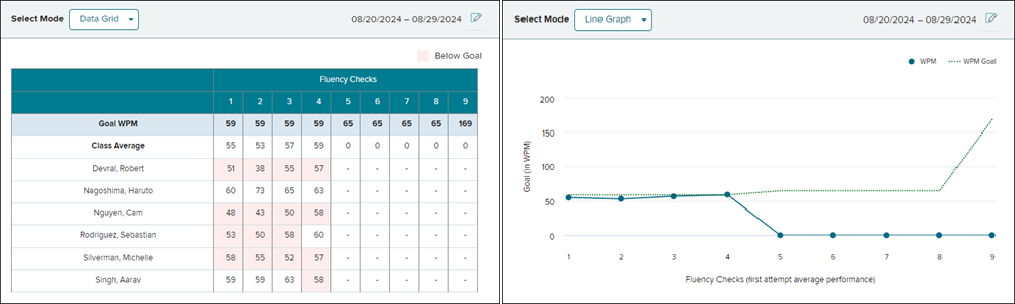
B. Click the Select Mode drop-down to toggle between the Data Grid and Line Graph.
C. Click the Edit (pencil) icon to adjust the date range for the data view.
D. The data will show in the selected Data Grid or Line Graph.
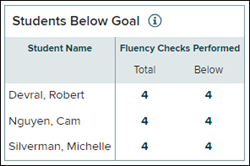
E. The Overall Class Summary section provides the Class Average Score (WPM) and the list of Students Below Goal for performed Fluency Checks.
The Students Below Goal table shows the list of students who scored below goal on 80% or more of their first attempts for all passages.
F. Click the Print icon to print out the current data view.