Help Students Study Effectively for Your A&P Course!
In this article, Dr. Koot shares his top 10 tips to help students be more effective at studying for their A&P course.
There’s no shortage of teaching challenges in the A&P course.
From prerequisite remediation to student engagement and everything in between, teaching students how to succeed in A&P can feel like a mystery. Instructors have many ways to address these challenges. But after you have checked all the boxes for instructional tips and course design, have you asked yourself: “Do my students know how to study?” In this article, I will share my top 10 tips to help students be more effective at studying for their A&P (anatomy & physiology, human anatomy, or human physiology) course.
What is the Problem?
I remember talking to many of my students who were spending hours doing what they thought was “studying” but were not seeing their hard work pay off with high performance on exams. I realized most students had not been taught how to study for a college-level science course—yet alone for a course like anatomy & physiology, human anatomy, or human physiology. Courses in these fields are unique because they require students to master a new vocabulary grounded in Greek and Latin prefixes and suffixes, along with visualizing anatomical relationships, integrating form and function, and understanding complex physiological processes. Taking an A&P course is like being enrolled in a physical geography and foreign language course at the exact same time! Furthermore, do students even realize that “studying” is really all about learning?
Students need to be taught how to learn, which is defined in this article as the process of acquiring new knowledge, skills, abilities, and behaviors. In addition to teaching students course-related content, I believe the role of each instructor is to also help students develop study skills that can be used in their specific course area. In A&P courses, there is already so much scientific information to cover and not enough time to fully cover it. Many of you are wondering “how can I also teach study skills for A&P on top of the scientific content?” Spending just a little bit of time to develop your students’ study skills will have benefits for your students that will extend beyond just the semester the student is enrolled in your course. You will be teaching them skills they will use in other science courses and continue to use throughout their journey as lifelong learner in their chosen healthcare-related field.
How Can You Help Me?
To assist you in helping you develop your students’ study skills for a course in an A&P-related field, I am sharing the top 10 tips I listed in a section of my syllabus titled “How do I study for this course?”.
This list of study tips developed organically from my own personal experiences as first a gross anatomy student and then as an instructor. After a mediocre performance on my first exam in medical gross anatomy, I quickly realized I needed a better method for learning anatomy. I began talking to my peers about what they were doing to successfully learn the material. This is when I started implementing several of the strategies you will read about below. I vividly remember reorganizing lecture content into simple line drawings, tables, and summary note cards.
This list continued to develop in an informal manner as I transitioned to teaching A&P at a local community college and leading supplemental instruction groups for medical students enrolled in human anatomy. It wasn’t until I became the course director for a human anatomy course at a large four-year university that I started posting the list in the course syllabus under the section “How should I study for this course?”
Over the past few years, I have become more familiar with the actual science behind my study tips. Scientists in the field of cognitive psychology have identified six evidence-based techniques for effective learning strategies: spaced practice, retrieval practice, interleaving, dual coding, elaboration, and concrete examples. I have noted these strategies when appropriate in the list of study tips below.
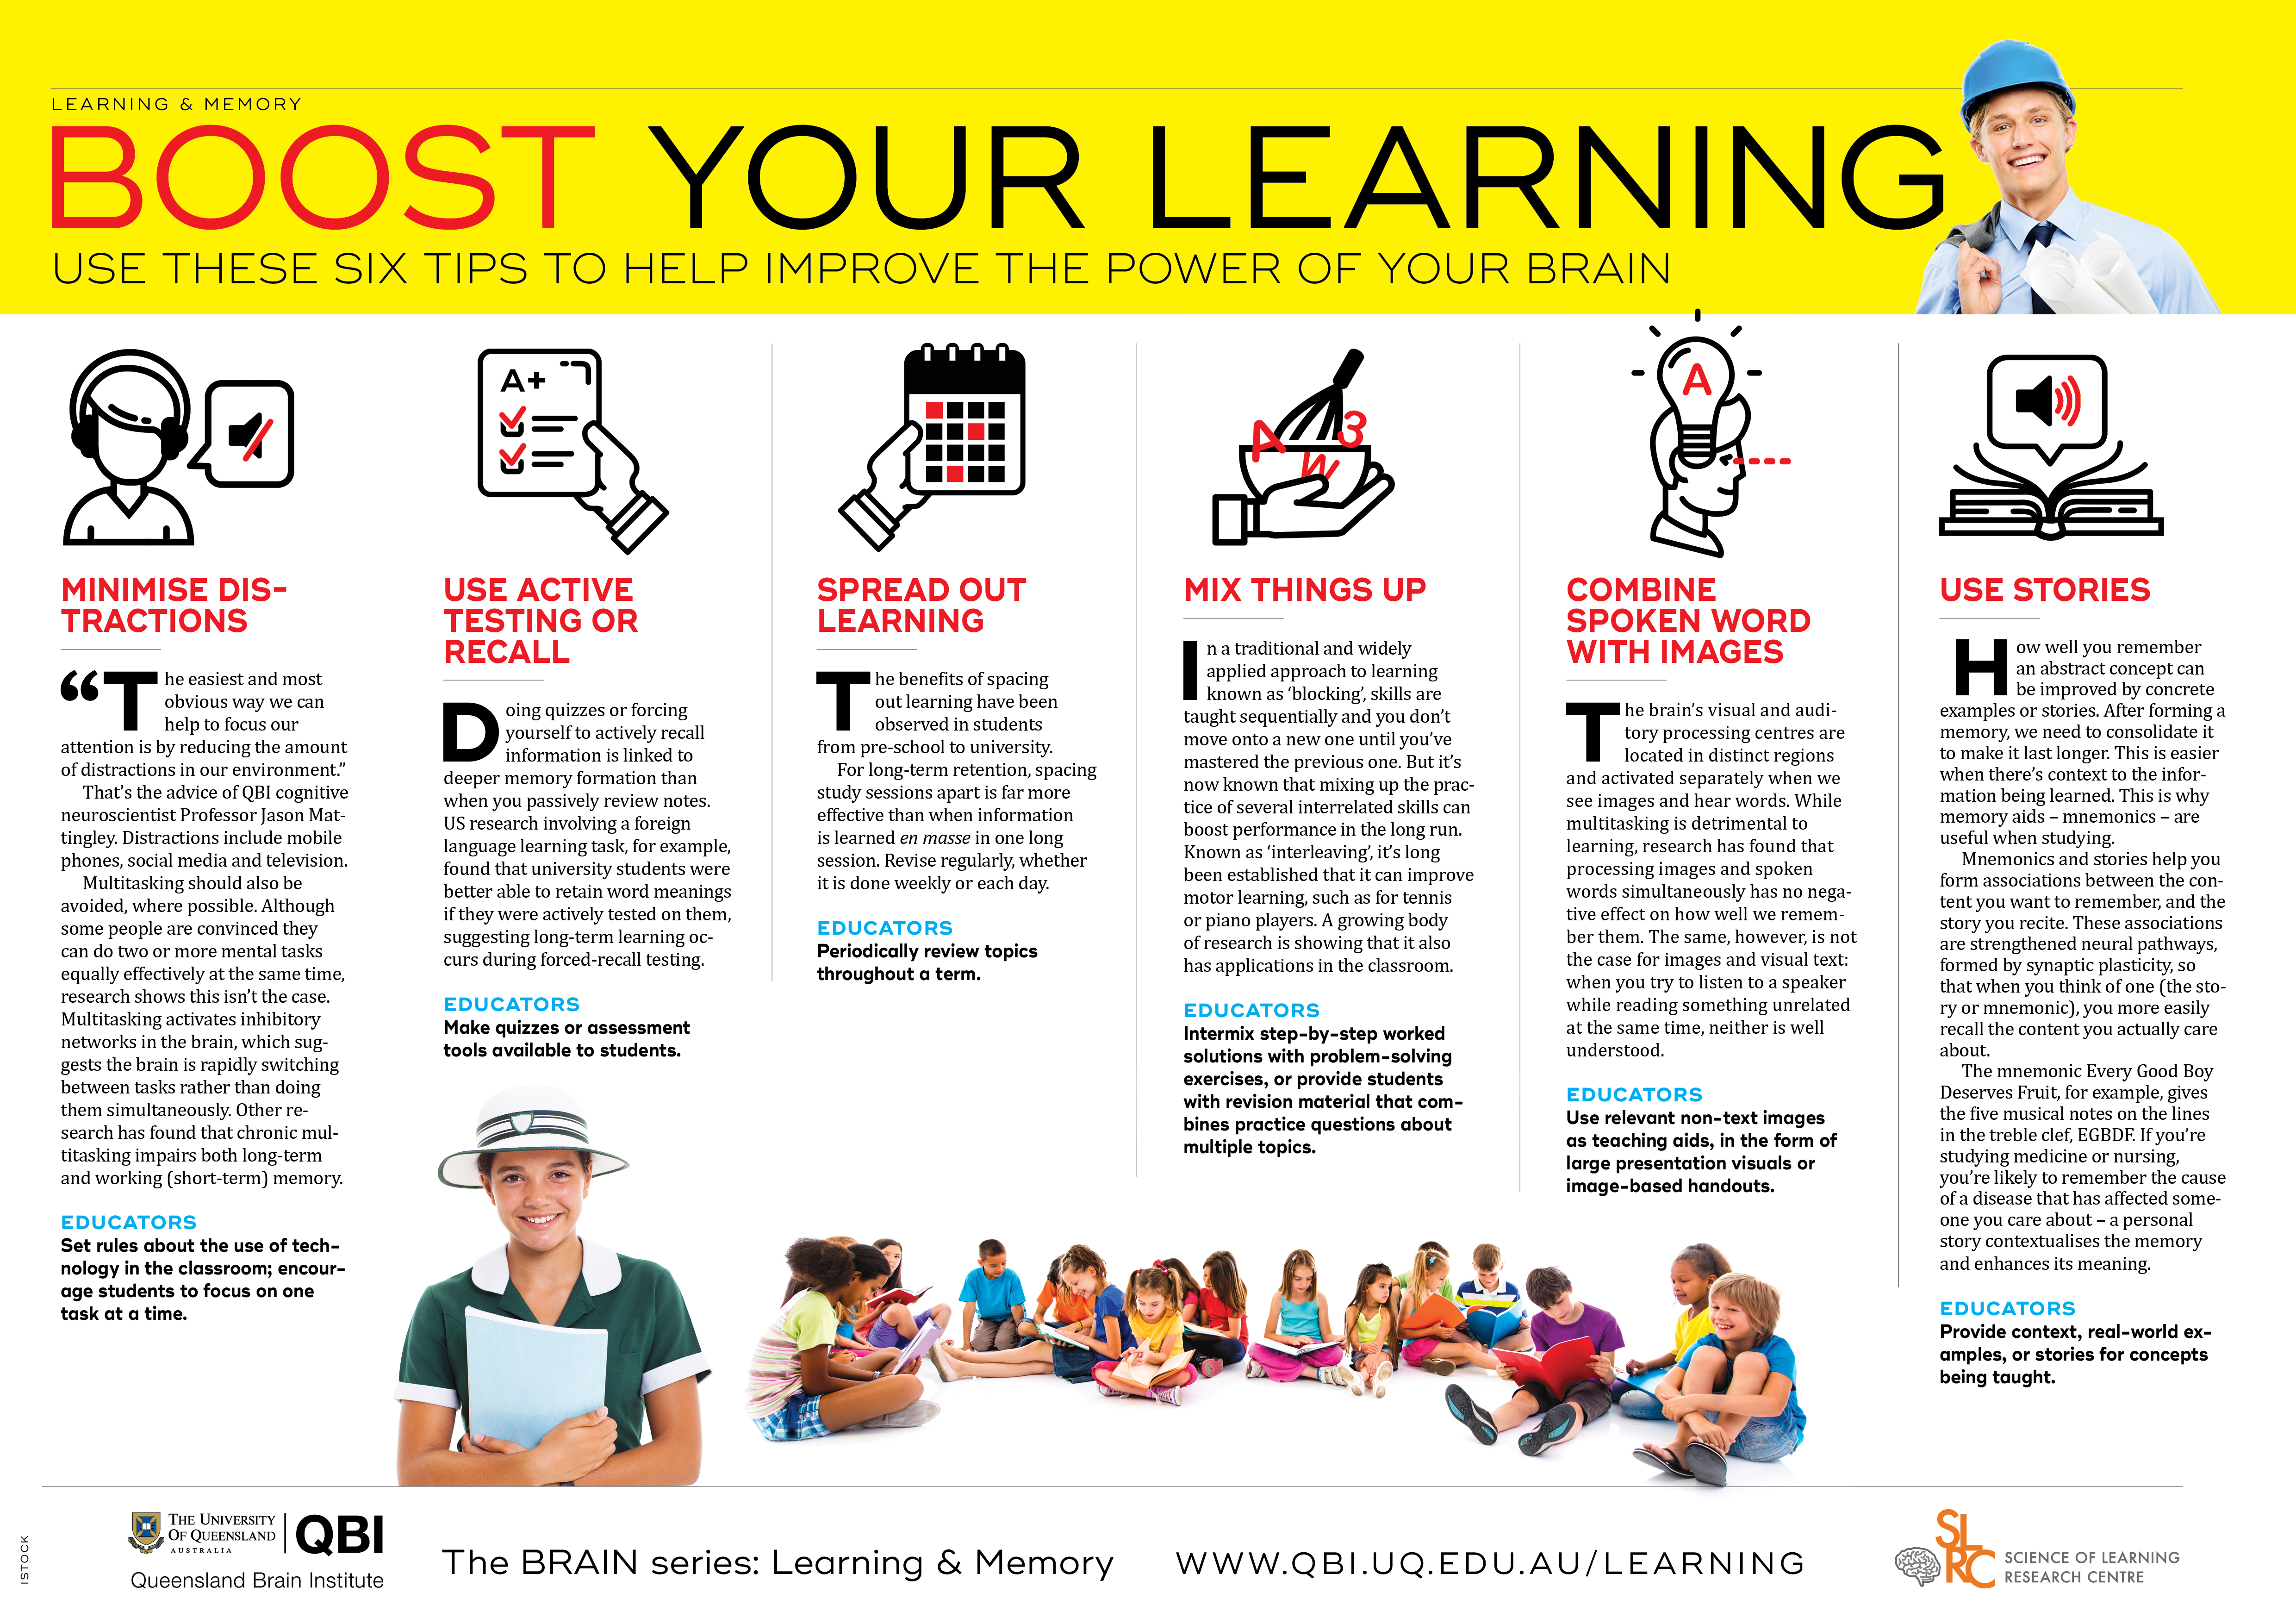
I recommend two websites that do an excellent job at detailing these learning strategies and providing actionable activities for students and educators alike. The Learning Scientists website and podcast is an excellent resource for educators and students to better understand how learning works and find materials and resources to share with your students. This website by the University of Queensland Brain Institute is also one you could share with your students to give them some foundation in the science of memory and learning, or share this quick summary poster with them.
Tips #1-3: Three Steps of Engaging with Content
#1 Preview – Preview the material before lecture (or lab). Lecture (or lab) will make much more sense if you have first previewed what will be discussed!
#2 Read and Look – Read assigned pages before lecture (or lab) and look at the images to be covered in lecture (or lab). A&P is a very visual course.
#3 Review and Practice – Review the prior lecture material by rewriting or retyping your notes and/or making summary tables, flashcards, or flow charts.
These are three activities a student in any science course needs to know about and actively complete before and after lecture/lab. Students often do not know the science behind learning—they are unaware that previewing content can help scaffold information in their brain and will help them to better organize material when they hear it again. Be sure to tell them about how important these three stages are for proper learning (what students typically call “studying”). The Review or Practice component emphasizes the evidence-based concepts of spaced practice and retrieval practice for how a student can move information from short-term to long-term memory. More specific strategies for practice are described below.
SmartBook® by McGraw Hill is a digital product that allows instructors to assign specific topics from within a textbook. Students then alternate between reading and answering questions to complete this formative assignment. The use of this adaptive assessment tool makes students accountable for doing some work before class (both Preview and Read) and allows students to continue quizzing themselves after class (Review and Practice).
Tip #4 – Visuals & Words
Always study your notes while you also have something visual to examine. You need to be able to compare visual images to text. Look at visuals and explain what you see. Draw your own visuals for a topic.
This tip is very important for any A&P course—whether it be a standard anatomy & physiology course, human anatomy, or human physiology course. Students often rely on simply reading and looking over their course notes. Encourage them to combine both reading while also looking at visuals from lecture PowerPoints, or from their textbook. Also explain to students the importance of drawing their own simple schematics. This evidence-based technique for learning is termed dual coding by scientists in field of cognitive psychology.
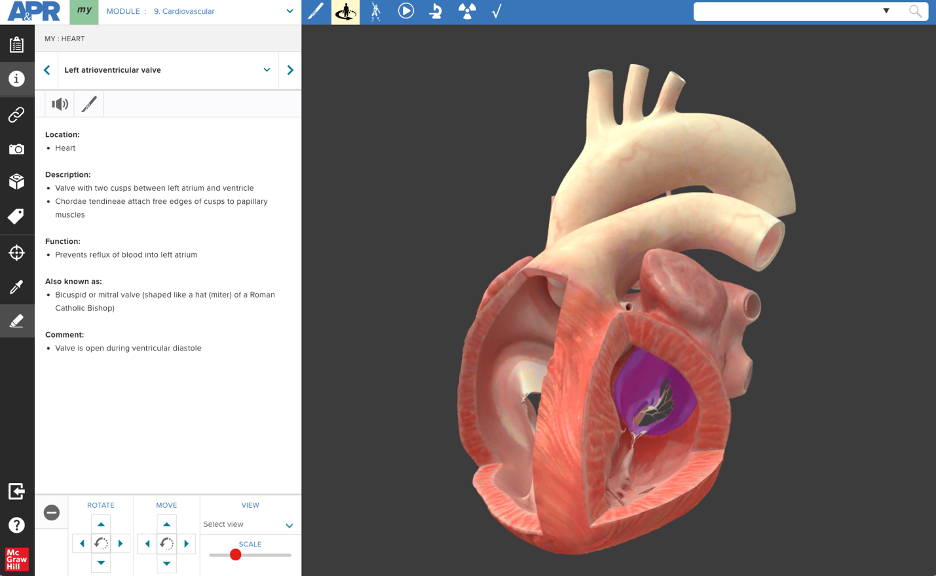
Anatomy and Physiology Revealed 4.0 (APR) is a great tool for visually studying human anatomy & physiology outside of the classroom or lab. APR is a website that allows students to virtually dissect a human cadaver. My students utilized APR in many creative ways, but one of the most common was simply to have APR open on their laptop or tablet device while they were studying their notes. Ask your students how they use the search feature in APR, and you will quickly learn that they find it easy to use—and it sure beats using the index in a textbook or anatomy atlas! My students commented that this feature was essential to their study. Whenever they would sit down to study, they made sure their device was open to APR.
1) Access to the search box is available from anywhere in APR:

2) Type the name of the structure you are looking for into the search box. You will see results for all the applicable content areas in APR such as Dissection, 3D Model, Practice Atlas, Histology, and Imaging.
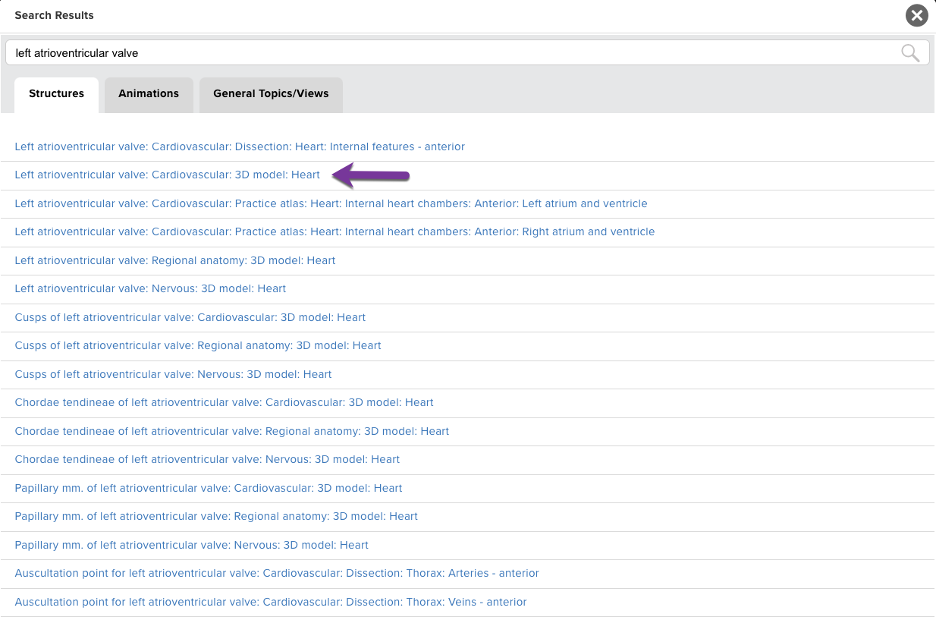
3) Click on any of the links, and you will be taken directly to the module to view this structure and read about its key features
Tip #5 – Avoid Cramming
Study A&P every day or at least every other day! More frequent studying is preferable to two or three days of just studying A&P. Set a schedule where you spend at least some time every day previewing or reviewing A&P information.
Do your students cram? Of course they do, but a question to first ask yourself is whether your course design is making it easier for them to cram? If you have a course with just a few large summative assessments (such as quizzes and exams) throughout the term, it is actually making it easier for students to cram in your course. Consider having multiple formative assessments throughout a given unit, then perhaps one or two quizzes before your unit exams. Having assignments that are due each week can decrease the likelihood of students cramming.
Secondly, be sure to educate your students about the dangers of cramming. Speak to them about how learning is dependent on moving information from short-term to long-term memory. To best facilitate learning, they need daily periods of studying separated with good rest and a healthy lifestyle (known as spaced practice). I encouraged my students to do something every day to study for anatomy, even if it was only 15-20 minutes previewing the next day’s lecture, or 30 minutes reviewing that day’s lecture.
Tip #6 – Organize
Organize the course material in a manner that makes the most sense to you. Perhaps you rewrite or retype your lecture notes, design a flow chart, draw/create simple line diagrams, create mnemonics, or create a table or chart that summarizes information.
Encourage your students to be creative and open to ideas that make the content their own. The possibilities are endless, but anything students can do to take the content out of their notes or textbook and organize it into a different structure will help them learn.
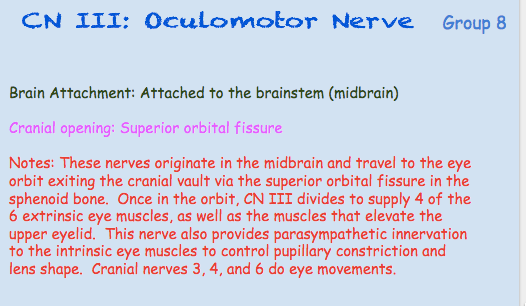
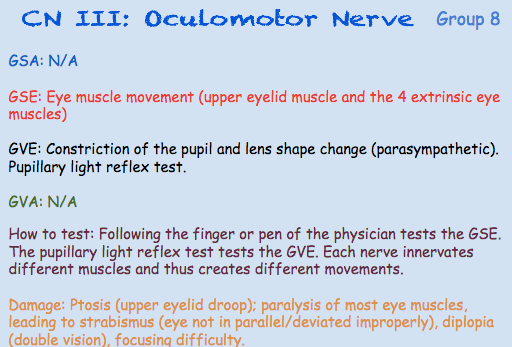
Sometimes it is important for an instructor to proactively model this process. When I first learned gross anatomy, I was told about the idea of making a summary notecard for each of the twelve cranial nerves. This strategy was so successful for me that I encouraged my students to also try it. (However, I told them that a digital slide would work just as well as the paper note card I used many years earlier.) I provided a very clear template for the type of information they should include for each cranial nerve. Below is how one group of students summarized information about the oculomotor cranial nerve.
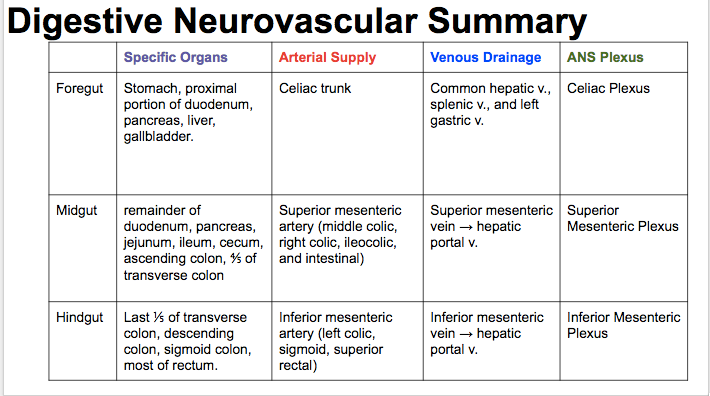
I also encouraged them to make tables or charts to better organize information to compare and contrast different categories. Below is how one group of students summarized the neurovascular supply to the digestive systems.
Finally, as an instructor, don’t be afraid to share with your students how their own peers have organized content. If you come across a student who is successfully creating their own study materials, ask permission to share their creativity with the rest of the class. You may even try having a discussion board in your course learning management system (LMS) dedicated to allowing students to share their study ideas and materials.
Tip #7 – Quiz Yourself
Create your own exam questions. This is a great technique to utilize once you have done a fair amount of studying. Ensure you don’t shy away from quizzing yourself on topics you’re not confident about!
Encourage your students to practice. Tell them to review the content they know and don’t know—and practice retrieving that information. One way students can do this is write their own multiple-choice style questions similar to what they may see on the exam. Students will quickly learn that writing a good multiple-choice question takes quite a bit of content knowledge. You may also consider adding a discussion board to your course LMS where students can share the multiple-choice questions they write with their peers. Another strategy that emphasizes retrieval practice is for students to take out a blank piece of paper and write down everything they know about certain topics without looking at their notes.
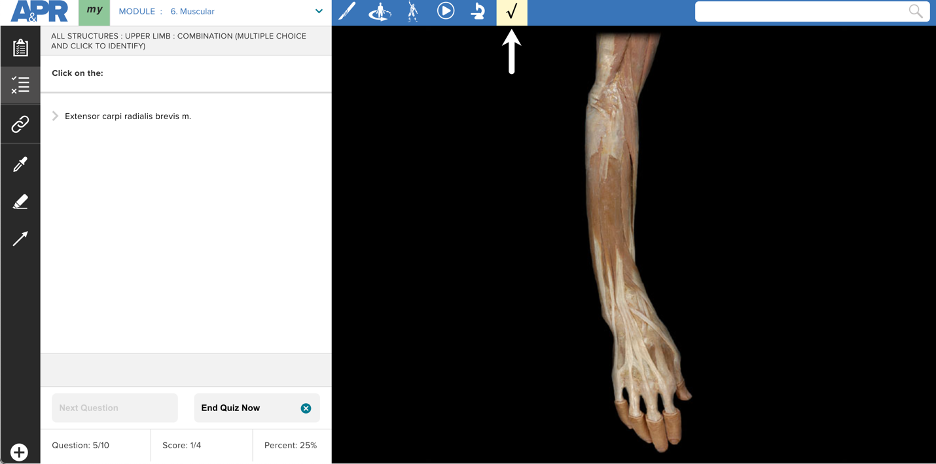
Also encourage your students to leverage the different self-quizzing resources within Connect. Anatomy & Physiology Revealed 4.0 (APR) has a quiz feature that allows students to test their
knowledge and learn from mistakes. When a student answers a question, they receive immediate feedback on whether their answer is correct or incorrect. After completing their quiz in APR, students can quickly click on a hyperlink that will take them directly to a module within APR where they can review the structure they missed on the quiz. You can learn more about the quiz feature in APR by watching this video.
Another resource available to your students in Connect for quizzing themselves is SmartBook, but you the instructor must first create assignments for them. Students can utilize SmartBook to practice quizzing themselves on questions related to the specific chapter in a textbook. Students must first select their level of metacognition before selecting an answer to the question. This helps students to identify what topics they are aware they know, and perhaps most importantly the topics they are unaware they don’t know. After selecting an answer, students receive immediate feedback on whether they had the correct answer. Once the assignment is completed, students are prompted to go back and practice questions related to the topics with which they struggled.
Tip #8 – Explain
You master a concept best when you can explain it. Practice explaining what you’ve learned—a process or a concept—to someone else. This may be someone who knows nothing about A&P or could be a member of your study group.
The learning strategies this emphasizes are elaboration and retrieval practice. Elaboration requires students to answer ‘how’ and ‘why’ questions related to a given A&P topic. In the process of explaining the topic to another novice learner, the student will inherently address the how and why of the specific topic. Students can also use elaboration while studying on their own with flashcards. The key is to also create some action verb flashcards, such as compare and contrast, describe, or explain. For example, a student could turn over the cards for osmosis and diffusion, and then flip over an action verb card that might read compare and contrast. The student’s task is to then verbally compare and contrast the processes of osmosis and diffusion.
Tip #9 – Study Group
Meet weekly or before every exam with several other students to learn the material. Assign each member different challenging topics and have that person teach it to the others in the group. You could also create a few questions on certain topics and share them with your group. Through the process of creating the questions, you will become an “expert” in those topics and can better explain and clarify the information to each other.
Study groups are an effective way for students to stay informed of the content—and it helps them avoid cramming. An effective study group can utilize all the other learning strategies in this list.
Tip #10 – Office Hours
Make appointments to meet with your instructor and clarify information.
As an instructor, you know the first step for a student to receive help is to attend your office hours. Once the student is in your office, you can share this list of study tips and ask which of these strategies they are currently implementing while studying for your course.
What else can you do to help your students? Employ assignments in your course that provide the opportunity for students to receive feedback and opportunities for remediation. All the digital products in Connect offer both feedback and remediation.
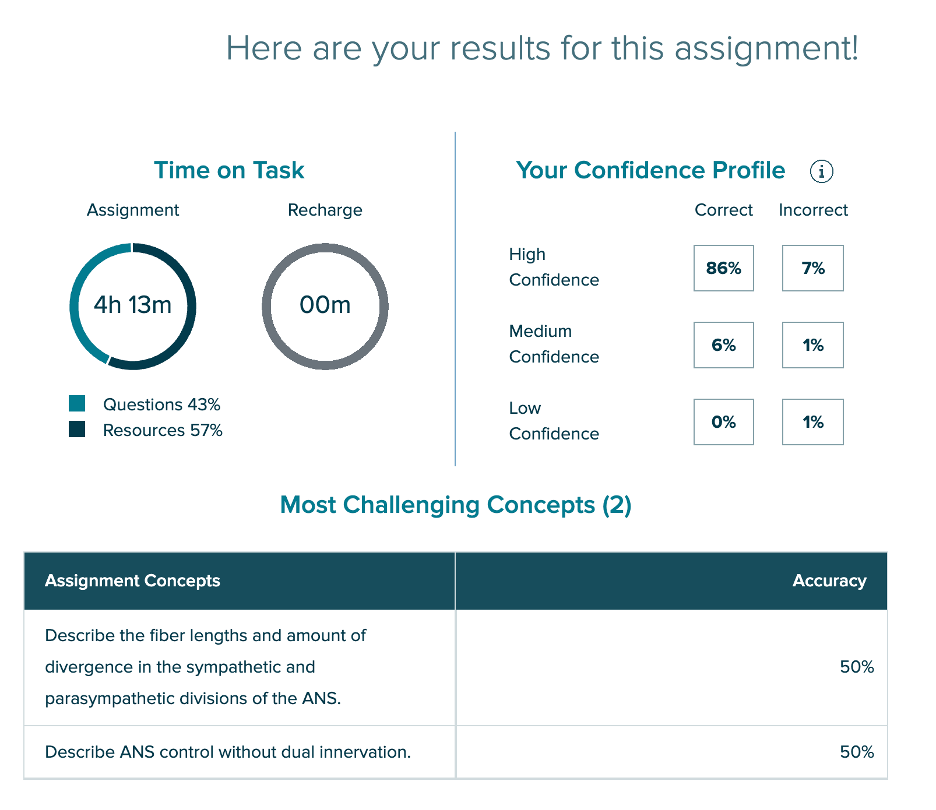
One effective implementation of SmartBook is for a student to share their reports for SmartBook assignments with you during office hours. Instead of a student coming into your office hour and saying, “I just don’t understand anything about the autonomic nervous system,” a student can share their SmartBook report that shows their Most Challenging Concepts with you for this chapter. This provides you, the instructor, a quick and easy way to identify specific topics to help the student remediate. Below is an example of how you could proactively use this report to start helping a student with these topics in the autonomic nervous system.
I hope you found this list of study tips useful and look forward to hearing which ones resonated the most with your students.
Hear directly from Dr. Michael Koot about his best study advice on the Succeed in A&P Podcast: Top 10 Tips to Thrive in A&P

Dr. Michael Koot is a Senior Director of Digital Content and Pedagogy for McGraw Hill. Before joining McGraw Hill, Michael taught human anatomy at Michigan State University where he won a campus-wide teaching with technology award. At McGraw Hill, he works at the intersection of content, pedagogy, accessibility, and technology with both internal and external stakeholders to develop effective teaching and learning tools.

