Assign McGraw Hill Assessments
Learn how to assign McGraw Hill online assessments for students to complete.
- McGraw Hill Social Studies
- Asi se Dice 2024
- Arrive Math
- Customer Support
- Online Assessments
- Inspire Science 2020
- Middle School
- High School
- Open Court Reading
- Glencoe Health 2022
- CA Impact 2019
- Wonders 2023 2020 2017
- Networks 2018
- CA Inspire Science 2020
- SSO & Auto-Rostering
- PreK-12
- Everyday Mathematics 4 (K-6)
- All Sorts 2026 (K-5)
- Supplemental
- Visual & Performing Arts
- Health
- Literacy
- Social Studies
- Core
- AP, Honors & Electives
- CA Reveal Math (K-12)
- Teen Health 2021
- FL Social Studies 2024 (K-12)
- Building Blocks PreK 2025
- McGraw Hill Literacy
- OCR Foundational Skills Kit
- TX Science 2025 (K-12)
- SSO & Manual-Rostering
- Number Worlds 2024
- Maravillas 2020 & 2017
- Direct Login & Manual-Rostering
- Classroom Teacher
- Elementary School
- FL Science 2025 (K-12)
- World Languages
- Math
- Direct Instruction
- Intervention
- OCR Word Analysis Kit
- Direct Login & Auto-Rostering
- Building Blocks 2024
- McGraw Hill My Math 2018
- Science
- Preschool
- Grades & Assignments
- AP Biology
- AP Chemistry
- AP History & Geography
- AP Psychology
- AP Economics
- AP African American Studies
- AP Precalculus
- AP Statistics
- AP Computer Science
- AP Language and Composition
- AP Public Speaking
- AP Music Theory
- 5 Steps to a 5 - AP Test Prep
- SRA Reading Laboratory 2025
- SRA Reading Mastery Transformations
- Achieve3000 Literacy
- Actively Learn
- McGraw Hill Literacy Emerge!
- McGraw Hill Literacy Summit!
- McGraw Hill Literacy Soar!
- Redbird
- StudySync 2021
- ALEKS
- ALEKS Adventure
- Illustrative Math
- Redbird Math
- Reveal Math (K-12)
- TN Science (K-12)
- Impact Social Studies


This article walks teachers through assigning assessments.
For a full page view of the demo, click here.
For a Spanish version of the demo, click here.
Article Contents
From Assessments Page (ConnectED and Open Learning Courses)
From Assignments Page (Open Learning Courses Only)
From Course Page (Open Learning Courses Only)
From Course Resources Page (Open Learning Courses Only)
From Assessments Page
This section refers to both ConnectED and Open Learning courses.
1. Launch your course.
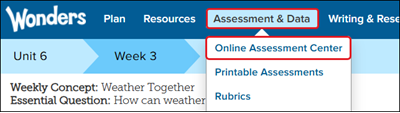
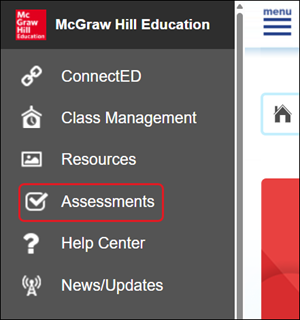
2. Click on Assessments from the navigation menu.
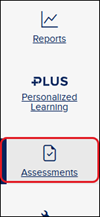
For certain programs, you will need to click on Assess, Assessment, or Online Assessment Center.

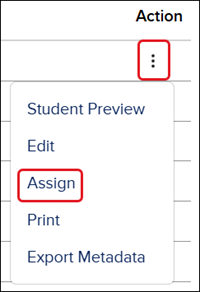
3. Click on the assessment folder where the assessment is housed.

4. Click the Options menu icon in the Actions column and click Assign from the menu.
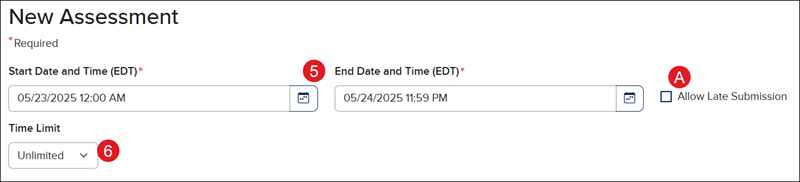
5. Select the Start and End Date and Time.
A. If you would like students to be able to submit the assessment after the selected End Date and Time, check the Allow Late Submission box.
6. Select a Time Limit from the drop-down. The default is set to Unlimited.
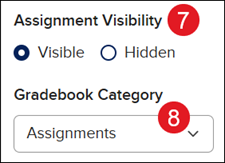
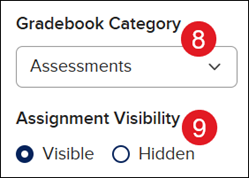
7. Select the radio button next to the preferred Assignment Visibility.
If Hidden is selected, students will not be able to see the assessment in the assessment list to complete. You will need to change the visibility to Visible when you are ready for them to see the assessment.
8. Select the preferred Gradebook Category. The system default is set to Assignments.
For more information on adding additional categories, refer to the Open Learning Platform - Gradebook article. Currently adding additional categories to the gradebook is only an option for Open Learning courses.
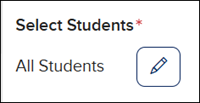
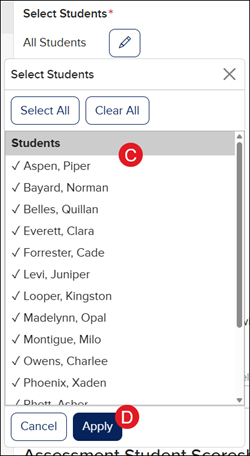
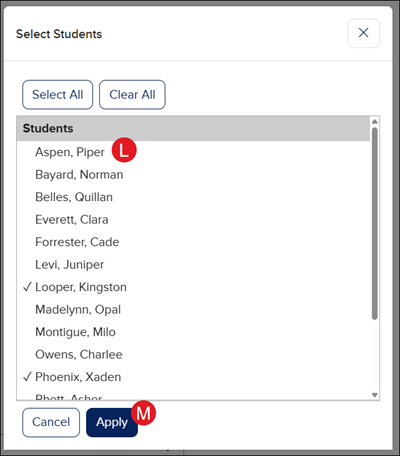
9. Select Students is set by default to assign the assessment to All Students rostered to the class. Click the Edit (pencil icon) to select certain students to assign the assessment to.
B. Select the students you want assigned to the assessment. Those assigned to the assessment will have a checkmark next to their name.
C. Click the Apply button.

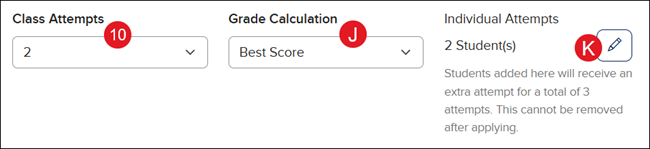
10. Select the preferred number of Class Attempts from the drop-down. They can have up to three attempts to complete the assessment.
D. If 2 or 3 attempts is selected, select the preferred Grade Calculation from the drop-down.
E. If you would like specific students to have more than one attempt, click the Edit (pencil icon) button under Individual Attempts.
Each student selected for an Individual Attempt will receive one extra attempt at the assessment.

F. On the Select Students pop-up, click on the students you want to provide an individual attempt to.
G. Click the Apply button.

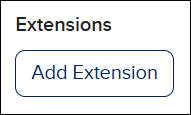
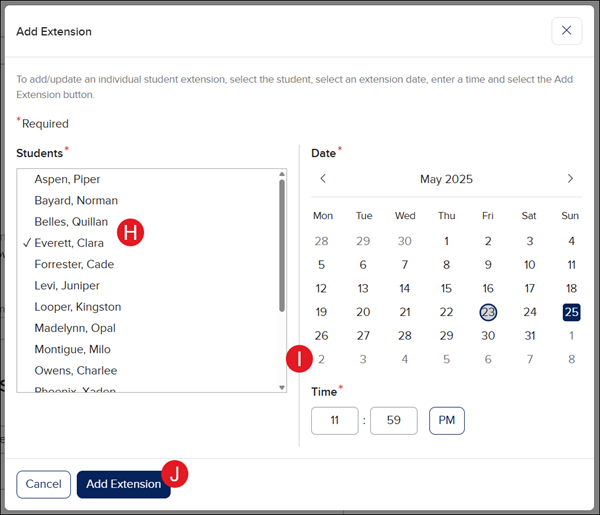
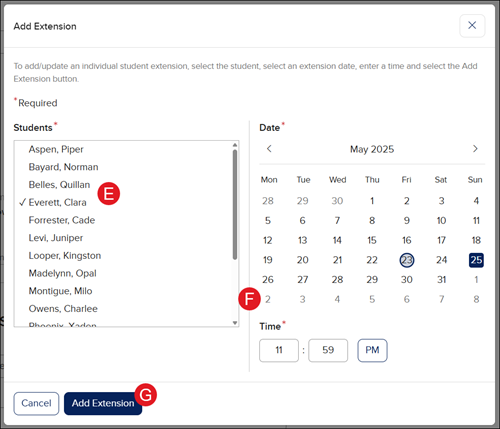
11. Click the Add Extension button to select specific students for an extended End Date and Time for the assessment.
H. On the Add Extension pop-up, click on the Students you want to provide with an extension.
I. Select the Date and Time for the extension.
J. Click the Add Extension button.
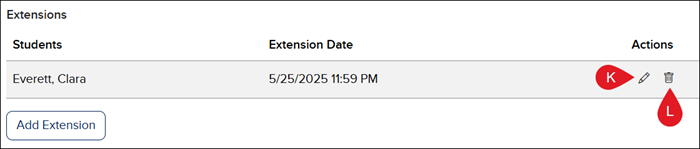
K. Click the pencil icon to the right of the student to edit the Date and Time for their extension.
L. Click the trash can icon to delete the extension.
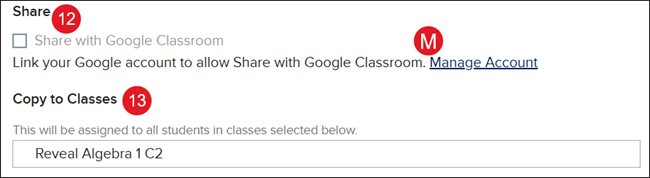
12. Check the box next to Share with Google Classroom for students to be able access the assessment through their Google Classroom account.
M. If you have not linked your account to Google Classroom and would like to, click the Manage Account link. Follow the steps on the Pair/Unpair Your McGraw Hill Account with Your Google Account article.
Students would need to follow the Pair/Unpair Your McGraw Hill Account with Your Google Account - Students steps.
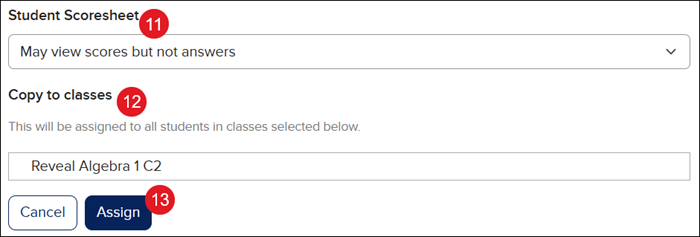
13. If you have more than one class created and using the same course program, to copy the assessment assignment to another class, select it from the drop-down list under Copy to Classes.
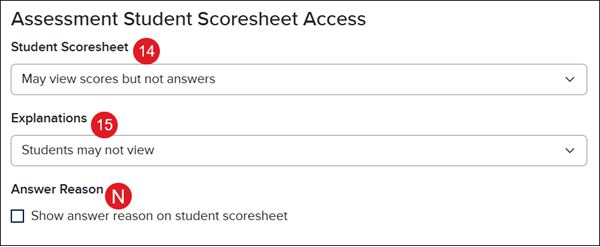
14. Select the preferred option for the Student Scoresheet.
15. Select the preferred option for Explanations.
For a description of each option for Student Scoresheet and Explanations, refer to the MH Assess - Student Scoresheet Access article.
N. Check the box for Answer Reason if you want students to be able to view the reasoning for the answer choice.
For more information on creating Answer Reasons, refer to the MH Assess - Create a New Assessment, MH Assess - Edit an Assessment, or MH Assess - Create and Edit Questions articles.
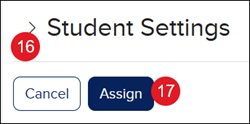
16. Click the arrow to expand the Student Settings.
Keep in mind, when selecting different Student Settings than what is default, this creates a custom assessment. This can result in the assessment results not flowing into the Administrator Reports.
For in-depth details for each of the available Student Settings, refer to the MH Assess - Student Settings article.
17. Click the Assign button once all fields are completed.
From Assignments Page
This section refers to only Open Learning courses.
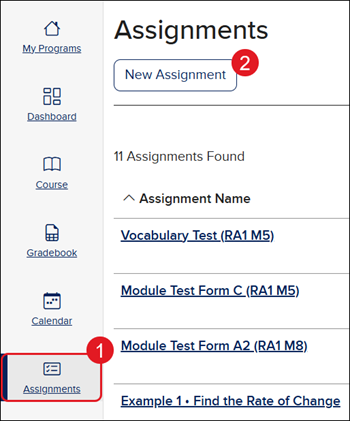
1. Click on Assignments from the navigation menu.
2. Click on the New Assignment button.
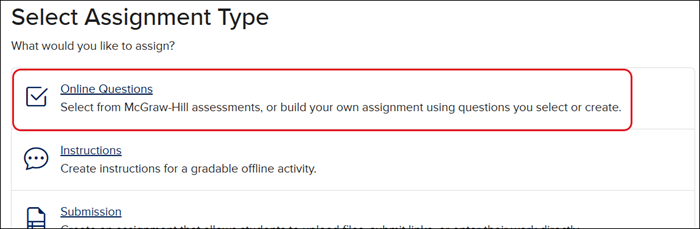
3. On the Select Assignment Type page, click on the Online Questions link.
4. Follow the assessment details steps.
From Course Page
This section refers to only Open Learning courses.
If you would like to have the extra assignment detail options than what is provided when assigning through the Course page, we recommend assigning the assessment through the Assessments or Assignments pages.
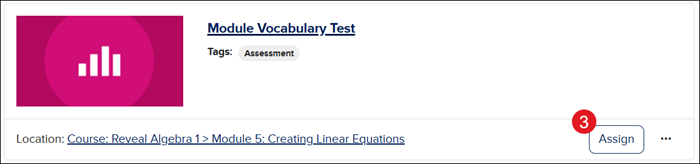
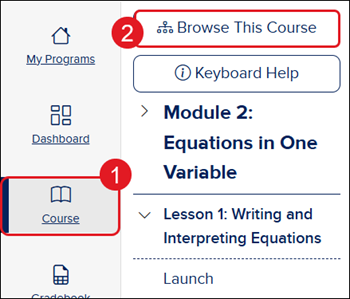
1. Click on Course from the navigation menu.
2. Click Browse This Course and select where the assessment is located.
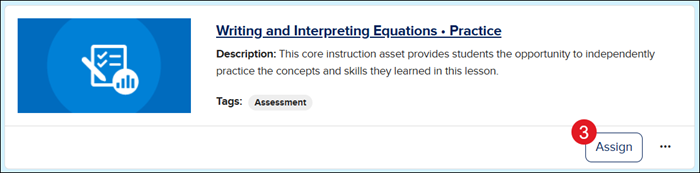
3. Click the Assign button on the resource tile.
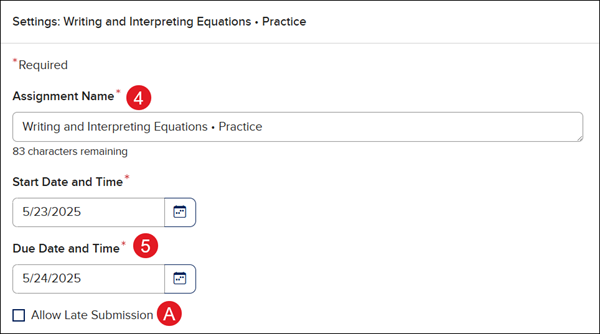
4. On the Settings panel, enter an Assignment Name if you want it to show differently than the default.
5. Select a Start and End Date and Time.
A. If you would like students to be able to submit the assessment after the selected End Date and Time, check the Allow Late Submission box.
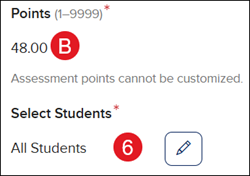
B. The Points are automatically set for the assessment. These cannot be adjusted.
6. Select Students is set by default to assign the assessment to All Students rostered to the class. Click the Edit (pencil icon) to select certain students to assign the assessment to.
C. Select the students you want assigned to the assessment. Those assigned to the assessment will have a checkmark next to their name.
D. Click the Apply button.
7. Click the Add Extension button to select specific students for an extended End Date and Time for the assessment.

E. On the Add Extension pop-up, click on the Students you want to provide with an extension.
F. Select the Date and Time for the extension.
G. Click the Add Extension button.
H. Click the pencil icon to the right of the student to edit the Date and Time for their extension.
I. Click the trash can icon to delete the extension.

8. Select the preferred Gradebook Category. The system default is set to Assignments.
For more information on adding additional categories, refer to the Open Learning Platform - Gradebook article.
9. Select the radio button next to the preferred Assignment Visibility.
If Hidden is selected, students will not be able to see the assessment in the assessment list to complete. You will need to change the visibility to Visible when you are ready for them to see the assessment.
10. Select the preferred number of Class Attempts from the drop-down. They can have up to three attempts to complete the assessment.
J. If 2 or 3 attempts is selected, select the preferred Grade Calculation from the drop-down.
K. If you would like specific students to have more than one attempt, click the Edit (pencil icon) button under Individual Attempts.
Each student selected for an Individual Attempt will receive one extra attempt at the assessment.
L. On the Select Students pop-up, click on the students you want to provide an individual attempt to.
M. Click the Apply button.
11. Select the preferred Student Scoresheet option from the drop-down.
For a description of each option for Student Scoresheet, refer to the MH Assess - Student Scoresheet Access article.
12. If you have more than one class created and using the same course program, to copy the assessment assignment to another class, select it from the drop-down list under Copy to Classes.
13. Click the Assign button.
From Course Resources Page
This section refers to only Open Learning courses.
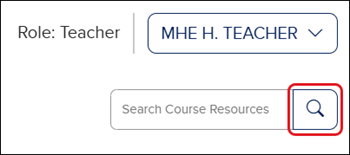
1. From the Dashboard or Course page, click on the Search (magnifying glass) button.
2. Use the Search by Resource field or the Filters to locate the assessment you want to assign.

3. Click the Assign button on the resource tile.