
Add and Remove Students from an Open Learning Class Roster
Manage class rosters by adding, removing, or updating students.
- Customer Support
- PreK-12
- Classroom Teacher
- Preschool
- Elementary School
- Middle School
- High School
- Direct Login & Auto-Rostering
- Direct Login & Manual-Rostering
- SSO & Auto-Rostering
- SSO & Manual-Rostering
- Core
- Intervention
- Supplemental
- AP, Honors & Electives
- Career & Technical Education
- Literacy
- Math
- Science
- Social Studies
- Health
- Visual & Performing Arts
- World Languages
- AP Biology
- AP Chemistry
- AP History & Geography
- AP Psychology
- AP Economics
- AP African American Studies
- AP Precalculus
- AP Statistics
- AP Computer Science
- AP Language and Composition
- AP Public Speaking
- AP Music Theory
- 5 Steps to a 5 - AP Test Prep
- Glencoe Health 2022
- Teen Health 2021
- Arrive Math
- Building Blocks 2024
- Building Blocks PreK 2025
- Number Worlds 2024
- SRA Reading Laboratory 2025
- SRA Reading Mastery Transformations
- Achieve3000 Literacy
- Actively Learn
- McGraw Hill Literacy Emerge!
- McGraw Hill Literacy Summit!
- McGraw Hill Literacy Soar!
- Open Court Reading 2025
- Redbird
- StudySync 2021
- ALEKS
- ALEKS Adventure
- CA Reveal Math (K-12)
- Illustrative Math
- Redbird Math
- Reveal Math (K-12)
- Texas Math
- CA Inspire Science 2020
- FL Science 2025 (K-12)
- Inspire Science 2020
- TN Science (K-12)
- TX Science 2025 (K-12)
- CA Impact 2019
- FL Social Studies 2024 (K-12)
- Impact Social Studies
- McGraw Hill Social Studies
- All Sorts 2026 (K-5)
- Asi se Dice 2024
- CTE - Business, Marketing, and Finance
- CTE - Health Science
- CTE - Computing and Technology
- CTE - Agriculture
- CTE - Culinary Arts
- CTE - Early Childhood Education
- CTE - Criminal Justice
- Level Up K–5
- Level Up 6–8
- Level Up 9–12
- Class Management
- Back-to-School Setup
- Getting Started & Orientation


View the demo in a separate tab.
View the Spanish version of the demo.
Note: If you are associated with a managed account and you need students added or removed from classes created for you by the district, you will need to reach out to your Organization Administrator. You will only be able to add and remove students from classes you have manually created.
Article Contents
Add Students to Roster
For district-created classes, to have a student added to the class, you will need to reach out to your Organization Administrator.
- SSO or sign in at my.mheducation.com.
- Create a class.
- Click on Classroom Actions.
- Click on Manage Class Roster from the menu.
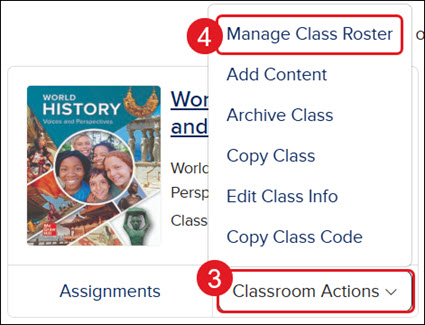
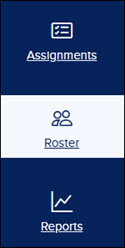
You can also click on the class and then click on Roster from the navigation menu.
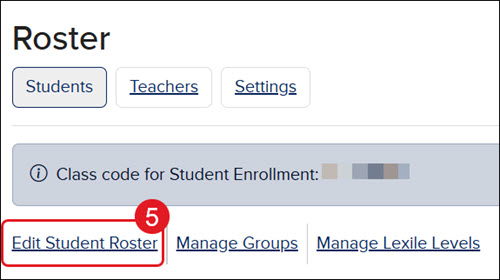
- Click the Edit Student Roster link.
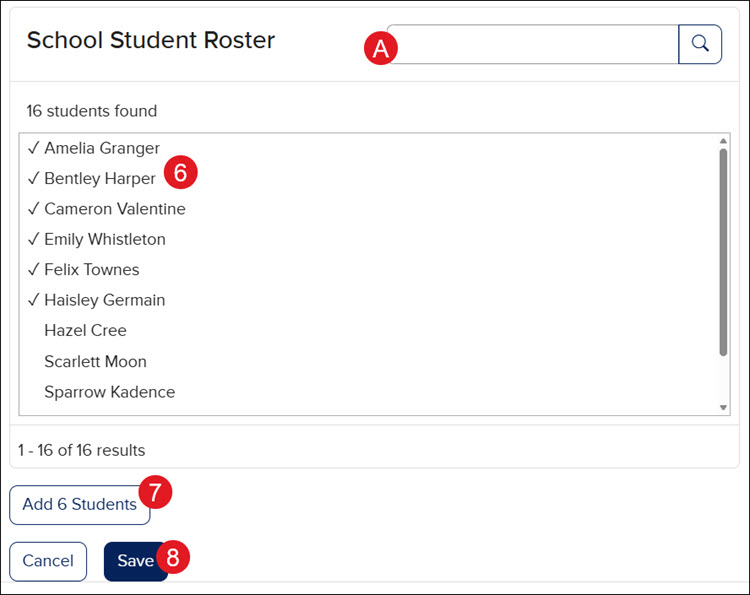
- In the School Student Roster section, select the student(s) you want to add to the class.
A. Use the search field to locate a specific student.
- Click the Add Student button.
- Click the Save button.
Create a New Student
Manual Roster teachers also have the option to use the Students/Rosters import process to create new student accounts. Teachers who have their classes created for them will not have access to this feature.
- SSO or sign in at my.mheducation.com.
- Create a class.
- Click on Classroom Actions.
- Click on Manage Class Roster from the menu.
You can also click on the class and then click on Roster from the navigation menu.
- Click the Edit Student Roster link.
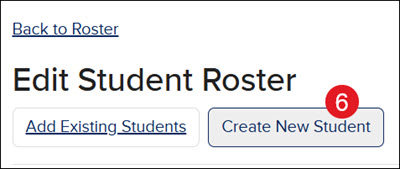
- Click the Create New Student button.
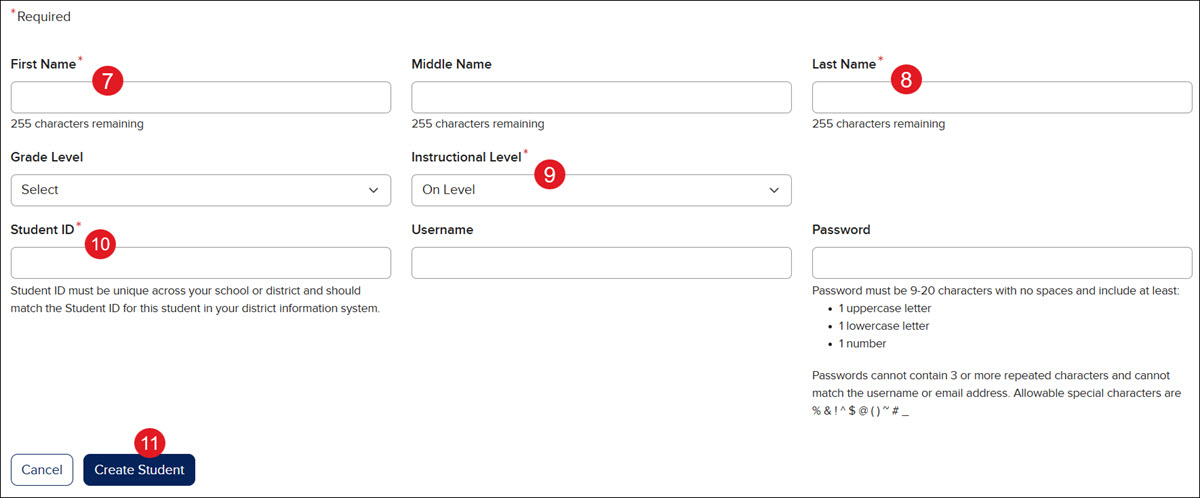
- Enter a First Name.
- Enter a Last Name.
- Select an Instructional Level from the drop menu.
- Enter a Student ID. This must be unique across your school or district and should match the Student ID for this student in your district information system.
The Middle Name, Grade Level, Username, and Password are optional fields.
If you are wanting the student to have a specific Username and Password, you will want to fill in these fields, or the system will generate one for them.
- Click the Create Student button.
The student is then added automatically to the class roster.
Edit Student Profile
For students that are created and rostered by the district, teachers will only be able to edit certain options within the student profile.
- SSO or sign in at my.mheducation.com.
- Click on Classroom Actions.
- Click on Manage Class Roster from the menu.
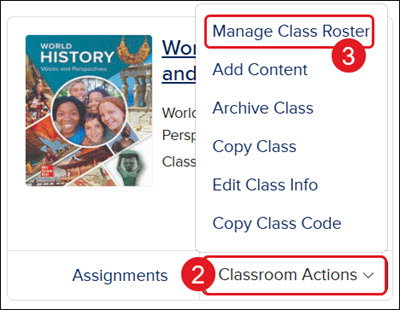
You can also click on the class and then click on Roster from the navigation menu.
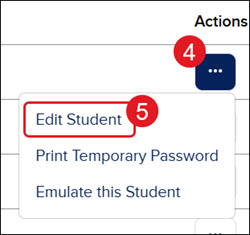
- Click the Options button in the Actions column for the student.
- Click Edit Student from the menu.
- Make preferred changes.
Note: Making changes to the Name, Grade Level, Student ID, Username, and Password fields changes them in the entire system for that student, no matter their assigned class or teacher.
For more information about the IEP Settings section, refer to the Set Student IEP Settings for an Open Learning Class article.
- Click the Update button at the bottom.
Remove Students from Roster
Note: Removing a student from the roster will also remove all of their data. Adding the student back to the roster will also add the data back to the class reports.
For classes managed by the district, if the student is assigned to a class the district created, you will need to reach out to the Organization Administrator to have the student removed.
- SSO or sign in at my.mheducation.com.
- Click on Classroom Actions.
- Click on Manage Class Roster from the menu.
You can also click on the class and then click on Roster from the navigation menu.
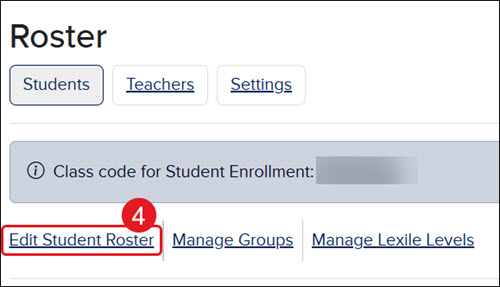
- Click the Edit Student Roster link.
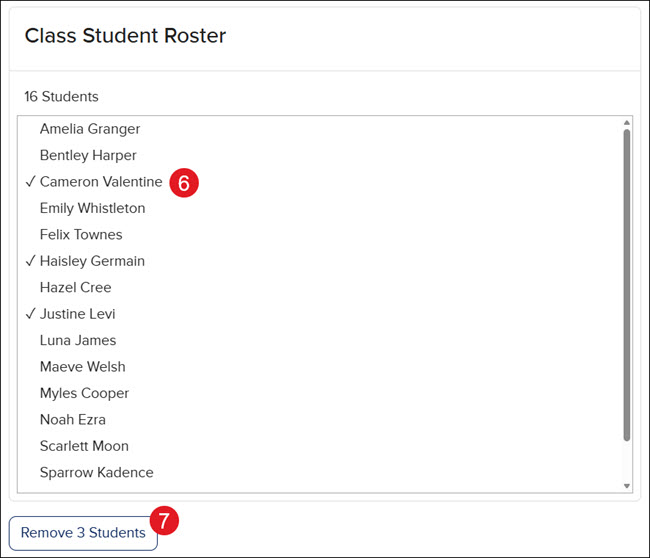
- In the Class Student Roster section, select the student(s) you want to remove.
- Click the Remove Students button.
- Click the Save button.
