When students access ALEKS Adventure for the first time, the Start button takes them immediately into the Onboarding Narrative where students create a custom character that they use to navigate the ALEKS Adventure experience and interact with their classmates. They can also change the look of the character from the ALEKS Adventure as part of a Topic Reward while in between topics. They can use the Coins they collect by completing Progress Knowledge Checks to unlock further customization options.
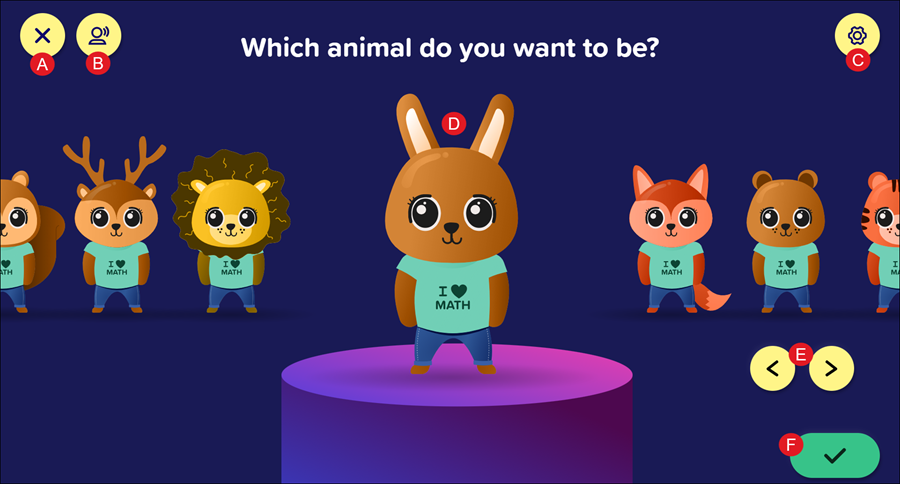
Character Selection
Students create a custom character in the character creation process by choosing the animal they want to be from the character selection screen. Once they create their character, they use it to interact with the ALEKS Adventure world and with their classmates.
A. Home Button: Returns students to the ALEKS Adventure Homepage. If they haven’t completed the onboarding narrative, this button is replaced with an X button that returns them to the ALEKS Adventure Start Page.
B. Respeak Button: Resets the student’s selection and replays the spoken audio on the page.
C. Settings Button: Opens the Settings panel where students can toggle buttons on and off to change their environment in ALEKS Adventure. The Settings button is available in the top-right corner of every page in ALEKS Adventure.
D. Current Selection: The animal character currently selected appears on the pedestal in the center of the screen.
E. Scroll Buttons: These buttons are used to scroll left and right through the animal character options. The different options are visible in a line across the center of the screen and move onto the pedestal when selected.
F. Accept Button: When selected, confirms the currently selected animal as the one a student wants to use for their character. Students then move on to the Character Color Selection screen.
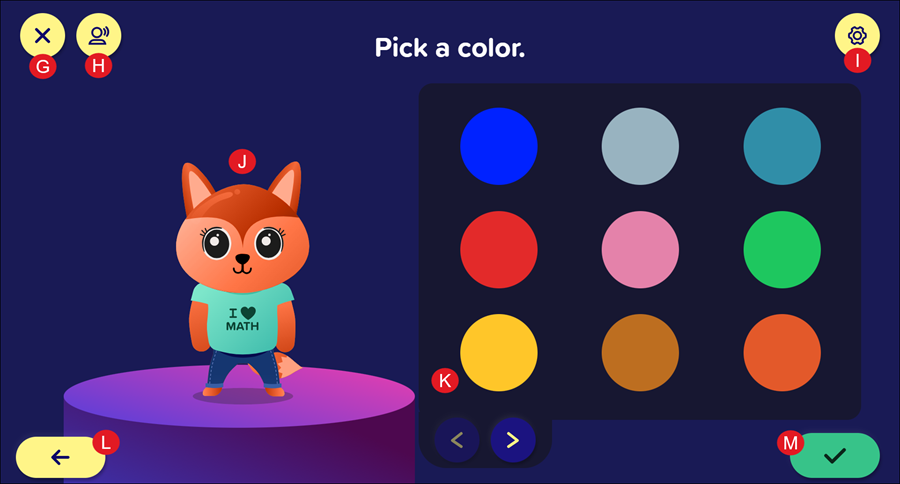
Character Customization
There are multiple screens to navigate through when customizing your character including selecting their eyes, mouth, and clothing.
G. Home Button: Returns students to the ALEKS Adventure Homepage. If the onboarding narrative is not complete, this button is replaced with an X button that returns students to the ALEKS Adventure Start Page.
H. Respeak Button: Resets the student’s selection and replays the spoken audio on the page.
I. Settings Button: Opens the Settings panel where students can toggle buttons on and off to change their environment in ALEKS Adventure. The Settings button is available in the top-right corner of every page in ALEKS Adventure.
J. Current Appearance: For customization of the character’s color, eyes, and mouth, the character is shown with the currently selected option on the pedestal.
K. Selection Panel: Displays the customization options for the character. Selecting an option from the panel causes the character’s appearance to change to that selection. The currently selected item is outlined.
If the panel has more than one page, navigation arrows appear at the bottom of the panel that allow students to navigate left and right through the panel’s pages.
L. Back Button: When selected, returns students to the previous panel. When students are on the color panel, the button instead returns them to the Character Selection screen.
M. Accept Button: When selected, confirms the currently selected option as the one the student wants to use for their character and sends them to the next panel.
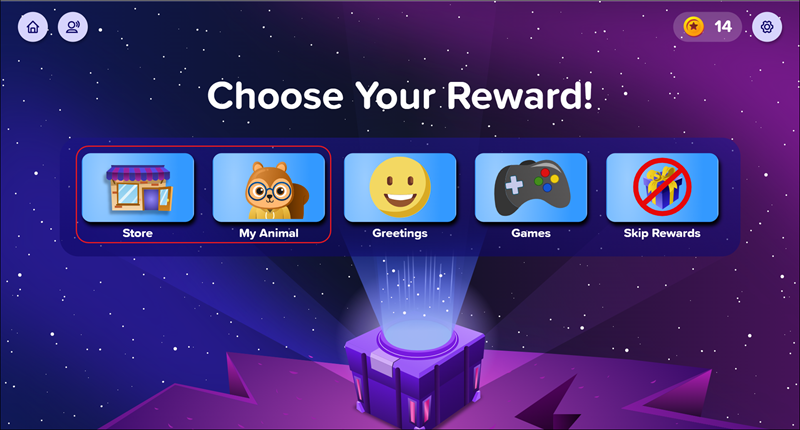
Character Customization After Onboarding
After the student has completed their Onboarding of the program, if they would like to make changes to their character, students can do so by selecting the Store or My Animal option on their Topic Rewards page. They will then be able to navigate through choosing an animal, eyes, and mouth.
Purchasing clothing options is only available for selection after the Onboarding process by accessing the Store.
aleks-adventure
student
school-parent
prek-12
Supplemental, ALEKS Adventure, Math, Getting Started & Orientation, Dashboard & Navigation Overview, SSO & Manual-Rostering, Customer Support, Direct Login & Auto-Rostering, School Student, Direct Login & Manual-Rostering, School Parent, SSO & Auto-Rostering, PreK-12, Elementary School
dts
2026-03-24T18:57:25.840-03:00
For a full page view of the demo, click here. For a Spanish version of the demo, click here. Article Contents Character Selection Character Customization Character Customization After Onboarding When students access ALEKS Adventure for the first time, the Start button takes them immediately into the Onboarding Narrative where students create a custom character that they use to navigate the ALEKS Adventure experience and interact with their classmates. They can also change the look of the character from the ALEKS Adventure as part of a Topic Reward while in between topics. They can use the Coins they collect by completing Progress Knowledge Checks to unlock further customization options. Character Selection Students create a custom character in the character creation process by choosing the animal they want to be from the character selection screen. Once they create their character, they use it to interact with the ALEKS Adventure world and with their classmates. A. Home Button: Returns students to the ALEKS Adventure Homepage. If they haven’t completed the onboarding narrative, this button is replaced with an X button that returns them to the ALEKS Adventure Start Page. B. Respeak Button: Resets the student’s selection and replays the spoken audio on the page. C. Settings Button: Opens the Settings panel where students can toggle buttons on and off to change their environment in ALEKS Adventure. The Settings button is available in the top-right corner of every page in ALEKS Adventure. D. Current Selection: The animal character currently selected appears on the pedestal in the center of the screen. E. Scroll Buttons: These buttons are used to scroll left and right through the animal character options. The different options are visible in a line across the center of the screen and move onto the pedestal when selected. F. Accept Button: When selected, confirms the currently selected animal as the one a student wants to use for their character. Students then move on to the Character Color Selection screen. Character Customization There are multiple screens to navigate through when customizing your character including selecting their eyes, mouth, and clothing. G. Home Button: Returns students to the ALEKS Adventure Homepage. If the onboarding narrative is not complete, this button is replaced with an X button that returns students to the ALEKS Adventure Start Page. H. Respeak Button: Resets the student’s selection and replays the spoken audio on the page. I. Settings Button: Opens the Settings panel where students can toggle buttons on and off to change their environment in ALEKS Adventure. The Settings button is available in the top-right corner of every page in ALEKS Adventure. J. Current Appearance: For customization of the character’s color, eyes, and mouth, the character is shown with the currently selected option on the pedestal. K. Selection Panel: Displays the customization options for the character. Selecting an option from the panel causes the character’s appearance to change to that selection. The currently selected item is outlined. If the panel has more than one page, navigation arrows appear at the bottom of the panel that allow students to navigate left and right through the panel’s pages. L. Back Button: When selected, returns students to the previous panel. When students are on the color panel, the button instead returns them to the Character Selection screen. M. Accept Button: When selected, confirms the currently selected option as the one the student wants to use for their character and sends them to the next panel. Character Customization After Onboarding After the student has completed their Onboarding of the program, if they would like to make changes to their character, students can do so by selecting the Store or My Animal option on their Topic Rewards page. They will then be able to navigate through choosing an animal, eyes, and mouth. Purchasing clothing options is only available for selection after the Onboarding process by accessing the Store.
Top
Regional Page Available
It looks like you're outside the United States. Do you want to see your regional version of this page?