Blueprinting and Sharing with Canvas
Use blueprinting and sharing features with Canvas to manage course content.
- PreK-12
- Customer Support
- Classroom Teacher
- Preschool
- Elementary School
- Middle School
- High School
- SSO & Auto-Rostering
- AP Biology
- AP Chemistry
- AP History & Geography
- AP Psychology
- AP Economics
- AP African American Studies
- AP Precalculus
- AP Statistics
- AP Computer Science
- AP Language and Composition
- AP Public Speaking
- AP Music Theory
- 5 Steps to a 5 - AP Test Prep
- Glencoe Health 2022
- Teen Health 2021
- Arrive Math
- Building Blocks 2024
- Building Blocks PreK 2025
- Number Worlds 2024
- SRA Reading Laboratory 2025
- SRA Reading Mastery Transformations
- Actively Learn
- McGraw Hill Literacy Emerge!
- McGraw Hill Literacy Summit!
- McGraw Hill Literacy Soar!
- Open Court Reading 2025
- StudySync 2021
- CA Reveal Math (K-12)
- Illustrative Math
- Reveal Math (K-12)
- CA Inspire Science 2020
- FL Science 2025 (K-12)
- Inspire Science 2020
- TN Science (K-12)
- TX Science 2025 (K-12)
- CA Impact 2019
- FL Social Studies 2024 (K-12)
- Impact Social Studies
- McGraw Hill Social Studies
- All Sorts 2026 (K-5)
- Asi se Dice 2024
- CTE - Business, Marketing, and Finance
- CTE - Health Science
- CTE - Computing and Technology
- CTE - Agriculture
- CTE - Culinary Arts
- CTE - Early Childhood Education
- CTE - Criminal Justice
- Open Court Reading 2016, 2018, 2023
- Wonders Balanced Literacy 2016
- Maravillas 2020 & 2017
- Music! Its Role
- McGraw Hill My Math 2018
- Networks 2018
- OCR Foundational Skills Kit
- OCR Word Analysis Kit
- Spotlight on Music
- Wonders 2023 2020 2017
- Texas Math
- Assignment Sync & Grade Passback
- Canvas
- Grades & Assignments


Single Sign-On (SSO) and Auto-Rostering
This article applies to districts that use the SSO and Auto-Rostering Access Service. SSO applies to districts that use an SSO portal, district website, or Learning Management System (LMS) to access McGraw Hill digital programs. Auto-Rostering means that account creation, class setup, and roster management are automated through a process handled by your district.
Not sure which Access Service your district uses? Click here to learn more about the four Access Services that we support.
View a PDF copy of the article.
As part of your districts existing Assignment Sync and Grade Passback integration with McGraw Hill and Canvas, McGraw Hill supports a number of ways of sharing assignments and resources between users within your district.
These abilities include:
- Canvas Blueprinting (Administrators Only)
- Canvas Commons
- User to User Sharing
Article Contents
Canvas Blueprinting (Admin Only)
Enable Blueprint Course Option
Accessing Shared Content After Sync/Import
Canvas Blueprinting (Administrators Only)
Canvas Blueprinting is a specific functionality that allows a district administrator to create a customized lesson plan within Canvas that can be shared with their teachers. This enables an administrator to build and share assignments and resources with their teachers. This not only creates a unified course for all teachers to follow, but also enables teachers to readily begin teaching without needing to build their own course.
Note: Creating a Blueprinted course as an Administrator involves many of the same steps that teachers follow when managing their courses and assignments when using Assignment Sync and Grade Passback within Canvas. Links to these steps are included throughout this document.
Enable Blueprint Course Option
To successfully create, build, and share a Blueprinted course within Canvas using McGraw Hill materials, you first need to have completed and meet the following requirements:
Important Note: You will need to be licensed for the appropriate program within McGraw Hill to be able to create assignments and resources for those programs.
Requirements:
- Administrator access within Canvas
- Teacher specific access within McGraw Hill
- Users can have both administrator and teacher roles enabled within the McGraw Hill platform.
- Refer to the Manage Roles for an Existing User article for steps on managing user roles within the McGraw Hill platform. When creating teacher accounts, be sure to follow your district integration process.
- A license/class within the McGraw Hill platform for the program(s) you are creating a Blueprint course for.
- Successfully pair your Canvas course with your McGraw Hill class.
- Refer to the Quick Start Guide for Canvas Assignment Sync & Grade Passback article for steps on pairing your McGraw Hill classes with your Canvas courses.
Once these requirements have been met, you can begin creating a Blueprinted course!
1. Sign into Canvas as an administrator.
2. Navigate to Course Settings.
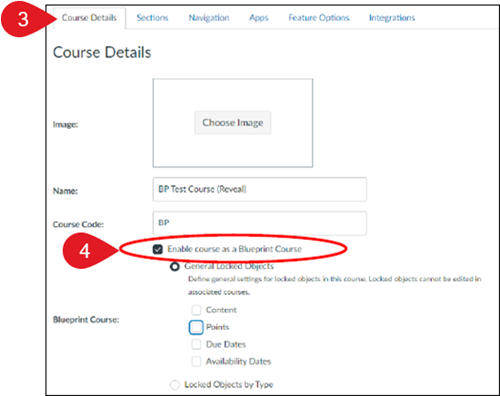
3. Click on the Course Details tab.
4. Check the box next to Enable course as a Blueprint Course.
All other settings are optional and can be configured based on your needs.
5. Click the Update Course Details button at the bottom of the page.
You should now be able to see the Blueprint icon  at the top-right of your screen. You may need to first navigate to your Modules page.
Once the Blueprint course option has been enabled, you can start building your course. This can include any resources you would like to add and do not have to be McGraw Hill specific. Keep in mind, this document only focuses on adding McGraw Hill resources and assignments.
Build Blueprint Course
Once the Blueprint course option has been enabled, you can start building your course. This can include any resources you would like to add and do not have to be McGraw Hill specific. Keep in mind, this document only focuses on adding McGraw Hill resources and assignments.
1. From your Canvas Dashboard, click on the course tile.
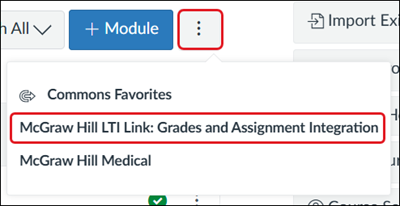
2. Click on the kebob button either at the top-right of the page or on an existing module within the course.
3. Click McGraw Hill LTI Link: Grades and Assignment Integration from the menu.
Note: The way you navigate here will dictate where the assignments/resources are synced. If you use the menu within an existing module, anything you sync will be placed within that module. If you use the menu at the top-right of the course page, a new module will be created with the title “New Content from App.”

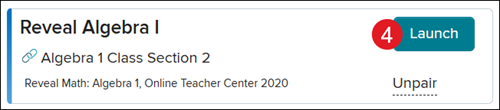
4. Click Launch for the class.
5. For supported Open Learning programs, click to Add Pre-Built Assignments or Create Custom Assignments.
The Pre-Built Assignments option also allows you to deep-link specific assets and resources without making them into assignments.
For in-depth steps on creating assignments and deep-linking assets, refer to the Assignment Sync and Grade Passback with Canvas article.
For StudySync assignments, refer to the StudySync Assignment Sync and Grade Passback with Canvas article. StudySync does not support deep-linking.
Note: The start and end dates you set for assignments will be shared with teachers. Teachers can then change these dates or use the dates populated by the administrator.
Once you have built the desired resources and assignments, you can share the course with teachers.
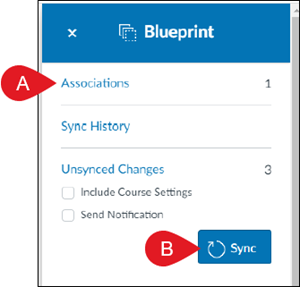
A. Ensure you have associated all of the desired courses first, using the Associations link within the Blueprint menu.
B. Click the Sync button to push the course out to teachers.
Refer to the Accessing Shared Content section for details as to how teachers can use the materials that have been shared with them via Blueprinting.
Canvas Commons
Canvas Commons acts as a repository for resources that any user can access and import into their courses. It’s a great way for teachers to share a customized assignment with the entire district instead of having to send it to each individual user separately.
Note: Creating resources to import into Canvas Commons requires many steps that teachers follow when using the McGraw Hill Assignment Sync and Grade Passback integration with Canvas, which are not included in this document. For in-depth steps on creating assignments and deep-linking assets, refer to the Assignment Sync and Grade Passback with Canvas article.
Sharing to Canvas Commons
Note: These resources and assignments are copyrighted materials and cannot be accessed by a user that does not have the proper license for the program.
1. Populate all assignments, assessments, and/or resources into your Canvas course by following the Assignment Sync and Grade Passback with Canvas article steps.
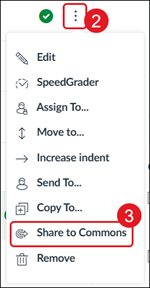
2. Click the kebob menu next to the module, course, or resource you would like to share.
3. Click Share to Commons from the menu.
4. Select the Who can use this resource and License options. Enter a Title and Description. All other selections are optional.
It is recommended to fill in a Title, Description, and any relevant Tags for the resources so they can be easily found and recognized within Canvas Commons.
5. Click Share at the bottom of the page.
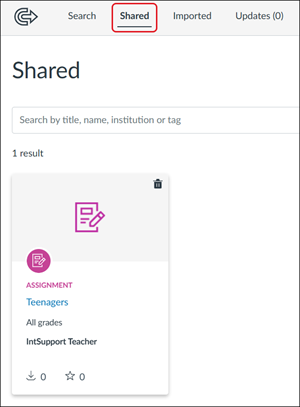
Any modules, courses, and/or resources shared within Canvas Commons can be located on the Shared tab.
Refer to the Accessing Shared Content section for details as to how teachers can import and use the shared resources from within Canvas Commons.
User to User Sharing
User to User sharing is a function within Canvas that allows teachers to share an assignment or resource with other teachers. It’s a great way for teachers to share a customized assignment with another user.
Note: Creating resources to share with others requires many steps that teachers follow when using the McGraw Hill Assignment Sync and Grade Passback integration with Canvas, which are not included in this document. For in-depth steps on creating assignments and deep-linking assets, refer to the Assignment Sync and Grade Passback with Canvas article.
1. Populate all assignments, assessments, and/or resources into your Canvas course by following the Assignment Sync and Grade Passback with Canvas article steps.
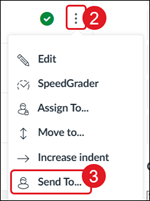
2. Click the kebob menu next to the module, course, or resource you would like to share.
3. Click Send To from the menu.
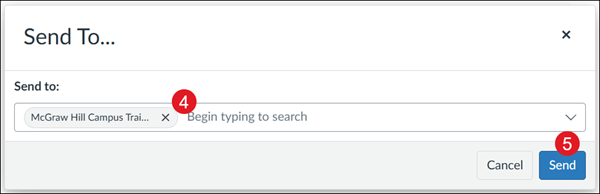
4. Enter the Name or Email Address of the user to share the resource with. Multiple users can be entered at one time.
5. Click Send.
Once the resource has been shared, that user will need to import the resources shared with them. These steps can be found in the next section.
Accessing Shared Content
This section reviews how teachers can successfully access/import McGraw Hill content and resources within their Canvas course after it has been shared with them via Blueprinting, Canvas Commons, or directly from another user.
Getting resources to successfully appear/import into the teacher’s course differs between each sharing type. However, once the resources have been successfully imported/synced into the teacher’s course – viewable on their Modules screen – all steps for accessing the content are the same.
Note: Any Blueprinted/shared assignments will be imported with the same start/end dates that the creator set. Teachers can use these default dates or change them manually within each assignment if preferred.
Blueprinted Content
No steps required to access these shared resources!
Blueprinted content will automatically appear within a teacher’s course after the administrator has synced the Blueprinted course content. There are no special steps required by the teacher. Refer to the Accessing Shared Content After Sync/Import section for steps on accessing these shared materials.
Canvas Commons Content
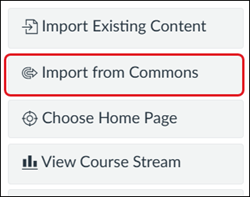
1. From the Modules page, click Import from Commons on the right-hand menu.
2. Use the Search and Filter options to locate the content that you want imported.
3. Click on the resource.
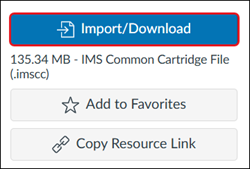
4. Click Import/Download on the right.
5. On the Import/Download panel, checkmark the courses you want the resources imported to.
6. Click Import into Course at the button.
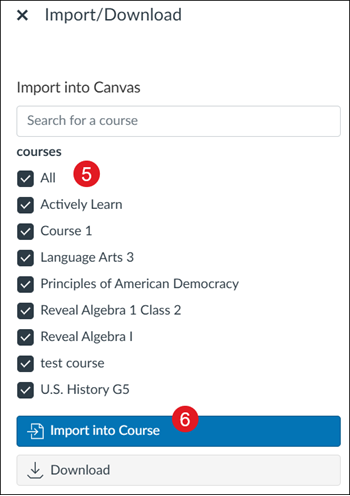
Note: It may take several minutes before the content is populated within your course.
User Shared Content
1. Click Account on the left-hand menu.
2. Click on Shared Content from the menu.

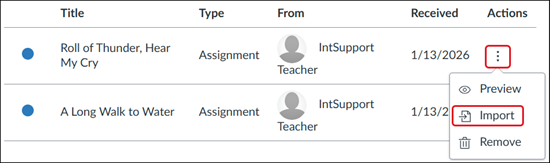
3. Next to each shared resource, click the kebob menu and choose Import from the menu.
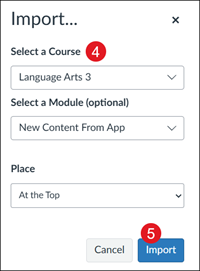
4. On the Import panel, Select a Course to import the resource to. You can also Select a Module and Place, if preferred.
5. Click the Import button.
Accessing Shared Content After Sync/Import
Note: You MUST pair your McGraw Hill classes with your Canvas classes prior to attempting to launch any shared or blueprinted assignments and resources. If your class(es) are not paired, you will receive an L500 error message upon launch. For steps on pairing your McGraw Hill and Canvas courses, refer to the Quick Start Guide for Canvas Assignment Sync & Grade Passback article.
Once you have successfully imported/synced the necessary materials into your Canvas course, there are a few additional steps to take to be able to use and assign those resources that have been shared.
- For shared resources/assets (non-assignments), these are immediately accessible to be used by teachers and students.
For Assignments:
Option A: Launch the assignment as the teacher from within the Canvas course. This simply requires clicking the assignment name and waiting for it to launch. This will create the assignment on the McGraw Hill platform automatically. The process will be completed after a few minutes, once the assignment is launched into the teacher’s view.
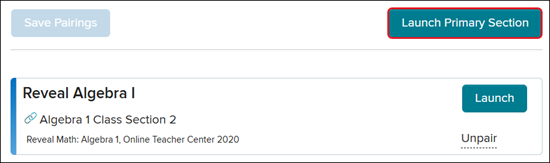
Option B: If there are multiple classes within the Canvas course and a Primary Section has been created, teachers can sync a list of assignments at once by launching the McGraw Hill LTI Link: Grades and Assignment Integration app within their course menu. Click the Launch Primary Section button.
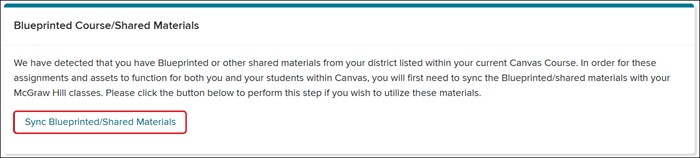
Once the shared materials are within the teacher’s Canvas course, the McGraw Hill app will automatically detect this and will display a new field on the class screen labeled Blueprinted Course/Shared Materials.
Click the Sync Blueprinted/Shared Materials button