Assignment Sync and Grade Passback with Schoology®
Set up Assignment Sync and Grade Passback with Schoology.
- PreK-12
- Customer Support
- Classroom Teacher
- Preschool
- Elementary School
- Middle School
- High School
- SSO & Auto-Rostering
- Core
- Intervention
- Supplemental
- AP, Honors & Electives
- Career & Technical Education
- Literacy
- Math
- Science
- Social Studies
- Health
- Visual & Performing Arts
- World Languages
- AP Biology
- AP Chemistry
- AP History & Geography
- AP Psychology
- AP Economics
- AP African American Studies
- AP Precalculus
- AP Statistics
- AP Computer Science
- AP Language and Composition
- AP Public Speaking
- AP Music Theory
- 5 Steps to a 5 - AP Test Prep
- Glencoe Health 2022
- Teen Health 2021
- Arrive Math
- Building Blocks 2024
- Building Blocks PreK 2025
- Number Worlds 2024
- SRA Reading Laboratory 2025
- SRA Reading Mastery Transformations
- Actively Learn
- McGraw Hill Literacy Emerge!
- McGraw Hill Literacy Summit!
- McGraw Hill Literacy Soar!
- Open Court Reading 2025
- StudySync 2021
- CA Reveal Math (K-12)
- Illustrative Math
- Reveal Math (K-12)
- CA Inspire Science 2020
- FL Science 2025 (K-12)
- Inspire Science 2020
- TN Science (K-12)
- TX Science 2025 (K-12)
- CA Impact 2019
- FL Social Studies 2024 (K-12)
- Impact Social Studies
- McGraw Hill Social Studies
- All Sorts 2026 (K-5)
- Asi se Dice 2024
- CTE - Business, Marketing, and Finance
- CTE - Health Science
- CTE - Computing and Technology
- CTE - Agriculture
- CTE - Culinary Arts
- CTE - Early Childhood Education
- CTE - Criminal Justice
- Open Court Reading 2016, 2018, 2023
- Wonders Balanced Literacy 2016
- Maravillas 2020 & 2017
- Music! Its Role
- McGraw Hill My Math 2018
- Networks 2018
- OCR Foundational Skills Kit
- OCR Word Analysis Kit
- Spotlight on Music
- Wonders 2023 2020 2017
- Texas Math
- Assignment Sync & Grade Passback
- Grades & Assignments
- Schoology®
- User Guide


Single Sign-On (SSO) and Auto-Rostering
This article applies to districts that use the SSO and Auto-Rostering Access Service. SSO applies to districts that use an SSO portal, district website, or Learning Management System (LMS) to access McGraw Hill digital programs. Auto-Rostering means that account creation, class setup, and roster management are automated through a process handled by your district.
Not sure which Access Service your district uses? Click here to learn more about the four Access Services that we support.
View the demo in a separate tab.
View the Spanish version of the demo.
View a PDF copy of the article.
The McGraw Hill LTI® 1.3: Grade and Assignment Integration app syncs assignments and grades between the programs hosted on the McGraw Hill Platform and your Schoology® Learning Management System (LMS).
For Actively Learn specific steps, refer to the Actively Learn Assignment Sync and Grade Passback with Schoology® article.
For StudySync specific steps, refer to the StudySync Assignment Sync and Grade Passback with Schoology® article.
Article Contents
Sections and Course Tiles in Schoology
Deep-Linking Assets and Resources
Deep-Linking Assets and Resources
Sections and Course Tiles in Schoology
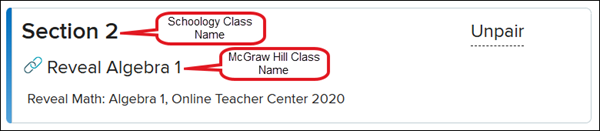
Schoology has a few options for how teachers can have their sections configured. It's important to understand how particular sections are set up, and how that relates to available Course Tiles, so classes can be paired correctly.
Course Tile: Tiles available from your Courses drop-down and Course Dashboard. Though course tiles may share a common course, different course tiles do not communicate with each other.
Course: This is the course used for your classes. This course may or may not be spread across multiple course tiles.
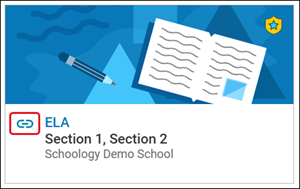
Section: Class(es) available within each course tile. Each course tile may be for only one class or multiple if they have cross-linked sections.
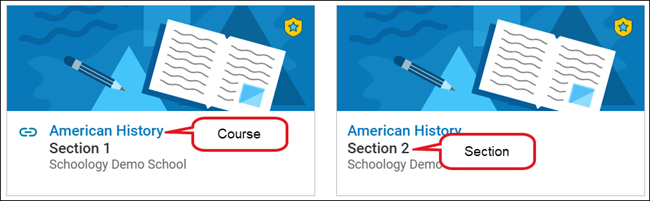
Cross-Linked Section: These are the classes from the same course that have been linked together into the same course tile. This allows you to have multiple classes/sections in a single course tile instead of one tile per class.
Class Pairing
Prior to syncing assignments and grades between your McGraw Hill classes and Schoology, you need to pair your class(es). Your McGraw Hill class is automatically generated by your districts nightly roster file sent to McGraw Hill.
Note: If you plan to use section linking for your classes, this must be done before completing the class pairing steps. However, additional classes can be added and paired in the future as necessary.
1. On the Course Dashboard, click on the course tile, or select the class from the Courses (A) drop-down.

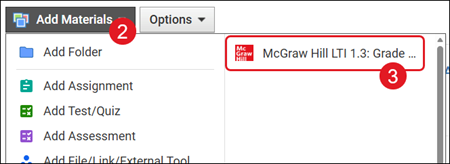
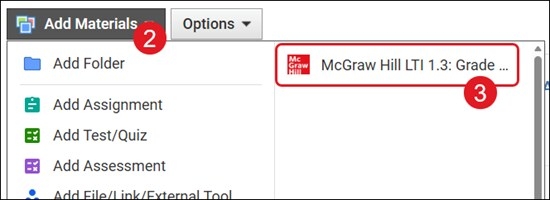
2. Click the Add Materials drop-down.
3. Click on McGraw Hill LTI 1.3: Grade and Assignment Integration from the menu.
Note: Installation of this app is completed by your District Administrator. If you do not see the app, please reach out to your District Administrator or Curriculum Coordinator.

4. Click Pair to the right of the course tile.
Important! Make sure to only click Pair on the course tile that matches the course you selected.
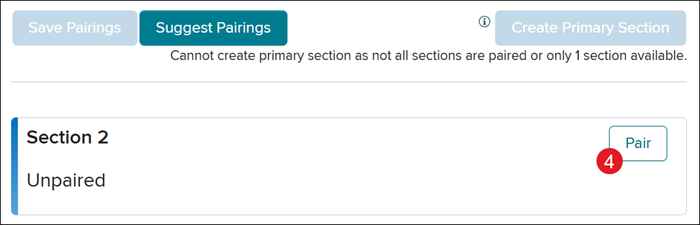
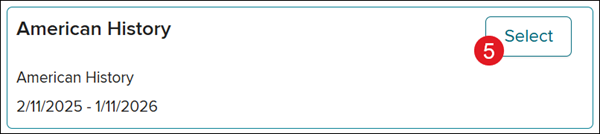
5. On the Course section pop-up, click Select on the course tile that matches the course you selected.
Complete these steps for every class that needs to be paired with the course you selected.
Alternative Option: Smart Pairing
Some schools may have access to the Suggest Pairings (B) option. This button will automatically pair your classes to the selected course.
If you do not have the button available, this means your district does not have a matching identifier between your McGraw Hill classes and your Schoology classes. You will need to reach out to your district IT team to further inquire about this new feature.
If using this option:
- Once your classes are paired, verify that the correct classes are linked to the course by scrolling through the list of classes on the pop-up.
- If a class was incorrectly paired, follow the Unpairing Classes steps.
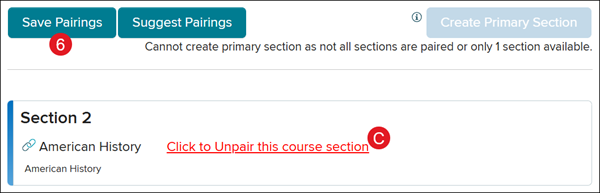
6. Click the Save Pairings button.
C. If you would like to start over with pairing classes to the selected course, click the Click to Unpair this course section link.
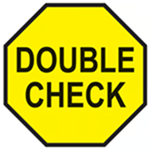
Stop and Double Check - Take time to double check and ensure your class pairings are correct before moving on. Incorrect class pairings, and any resulting issues, is a common issue.
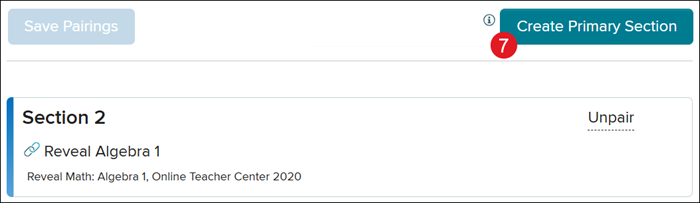
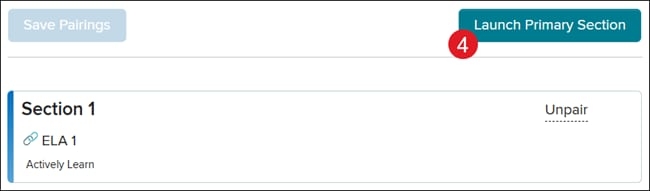
7. Click the Create Primary Section button.
This will create an empty class within the McGraw Hill platform with "Schoology® Course" affixed to the title of the class. This class will not have any students rostered to it but will serve as the primary class for creating assignments.
Important! Do not archive the primary section or any of your classes on the McGraw Hill platform. Archiving these classes will prevent the integration between your McGraw Hill classes and Schoology classes from functioning properly.
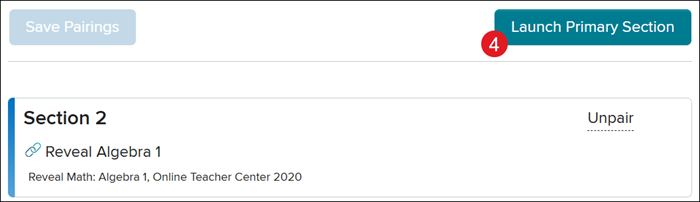
8. Click the Launch Primary Section button to create assignments.

Unpairing Classes
If a class has been paired by mistake and/or incorrectly, you can unpair it. Only classes paired in error should be unpaired.
Note: McGraw Hill content and assignments will not launch from your Schoology course if you unpair the class.
Important! If a Schoology class is deleted or unlinked prior to unpairing it from the McGraw Hill class, you will not be able to fully unpair it. You MUST first unpair the classes before deleting or unlinking the Schoology class. If you deleted the Schoology class before unpairing it, you will need to contact our DTS Customer Support team. This also applies to any linked classes. You MUST unpair your classes within the McGraw Hill LTI 1.3 app before unlinking any classes. Failure to do so will break the connection to Schoology and prevent you from pairing the classes again at a later time.
1. On the Course Dashboard, click on the course tile, or select the class from the Courses (A) drop-down.

2. Click the Add Materials drop-down.
3. Click on McGraw Hill LTI 1.3: Grade and Assignment Integration from the menu.
Note: Installation of this app is completed by your District Administrator. If you do not see the app, please reach out to your District Administrator or Curriculum Coordinator.

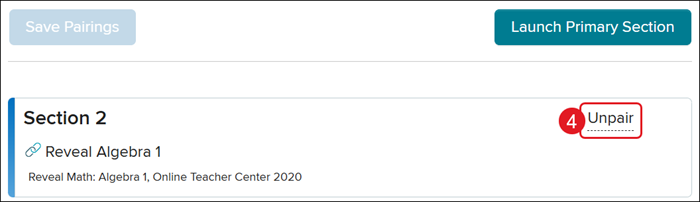
4. Click the Unpair link to the right on the class tile.
Create Assignments
1. On the Course Dashboard, click on the course tile, or select the class from the Courses (A) drop-down.

2. Click the Add Materials drop-down.
3. Click on McGraw Hill LTI 1.3: Grade and Assignment Integration from the menu.
Note: Installation of this app is completed by your District Administrator. If you do not see the app, please reach out to your District Administrator or Curriculum Coordinator.
4. Click the Launch Primary Section button.
Note: All assignments must be created through the primary section. All of your course sections linked to the selected course will automatically receive the assignment upon creation.
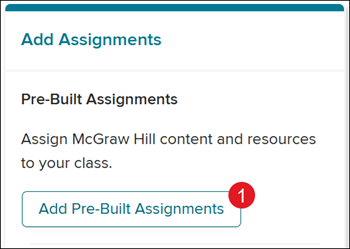
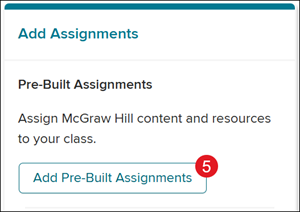
Pre-Built Assignments
1. On the Add Assignments tile, click the Add Pre-Built Assignments button.
The last selected Chapter/Unit/Lesson will open by default. Click the Browse This Course button to navigate to a different location within the program.
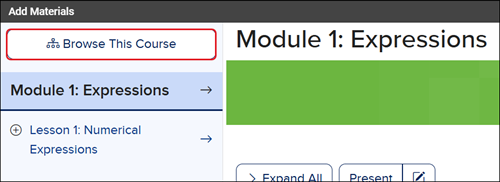
2. Click on a blade or click on an option in the Course Navigation Panel on the left to view the available resources.
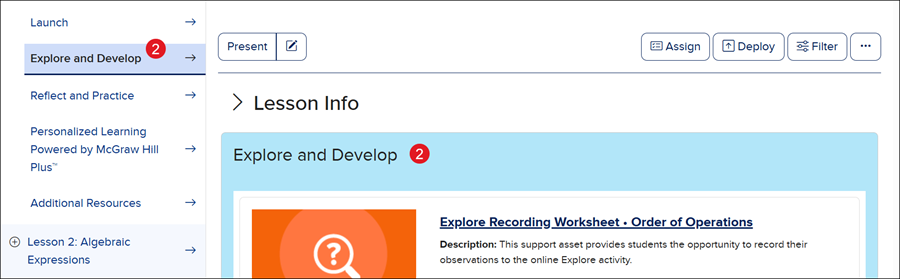
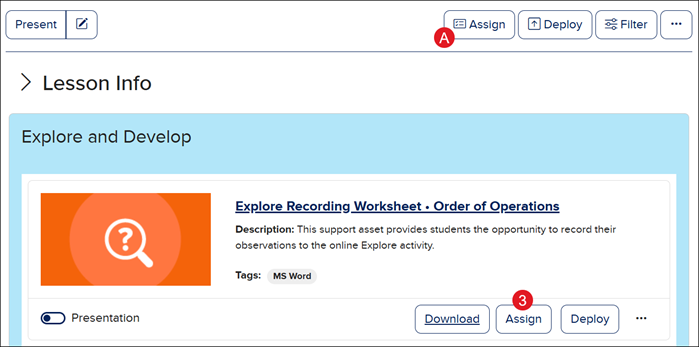
3. Click the Assign button on a resource tile to assign an individual resource.
Click the Assign (A) button at the top-right of the page to assign multiple resources at one time.
For in-depth instruction on how to create individual assignments, refer to the Create Open Learning Assignments article.
For in-depth instruction on how to create bulk assignments, refer to the Create Bulk Open Learning Assignments article.
Wait for the screen to close automatically. This will take around 10-20 seconds to process your new assignment before closing the screen. If you close the screen manually, your assignments will not be created successfully.
The page will automatically navigate you back to the Materials page in Schoology once you've created the assignments.
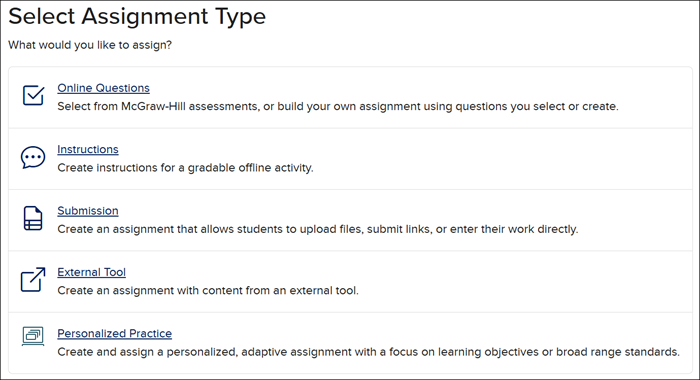
Custom Assignments
1. On the Add Assignments tile, click the Create Custom Assignments button.

2. Select the Assignment Type.
For in-depth instruction on creating Instruction, Submission, and External Tool assignments, refer to the Create Open Learning Assignments article.
For in-depth instruction on creating Online Questions assignments, refer to the Assign McGraw Hill Assessments article.
For in-depth instruction on creating Personalized Learning/SmartBook/LearnSmart assignments, refer to the Create Open Learning SmartBook® or LearnSmart® Assignments article.
Note: Personalized Learning/SmartBook/LearnSmart is only available for select programs.
Wait for the screen to close automatically once you've created the assignment. This will take around 10-20 seconds to process your new assignment before closing the screen. If you close the screen manually, your assignments will not be created successfully.
View Assignments
You can easily view assignments within Schoology from your Materials list.
Note: Student View (Preview Course) will not function for viewing assignments from a student perspective. The Student View generates a fake student user in Schoology that enables you to view items from a student's perspective. Since this fake account does not exist within the McGraw Hill platform, any attempt to launch assignments will result in an error screen.
1. On the Course Dashboard, click on the course tile, or select the class from the Courses (A) drop-down.

2. Click on Materials from the side menu.
3. Click on the assignment from the list.

4. Click the View button on the section tile.
Note: It may take 2-3 minutes for assignments to appear for students and before the assignment can be successfully launched within Schoology Classroom. If you attempt to launch the assignment too quickly after creation, both students and teachers will receive a "CI2" error message.
The assignment will open in another browser tab.

Adjust Assignment Settings
Important! If you need to later make adjustments to the settings of an assignment, you must complete these changes within the McGraw Hill platform directly, or by launching the assignment as a teacher in Schoology. If you attempt to make assignment edits within Schoology, they will not be reflected within McGraw Hill and may result in stopping the assignment from functioning in Schoology.
1. On the Course Dashboard, click on the course tile, or select the class from the Courses (A) drop-down.

2. Click on Materials from the side menu.
3. Click on the assignment from the list.

4. Click the Edit Primary Assignment button on the section tile.
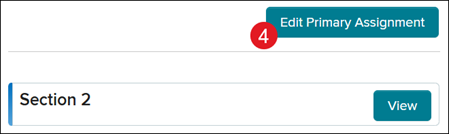
5. Make preferred changes and click the Save button.
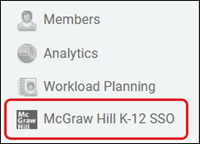
Alternative Option: Edit from McGraw Hill Platform
1. Click on the McGraw Hill K-12 SSO option in the left pane.
The McGraw Hill My Programs page will open in a separate browser window.
2. Click on the Assignments button on the course tile.
Note: The course will have "Schoology Course" in for the course title.
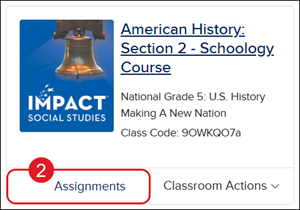
You can also click on the course name and click on Assignments from the navigation menu.
3. Click on the Options button to the right of the assignment.
4. Click Edit from the menu.
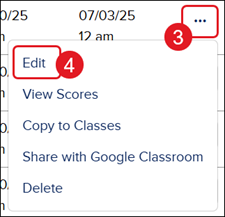
5. Make preferred changes and click Save at the bottom.
These changes will not be reflected in Schoology until you have resynced the assignments.
Resync Assignments
Resyncing assignments is an option available within the McGraw Hill LTI 1.3 tool. This option syncs all assignments and their settings from McGraw Hill into Schoology. This allows you to sync settings back into Schoology if you make any changes to your assignments. This also gives teachers a direct way to manually trigger the assignment syncing process in the event any assignments have not automatically appeared in Schoology.
1. On the Course Dashboard, click on the course tile, or select the class from the Courses (A) drop-down.

2. Click the Add Materials drop-down.
3. Click on McGraw Hill LTI 1.3: Grade and Assignment Integration from the menu.
Note: Installation of this app is completed by your District Administrator. If you do not see the app, please reach out to your District Administrator or Curriculum Coordinator.

4. Click the Launch Primary Section button.
Note: All assignments must be created through the primary section. All of your course sections linked to the selected course will automatically receive the assignment upon creation.

5. Click the Sync Assignments button.
McGraw Hill will automatically check to see if there are any assignments that have not yet been synced to Schoology. These will be listed in the area below the Sync Assignments button.
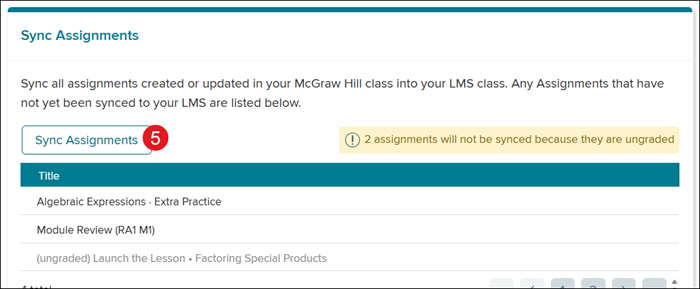
Wait for the screen to close automatically. The loading screen may take 10-20 seconds to process the new assignments before closing. If you close the screen manually, the assignments will not be created successfully.
Deep-Linking Assets and Resources
In addition to creating assignments, you can also create Deep-Links to McGraw Hill Assets and Resources within Schoology. This allows you to create links for users to launch resources in Schoology without necessarily making them into assignments.
1. On the Course Dashboard, click on the course tile, or select the class from the Courses (A) drop-down.

2. Click the Add Materials drop-down.
3. Click on McGraw Hill LTI 1.3: Grade and Assignment Integration from the menu.
Note: Installation of this app is completed by your District Administrator. If you do not see the app, please reach out to your District Administrator or Curriculum Coordinator.

4. Click the Launch Primary Section button.
Note: All assignments must be created through the primary section. All of your course sections linked to the selected course will automatically receive the assignment upon creation.

5. On the Add Assignments tile, click the Add Pre-Built Assignments button.
The last selected Chapter/Unit/Lesson will open by default. Click the Browse This Course button to navigate to a different location within the program.

6. Click on a blade or click on an option in the Course Navigation Panel on the left to view the available resources.
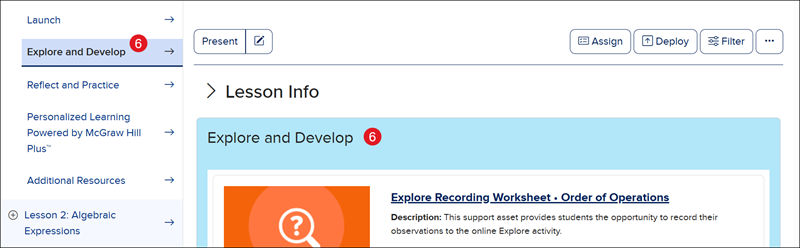
7. Click the Deploy button on a resource tile to assign an individual resource.
Click the Deploy (A) button at the top-right of the page to assign multiple resources at one time.
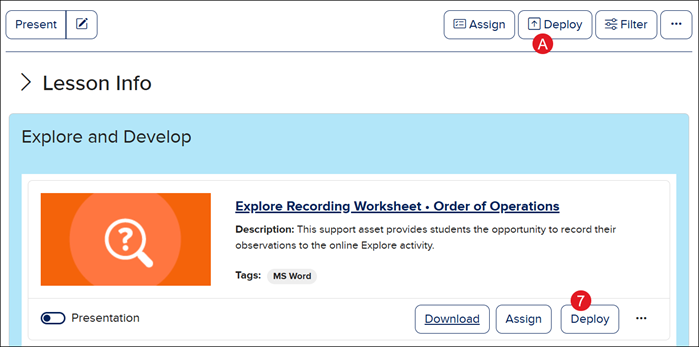
These resources will now appear within your Schoology course. To allow student access to these linked resources, you will first need to publish them from within Schoology.
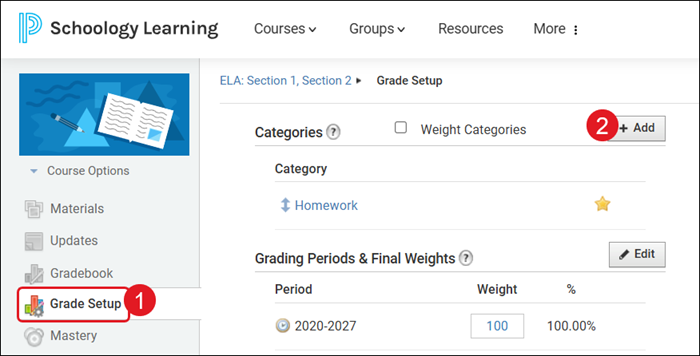
Configure Gradebook
Before you'll be able to see assignment scores in your Schoology gradebook, you'll need to configure the gradebook through the Grade Setup page.
As students complete their assignments, their grades will appear within the Schoology Gradebook.
Note: Any assignments that require manual scoring will not show a grade in the gradebook until it has been scored.
Important! Student should access their first assignment through Schoology. This allows the McGraw Hill platform to begin syncing grades for that student to Schoology. The student does not need to complete the assignment within Schoology if they would rather complete it within the McGraw Hill platform, they just need to launch it from the Schoology platform. After the initial launch, students can then access and complete assignments through Schoology or the McGraw Hill platform.
Add Gradebook Categories
1. Click on Grade Setup from the left menu.
2. Click the +Add button.
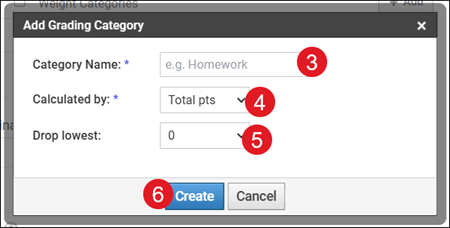
3. On the Add Grading Category pop-up, enter a Category Name.
4. Select the preferred Calculated by from the drop-down.
5. Select the Drop lowest option.
6. Click the Create button.
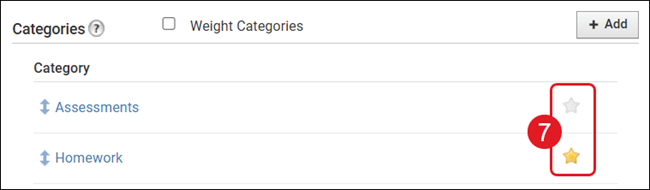
7. Click the star icon to the right of the category to make it the default.
This will allow assignments to automatically appear in the gradebook; otherwise, assignments will be "ungraded" by default, and you will need to edit the category via the Bulk Edit page.
Note: Assignments will not show in the gradebook until they've been assigned to a category. If you have a starred category, that option will be used as the default category and assigned to the assignment automatically.
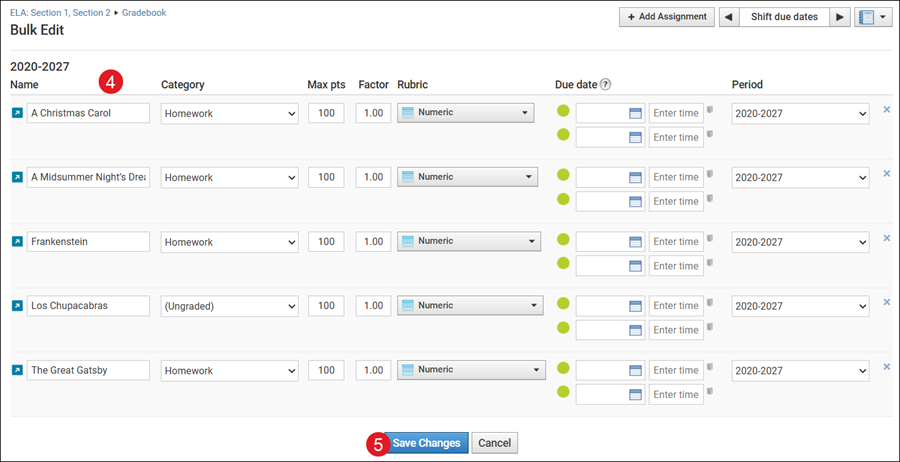
Bulk Edit Gradebook Sections
1. Click Gradebook from the left menu.
2. Click the kebob icon to the right of the page.
3. Click Bulk Edit from the menu.

4. Make any preferred changes to the different sections.
5. Click the Save Changes button at the bottom.
Grade Completed Assignments
Assignments can be graded from within Schoology by launching the assignment.
Note: Assignments can only be graded from within each section directly. Launching the Primary Section will only allow you to edit the assignment settings.
1. On the Course Dashboard, click on the course tile, or select the class from the Courses (A) drop-down.

2. Click on Materials from the side menu.
3. Click on the assignment from the list.

4. Click the View button on the section tile.
Note: It may take 2-3 minutes for assignments to appear for students and before the assignment can be successfully launched within Schoology Classroom. If you attempt to launch the assignment too quickly after creation, both students and teachers will receive a "CI2" error message.
The assignment will open in another browser tab.

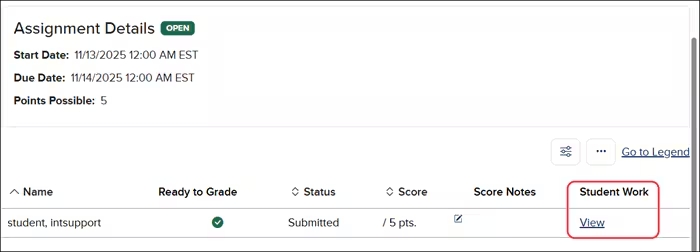
5. Depending on the assignment type, click the View or View Scoresheet link in the Student Work column.
For in-depth instructions on grading different assignments, refer to the Grade Open Learning Assignments article.
Graded assignments automatically sync to the Schoology Gradebook.
Resync Grades
1. On the Course Dashboard, click on the course tile, or select the class from the Courses (A) drop-down.

2. Click the Add Materials drop-down.
3. Click on McGraw Hill LTI 1.3: Grade and Assignment Integration from the menu.
Note: Installation of this app is completed by your District Administrator. If you do not see the app, please reach out to your District Administrator or Curriculum Coordinator.
4. Click the Launch Primary Section button.
Note: All assignments must be created through the primary section. All of your course sections linked to the selected course will automatically receive the assignment upon creation.
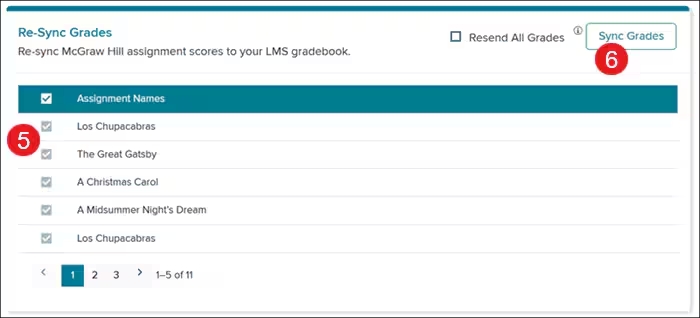
5. On the Re-Sync Grades tile, checkmark the assignment(s) that needs to be resynced.
6. Click the Sync Grades button.
Troubleshooting Tips
Error Messages on Student Launch
Common Errors: ID5, ER4, SE4 Most likely caused by a rostering mismatch between Schoology and McGraw Hill.
1. Ensure your class(es) are paired correctly. If your class(es) are not paired correctly, then the rosters will not match.
2. Ensure the student is properly enrolled in the class within McGraw Hill. New students may take several days after enrollment to sync into McGraw Hill.
3. Ensure you are not using a “Preview Course” in Schoology. This view will not work and is not indicative of the experience students will have.
Most of the time this is caused when launching an assignment too quickly after creation.
1. Ensure you and students are waiting 2-3 minutes after assignment creation to launch it.
2. Ensure the assignment “start date” has passed. Assignments with future start dates cannot be launched by students.
"L500" Error Message
Often indicative of a greater issue with the district's installation of the app. The issue may exist on either the district side or the McGraw Hill side.
Reach out to your District Administrator contact support for this error.
Assignments and Grades Not Syncing Properly
Most of the time this is caused by incorrect class pairings.
1. Ensure your class(es) are paired correctly by reviewing the class pairings section. If your class(es) are not paired correctly, assignments and grades will not function as needed and may result in additional errors.
2. Ensure you are creating assignments at the proper level. The Primary Section should be used if assigning to all classes. If creating assignments directly within McGraw Hill, make sure you are creating assignments within the class that has "Schoology Course" in the title.
Grades Not Syncing for Some Students
If only some students within a class do not have grades populating in the Schoology Gradebook, but other students do, this indicates some students have not launched an assignment directly from within Schoology this school year.
Ensure the student launches any active assignment from directly within Schoology. You can then manually sync grades through the McGraw Hill tool to populate all grades for this student within the Schoology Gradebook.