Create Open Learning SmartBook® or LearnSmart® Assignments
Create SmartBook or LearnSmart assignments for adaptive learning.
- McGraw Hill Social Studies
- TX Science 2025 (K-12)
- SSO & Manual-Rostering
- Inspire Science 2020
- Customer Support
- Middle School
- Direct Login & Manual-Rostering
- High School
- CA Impact 2019
- Classroom Teacher
- CA Inspire Science 2020
- SSO & Auto-Rostering
- PreK-12
- Elementary School
- FL Science 2025 (K-12)
- Math
- Grades & Assignments
- Social Studies
- Direct Login & Auto-Rostering
- Core
- AP, Honors & Electives
- FL Social Studies 2024 (K-12)
- Science
- Preschool
- LearnSmart®
- Smartbook® Integration
- Literacy
- AP Biology
- AP Chemistry
- AP History & Geography
- AP Psychology
- AP Economics
- AP African American Studies
- AP Precalculus
- AP Statistics
- AP Computer Science
- AP Language and Composition
- AP Public Speaking
- AP Music Theory
- Reveal Math (K-12)
- TN Science (K-12)
- Texas Math


This article walks teachers through creating SmartBook, LearnSmart, or Personalized Practice assignments based on the program being used.
For a full page view of the demo, click here.
For a Spanish version of the demo, click here.
Article Contents
Custom Made Assignment
1. SSO or log in at my.mheducation.com.
2. Launch your course.
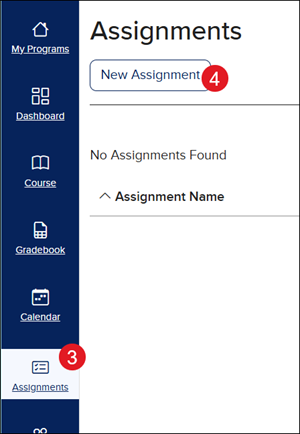
3. Click on Assignments.
4. Click the New Assignment button.
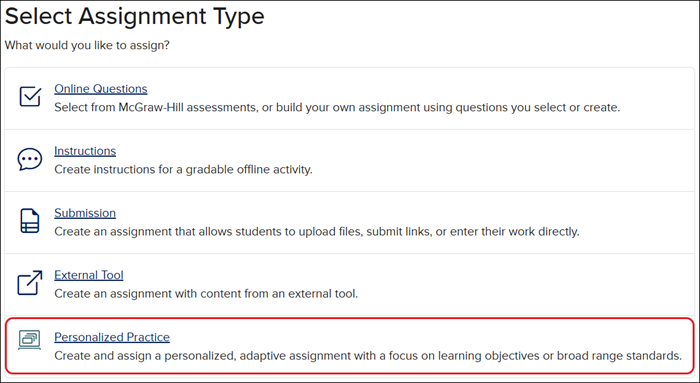
4. Click Personalized Practice, SmartBook, or LearnSmart. The option will vary based on the program being used.
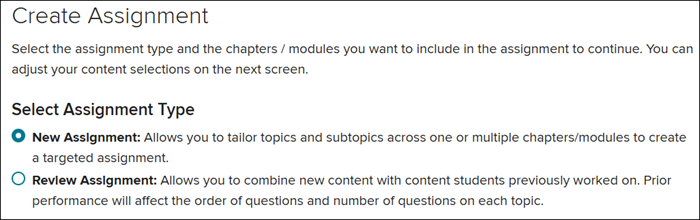
5. Select the Assignment Type.
New Assignment - Allows you to tailor topics and subtopics across one or multiple chapters/modules to create a targeted assignment.
Review Assignment - Allows you to combine new content with content students previously worked on. Prior performance will affect the order of questions and number of questions on each topic.
6. Select the content Source.
7. Check the box next to the Chapters/Modules you want included.
8. Click Continue.

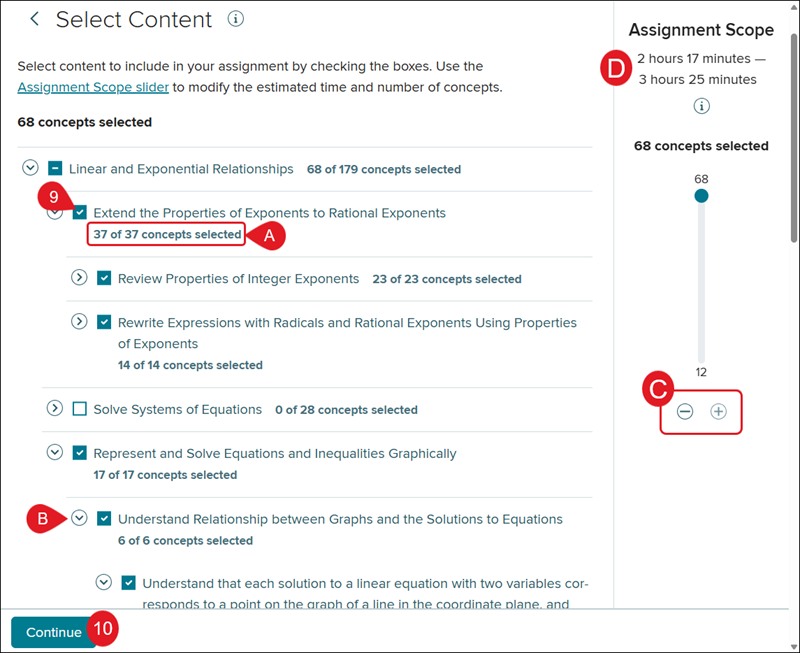
9. Checkmark the box next to the concepts you want included.
A. The number of concepts for each section will show in bold.
B. Click the arrow next to each section to select specific concepts within each section.
C. You can use the - (minus) and + (plus) buttons, or click and drag the dot on the slider, to decrease or increase the number of concepts for the assignment based on the selections made.
D. The estimated amount of time it would take a student to complete the number of concepts selected is shown under Assignment Scope.
10. Click Continue.
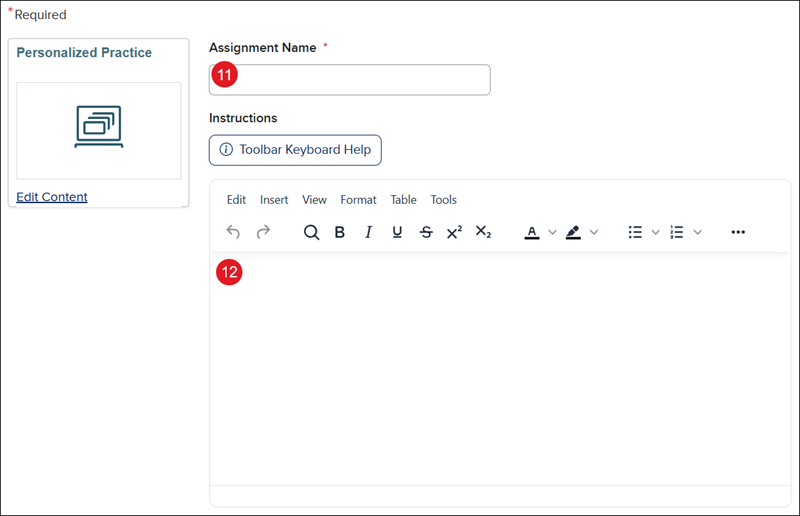
11. Enter an Assignment Name.
12. Enter any Instructions students need for the assignment. This is optional.
13. Select a Start and End Date and Time.
E. If you would like students to be able to submit the assignment after the selecting End Date, check the Allow Late Submission box.
14. Enter the number of Points the assignment is worth. This is only an option if the assignment is selected as Graded for the Grading Type.

15. Select the Assignment Visibility.
Note: If Hidden is selected, students will unable to see and access the assignment.
17. Select the Gradebook Category.
To add additional categories, refer to the Open Learning - Gradebook article.

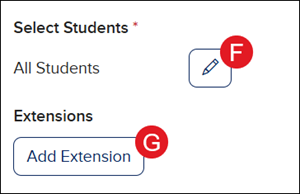
F. The assignment defaults to All Students. Click the Edit (pencil) button to select specific students for the assignment.
G. Click Add Extension to provide specific students with a different end date and time.
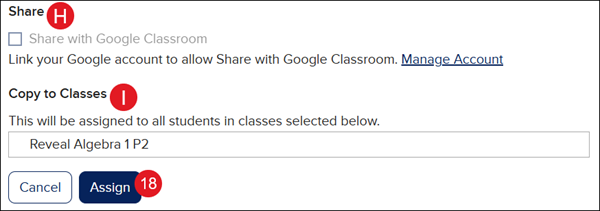
H. Check the box next to Share if you want the assignment access on Google Classroom.
Note: To share assignments with Google Classroom, you will need to pair your account with Google.
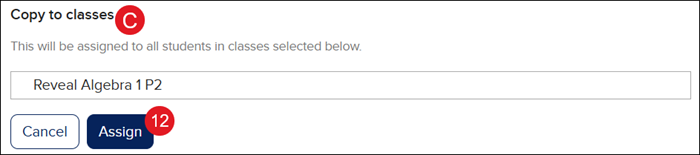
I. If you have more than one class created for the same program, you can also select classes to share the assignment with in the Copy to Classes section.
18. Click Assign.
Quick Assign
1. SSO or log in at my.mheducation.com.
2. Launch your course.
3. Click Browse This Course and select the Chapter/Lesson.
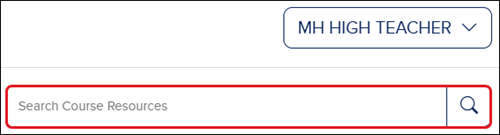
You can also assign the resource from the Course Resources page.
From the Dashboard or Course page, enter the name of the SmartBook or LearnSmart resource you want to assign in the Search Course Resources search bar and/or click the magnifying glass icon.
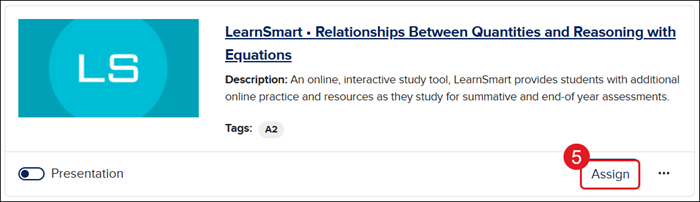
4. Locate the SmartBook or LearnSmart resource you want to assign.
5. Click Assign on the resource tile.
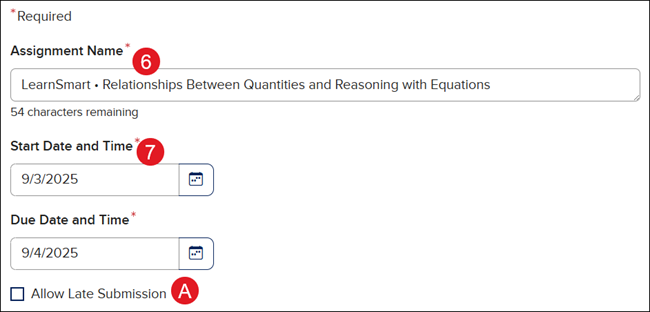
6. Enter an Assignment Name. The Assignment Name defaults to the resource name and changing it is optional.
7. Enter a Start and Due Date and Time.
A. If you would like students to be able to submit the assignment after the selecting End Date, check the Allow Late Submission box.
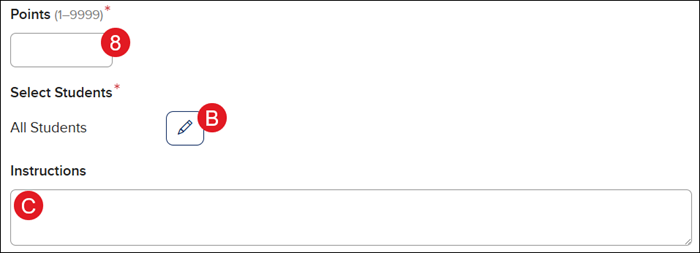
8. Enter the number of Points the assignment is worth. This is only an option if Graded is selected for the Grading Type.
B. The assignment defaults to All Students. Click the Edit (pencil) button to select specific students for the assignment.
C. Enter any Instructions students need for the assignment. This is optional.
10. Select the Gradebook Category.
To add additional categories, refer to the Open Learning - Gradebook article.
11. Select the Assignment Visibility.
Note: If Hidden is selected, students will unable to see and access the assignment.

D. If you have more than one class created for the same program, you can also select classes to share the assignment with in the Copy to Classes section.
12. Click Assign.