glencoe-math
my-math
glencoe-science
glencoe-health
mcgraw-hill-health
inspire-science
iscience
asi-se-dice
instructor
Programs & Solutions
Programs & Solutions/Asi Se Dice
Programs & Solutions/Asi Se Dice/Asi se Dice 2016
Business Unit
Business Unit/PreK-12
Context
Context/Integration Type
Context/Integration Type/Direct Login & Manual-Rostering
Context/Curriculum Type
Context/Curriculum Type/Core
Context/Education Level
Context/Education Level/High School
Programs & Solutions/Glencoe Math
Programs & Solutions/McGraw Hill My Math
Programs & Solutions/Glencoe Science
Context/Subject
Context/Subject/Science
Context/Integration Type/Direct Login & Auto-Rostering
Context/Integration Type/SSO & Auto-Rostering
Context/Subject/World Languages
Programs & Solutions/McGraw Hill My Math/McGraw Hill My Math 2018
Programs & Solutions/Inspire Science
Programs & Solutions/Inspire Science/Inspire Science 2017
Asset Format Type
Asset Format Type/Customer Support
Context/Subject/Social Studies
Programs & Solutions/Glencoe Math/Glencoe Algebra 1 2018
Context/Education Level/Middle School
Programs & Solutions/Glencoe Math/Glencoe Algebra 1 2014
Programs & Solutions/McGraw Hill Health
Programs & Solutions/McGraw Hill Health/McGraw Hill Health 2014
Programs & Solutions/Glencoe Math/Glencoe Geometry 2014
Programs & Solutions/Glencoe Science/Glencoe Science 2017
Programs & Solutions/Glencoe Math/Glencoe Math Accelerated
Context/Subject/Health
Programs & Solutions/Glencoe Math/Glencoe Geometry 2018
Context/Education Level/Elementary School
Programs & Solutions/Glencoe Health
Programs & Solutions/Glencoe Health/Glencoe Health 2014
Programs & Solutions/Glencoe Math/Glencoe Algebra 2 2014
Programs & Solutions/McGraw Hill My Math/McGraw Hill My Math 2013 & 2016
Personas
Personas/School Educator
Personas/School Educator/Classroom Teacher
Context/Subject/Math
Programs & Solutions/Glencoe Math/Glencoe Algebra 2 2018
Programs & Solutions/Glencoe Math/Glencoe Math Course 1
Programs & Solutions/Glencoe Math/Glencoe Math Course 2
Programs & Solutions/Glencoe Math/Glencoe Math Course 3
Programs & Solutions/iScience
Programs & Solutions/iScience/iScience 2017
Context/Integration Type/SSO & Manual-Rostering
Support Topics
Support Topics/Classroom & Course Management
Support Topics/Classroom & Course Management/Plan & Present
prek-12
2026-09-24T16:33:15.074-04:00
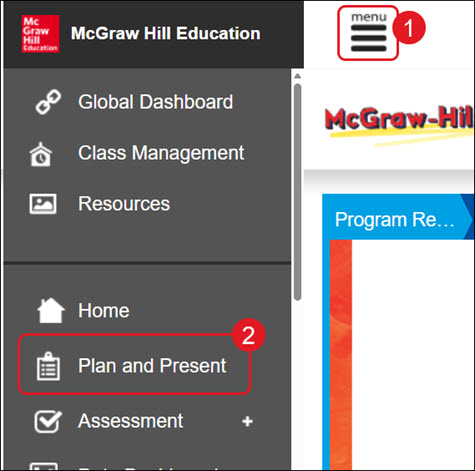
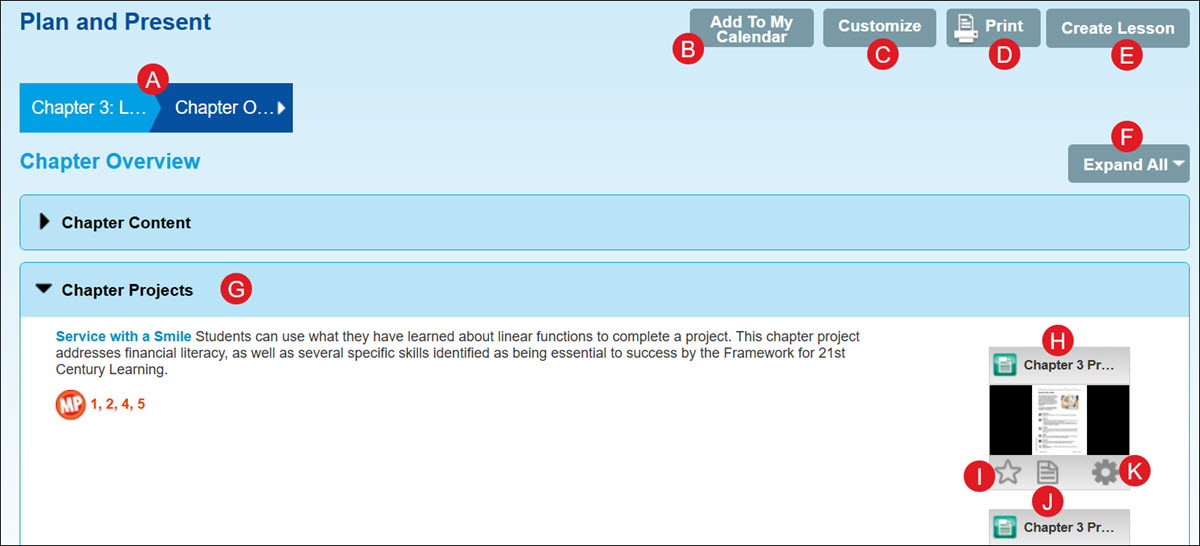
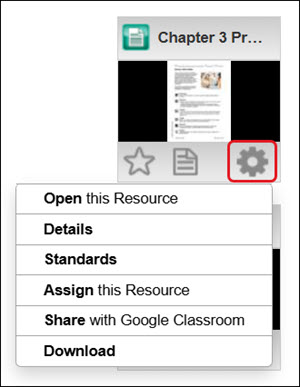
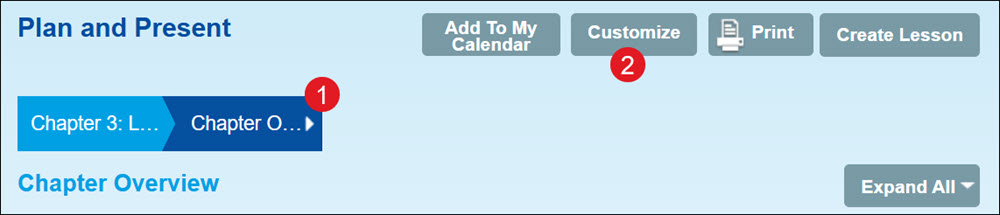
<h2 class="fs-5">Article Contents</h2> <p><a href="https://www.youtube.com/embed/GSO6DUOu4CQ" target="_blank">View a video walkthrough</a></p> <p><a href="#access_lessons">Access and Navigate the Plan and Preset Page</a></p> <p><a href="#customize_lesson">Customize an Existing Lesson Plan</a></p> <p><a href="#new_lesson">Add a New Lesson Plan</a></p> <p><a href="#new_section">Add New Section</a></p> <p><a href="#edit_section">Edit Section</a></p> <p><a href="#add_remove_resources">Add or Remove Resources in Section</a></p> <p><a href="#delete_section">Delete a Section</a></p> <p><a href="#delete_lesson">Delete a Custom Lesson Plan</a></p> <p><a href="https://www.mheducation.com/prek-12/support/knowledge/connected-saving-customized-lesson-plans.html" target="_blank">Save Customized Lesson Plans</a></p> <p> </p> <h3><span style="font-weight: normal; width: 11px; overflow: hidden; background-image: url("/libs/clientlibs/granite/richtext/resources/images/anchor.png"); background-position: left bottom; background-size: initial; background-repeat: no-repeat; background-attachment: initial; background-origin: initial; background-clip: initial; height: 12px;"><a id="access_lessons"></a></span><span class="fs-5"><span style="font-weight: normal; width: 11px; overflow: hidden; background-image: url("/libs/clientlibs/granite/richtext/resources/images/anchor.png"); background-position: left bottom; background-size: initial; background-repeat: no-repeat; background-attachment: initial; background-origin: initial; background-clip: initial; height: 12px;"></span>Access and Navigate the Plan and Preset Page</span></h3> <ol> <li>Click <strong>Menu </strong>at the top left.<br> <br> </li> <li>Click <strong>Plan and Preset </strong>from the menu.<br> <br> <img src="/content/dam/mhe/support/support-images/dts-k12-images/customize-ced-lesson-plans/ced-lesson-plans-1.jpg" data-assetref="ced-lesson-plans-1-1790279384270"><br> <br> <img src="/content/dam/mhe/support/support-images/dts-k12-images/customize-ced-lesson-plans/ced-lesson-plans-2.jpg" data-assetref="ced-lesson-plans-2-1790279643685"><br> <br> A. Select a <strong>Chapter</strong> and/or <strong>Lesson </strong>from the menu.<br> <br> B. The <strong><a href="https://www.mheducation.com/prek-12/support/knowledge/access-and-manage-the-connected-calendar.html" target="_blank">Add To My Calendar</a></strong> button will add the selected lesson to the course calendar.<br> <br> C. Click <strong>Customize </strong>to make changes to the lesson.<br> <br> D. Click <strong><a href="https://www.mheducation.com/prek-12/support/knowledge/connected-saving-customized-lesson-plans.html" target="_blank">Print</a> </strong>to save/download the lesson.<br> <br> E. Add additional lesson blades by clicking <strong>Create Lesson</strong>.<br> <br> F. Click <strong>Expand/Collapse All</strong> to open/close all lesson plan blades at once.<br> <br> G. Click on a blade to view that section of the lesson plan.<br> <br> <strong>Move section</strong> - Click and drag the blade to another location on the page.<br> <br> H. Click on a resource tile to view the resource.<br> <br> I. Click the star icon to add the resource to your <strong>Favorites</strong>.<br> <br> J. Click the paper icon to add <strong>Notes </strong>to the resource.<br> <br> K. Click on <strong>Tools </strong>(gear icon) to open the resource, view details, view standards, <a href="https://www.mheducation.com/prek-12/support/knowledge/connected-make-a-new-assignment.html" target="_blank">assign the resource</a>, <a href="https://www.mheducation.com/prek-12/support/knowledge/share-connected-resources-and-assessments-to-google-classroom" target="_blank">share the resource with Google Classroom</a>, or download the resource.<br> <br> These options will vary based on the resource.<br> <br> <img src="/content/dam/mhe/support/support-images/dts-k12-images/customize-ced-lesson-plans/ced-lesson-plans-3.jpg" data-assetref="ced-lesson-plans-3-1790280256036"></li> </ol> <p> </p> <h3><span class="fs-5"><span style="font-weight: normal; width: 11px; overflow: hidden; background-image: url("/libs/clientlibs/granite/richtext/resources/images/anchor.png"); background-position: left bottom; background-size: initial; background-repeat: no-repeat; background-attachment: initial; background-origin: initial; background-clip: initial; height: 12px;"><a id="customize_lesson"></a></span>Customize an Existing Lesson Plan</span></h3> <ol> <li>Select a <strong>Chapter</strong> and/or <strong>Lesson </strong>from the menu.<br> <br> </li> <li>Click the <strong>Customize </strong>button.<br> <br> <img src="/content/dam/mhe/support/support-images/dts-k12-images/customize-ced-lesson-plans/ced-lesson-plans-4.jpg" data-assetref="ced-lesson-plans-4-1790280570784"><br> <br> </li> <li>On the pop-up, enter a <strong>Lesson Plan Name</strong>.<br> <br> </li> <li>Click the <strong>OK </strong>button.<br> <br> <img src="/content/dam/mhe/support/support-images/dts-k12-images/customize-ced-lesson-plans/ced-lesson-plans-5.jpg" data-assetref="ced-lesson-plans-5-1790280705499"><br> <br> The customized lesson plan will open automatically.</li> </ol> <p> </p> <h3 class="fs-5"><a id="new_lesson"></a>Add a New Lesson Plan</h3> <ol> <li>Select a <strong>Chapter</strong> and/or <strong>Lesson </strong>from the menu.<br> <br> </li> <li>Click the <strong>Create Lesson </strong>button.<br> <br> <img src="/content/dam/mhe/support/support-images/dts-k12-images/customize-ced-lesson-plans/ced-lesson-plans-14.jpg" data-assetref="ced-lesson-plans-14-1790341615810"><br> <br> </li> <li>On the <strong>Create Lesson</strong> pop-up, enter a <strong>Lesson No.</strong> (Number).<br> <br> </li> <li>Enter a <strong>Lesson Plan Name</strong>.<br> <br> </li> <li>Click the <strong>Create</strong> button.<br> <br> <img src="/content/dam/mhe/support/support-images/dts-k12-images/customize-ced-lesson-plans/ced-lesson-plans-15.jpg" data-assetref="ced-lesson-plans-15-1790341621706"><br> <br> </li> <li>Follow the steps to <a href="#new_section">Add New Section</a>.</li> </ol> <p> </p> <h3 class="fs-5"><span style="font-weight: normal; width: 11px; overflow: hidden; background-image: url("/libs/clientlibs/granite/richtext/resources/images/anchor.png"); background-position: left bottom; background-size: initial; background-repeat: no-repeat; background-attachment: initial; background-origin: initial; background-clip: initial; height: 12px;"><a id="new_section"></a></span>Add New Section</h3> <ol> <li>Click the <strong>Add Section</strong> button.<br> <br> <img src="/content/dam/mhe/support/support-images/dts-k12-images/customize-ced-lesson-plans/ced-lesson-plans-6.jpg" data-assetref="ced-lesson-plans-6-1790281062954"><br> <br> </li> <li>On the pop-up, enter a <strong>Section Title</strong>.<br> <br> </li> <li>Click the <strong>OK </strong>button.<br> <br> <img src="/content/dam/mhe/support/support-images/dts-k12-images/customize-ced-lesson-plans/ced-lesson-plans-7.jpg" data-assetref="ced-lesson-plans-7-1790281136956"><br> <br> The new section will be added to the top of the lesson plan.</li> </ol> <p> </p> <h3 class="fs-5"><span style="font-weight: normal; width: 11px; overflow: hidden; background-image: url("/libs/clientlibs/granite/richtext/resources/images/anchor.png"); background-position: left bottom; background-size: initial; background-repeat: no-repeat; background-attachment: initial; background-origin: initial; background-clip: initial; height: 12px;"><a id="edit_section"></a></span>Edit Section</h3> <ol> <li>Click <strong>Tools </strong>(gear icon) on the section you want to change.<br> <br> </li> <li>Click <strong>Edit this Section</strong> on the menu.<br> <br> <img src="/content/dam/mhe/support/support-images/dts-k12-images/customize-ced-lesson-plans/ced-lesson-plans-8.jpg" data-assetref="ced-lesson-plans-8-1790281431211"><br> <br> </li> <li>On the <strong>Edit Section</strong> pop-up, make your preferred changes to the <strong>Title </strong>and/or <strong>Text</strong>.<br> <br> </li> <li>Click the <strong>OK </strong>button.<br> <br> <img src="/content/dam/mhe/support/support-images/dts-k12-images/customize-ced-lesson-plans/ced-lesson-plans-9.jpg" data-assetref="ced-lesson-plans-9-1790281562876"></li> </ol> <p> </p> <h3 class="fs-5"><span style="font-weight: normal; width: 11px; overflow: hidden; background-image: url("/libs/clientlibs/granite/richtext/resources/images/anchor.png"); background-position: left bottom; background-size: initial; background-repeat: no-repeat; background-attachment: initial; background-origin: initial; background-clip: initial; height: 12px;"><a id="add_remove_resources"></a></span>Add or Remove Resources in Section</h3> <ol> <li>Click <strong>Tools </strong>(gear icon) on the section you want to change.<br> <br> </li> <li>Click <strong>Add or Remove Resources in this Section</strong> on the menu.<br> <br> <img src="/content/dam/mhe/support/support-images/dts-k12-images/customize-ced-lesson-plans/ced-lesson-plans-10.jpg" data-assetref="ced-lesson-plans-10-1790281724049"><br> <br> </li> <li>On the <strong>Edit Resources</strong> pop-up, click the Add button on the resource(s) you want to include in the section.<br> <br> A. Click the <strong>Remove </strong>button for those you don't need in the section.<br> <br> </li> <li>Click the <strong>Save </strong>button.<br> <br> <img src="/content/dam/mhe/support/support-images/dts-k12-images/customize-ced-lesson-plans/ced-lesson-plans-11.jpg" data-assetref="ced-lesson-plans-11-1790281939094"></li> </ol> <p> </p> <h3 class="fs-5"><span style="font-weight: normal; width: 11px; overflow: hidden; background-image: url("/libs/clientlibs/granite/richtext/resources/images/anchor.png"); background-position: left bottom; background-size: initial; background-repeat: no-repeat; background-attachment: initial; background-origin: initial; background-clip: initial; height: 12px;"><a id="delete_section"></a></span>Delete a Section</h3> <p>Keep in mind that once you delete a customized section, you can't get it back.</p> <ol> <li>Click <strong>Tools </strong>(gear icon) on the section you want to change.<br> <br> </li> <li>Click <strong>Delete this Section</strong> on the menu.<br> <br> <img src="/content/dam/mhe/support/support-images/dts-k12-images/customize-ced-lesson-plans/ced-lesson-plans-12.jpg" data-assetref="ced-lesson-plans-12-1790340424157"><br> <br> </li> <li>On the <strong>Delete Section</strong> pop-up, click the <strong>OK </strong>button to confirm.<br> <br> <img src="/content/dam/mhe/support/support-images/dts-k12-images/customize-ced-lesson-plans/ced-lesson-plans-13.jpg" data-assetref="ced-lesson-plans-13-1790340545167"></li> </ol> <p> </p> <h3 class="fs-5"><span style="font-weight: normal; width: 11px; overflow: hidden; background-image: url("/libs/clientlibs/granite/richtext/resources/images/anchor.png"); background-position: left bottom; background-size: initial; background-repeat: no-repeat; background-attachment: initial; background-origin: initial; background-clip: initial; height: 12px;"><a id="delete_lesson"></a></span>Delete a Custom Lesson Plan</h3> <p>Keep in mind that once you delete a customized lesson plan, you can't get it back.</p> <ol> <li>Click on the <strong>Chapter/Lesson</strong> drop-down.<br> <br> </li> <li>Click the <strong>X </strong>icon to the right of the <strong>My Customized Lesson Plans</strong> you want to remove.<br> <br> <img src="/content/dam/mhe/support/support-images/dts-k12-images/customize-ced-lesson-plans/ced-lesson-plans-16.jpg" data-assetref="ced-lesson-plans-16-1790341140324"><br> <br> </li> <li>On the <strong>Delete Lesson</strong> pop-up, click the <strong>OK </strong>button to confirm.<br> <br> <img src="/content/dam/mhe/support/support-images/dts-k12-images/customize-ced-lesson-plans/ced-lesson-plans-17.jpg" data-assetref="ced-lesson-plans-17-1790341213127"></li> </ol> dts Learn how teachers can make adjustments to program lessons. 2026-09-24 Access, Navigate, and Customize the Plan and Present Page Learn how teachers can make adjustments to program lessons. Learn how teachers can make adjustments to program lessons.
Learn how teachers can make adjustments to program lessons.
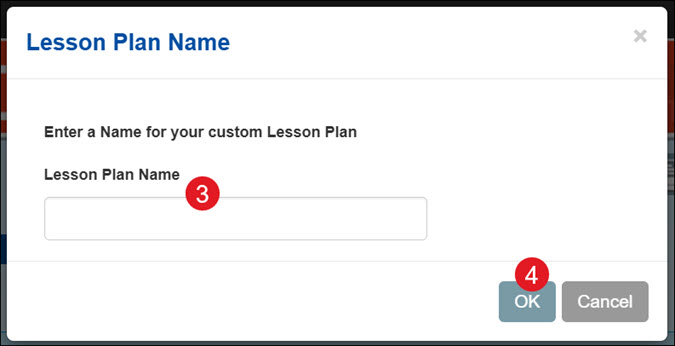
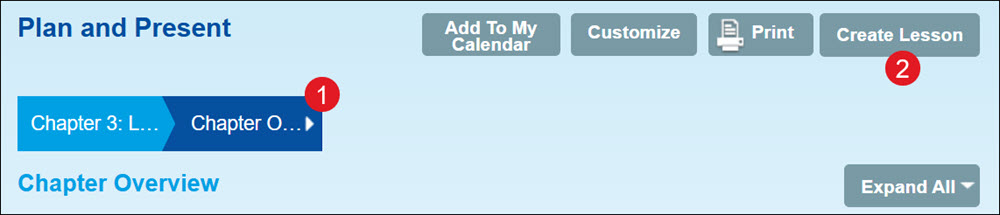
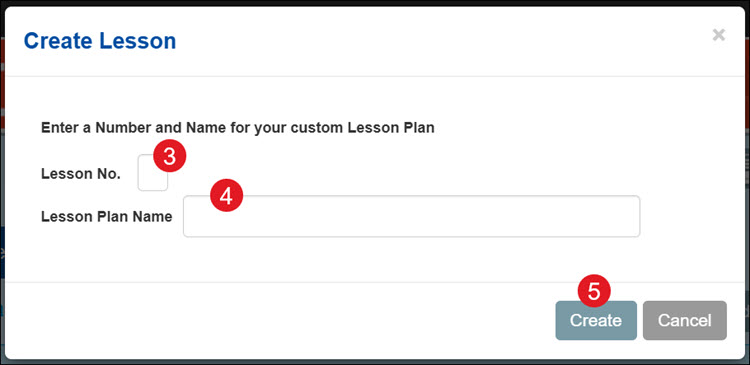
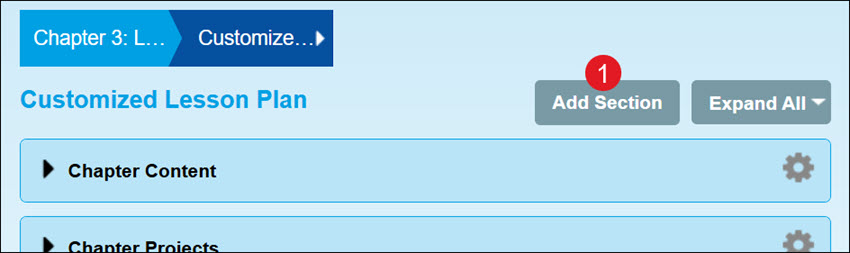
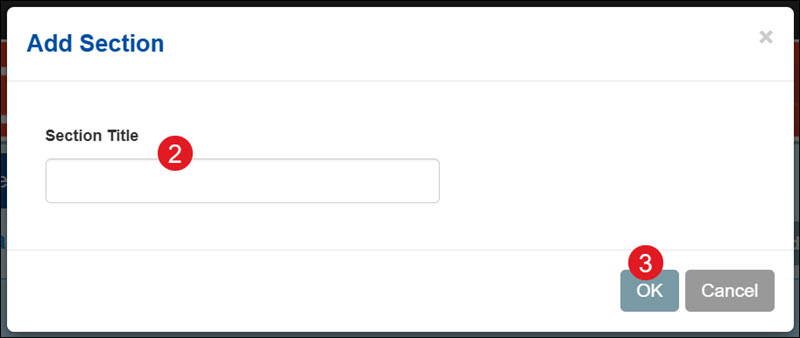
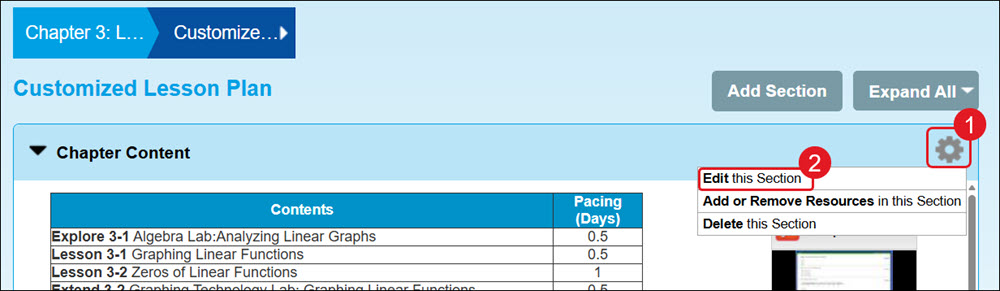
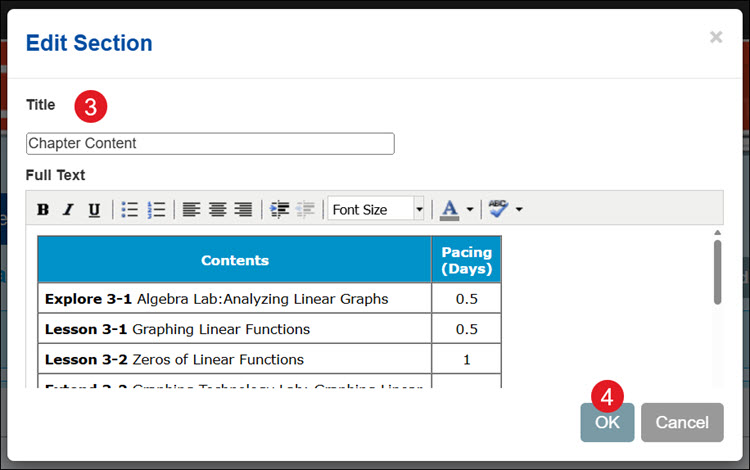
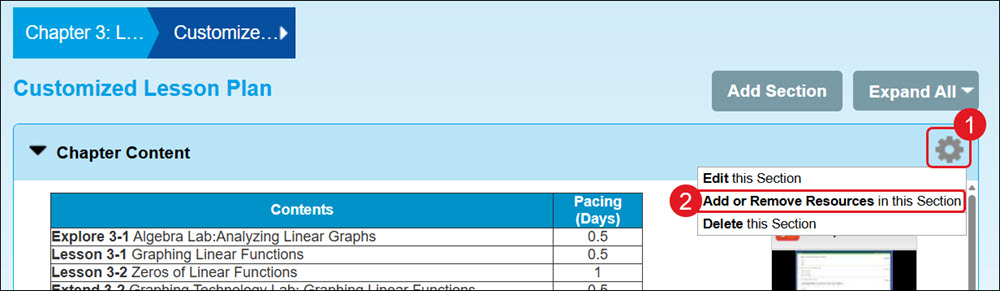
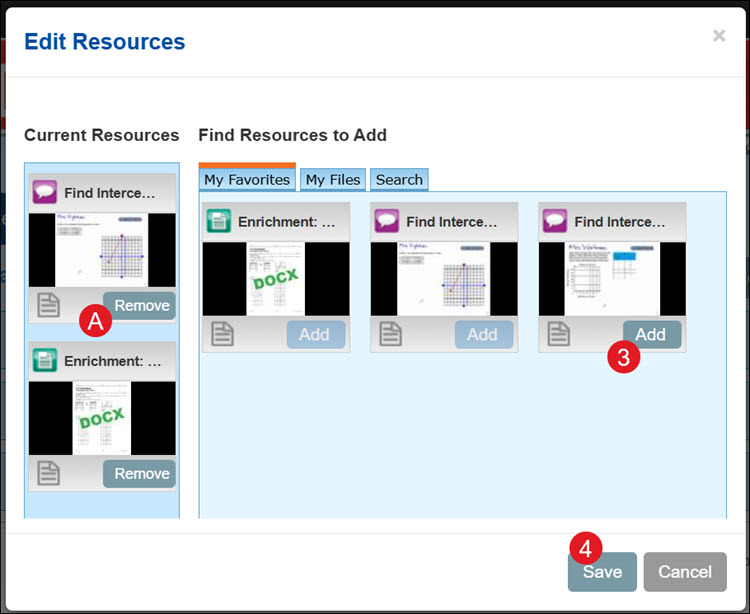
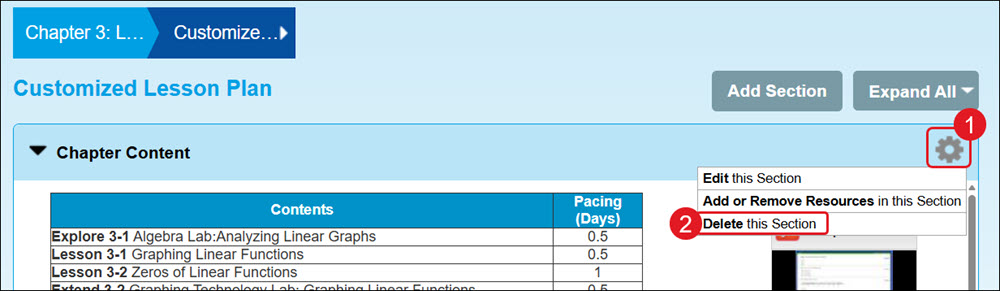
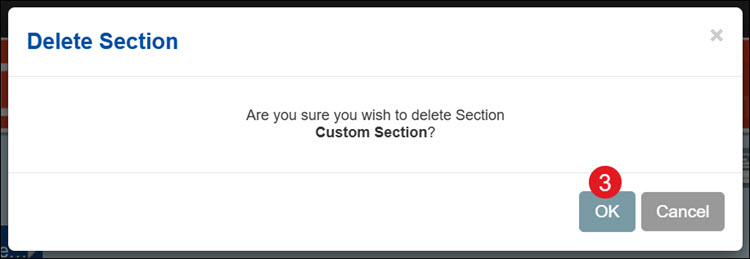
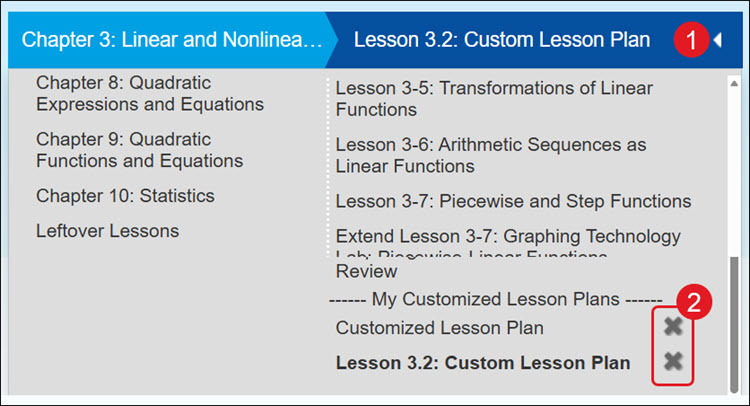
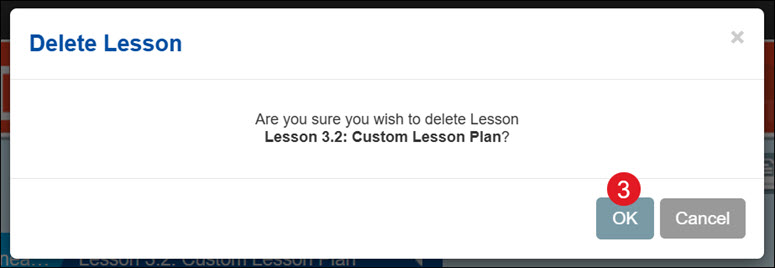
Article Contents View a video walkthrough Access and Navigate the Plan and Preset Page Customize an Existing Lesson Plan Add a New Lesson Plan Add New Section Edit Section Add or Remove Resources in Section Delete a Section Delete a Custom Lesson Plan Save Customized Lesson Plans Access and Navigate the Plan and Preset Page Click Menu at the top left. Click Plan and Preset from the menu. A. Select a Chapter and/or Lesson from the menu. B. The Add To My Calendar button will add the selected lesson to the course calendar. C. Click Customize to make changes to the lesson. D. Click Print to save/download the lesson. E. Add additional lesson blades by clicking Create Lesson. F. Click Expand/Collapse All to open/close all lesson plan blades at once. G. Click on a blade to view that section of the lesson plan. Move section - Click and drag the blade to another location on the page. H. Click on a resource tile to view the resource. I. Click the star icon to add the resource to your Favorites. J. Click the paper icon to add Notes to the resource. K. Click on Tools (gear icon) to open the resource, view details, view standards, assign the resource, share the resource with Google Classroom, or download the resource. These options will vary based on the resource. Customize an Existing Lesson Plan Select a Chapter and/or Lesson from the menu. Click the Customize button. On the pop-up, enter a Lesson Plan Name. Click the OK button. The customized lesson plan will open automatically. Add a New Lesson Plan Select a Chapter and/or Lesson from the menu. Click the Create Lesson button. On the Create Lesson pop-up, enter a Lesson No. (Number). Enter a Lesson Plan Name. Click the Create button. Follow the steps to Add New Section. Add New Section Click the Add Section button. On the pop-up, enter a Section Title. Click the OK button. The new section will be added to the top of the lesson plan. Edit Section Click Tools (gear icon) on the section you want to change. Click Edit this Section on the menu. On the Edit Section pop-up, make your preferred changes to the Title and/or Text. Click the OK button. Add or Remove Resources in Section Click Tools (gear icon) on the section you want to change. Click Add or Remove Resources in this Section on the menu. On the Edit Resources pop-up, click the Add button on the resource(s) you want to include in the section. A. Click the Remove button for those you don't need in the section. Click the Save button. Delete a Section Keep in mind that once you delete a customized section, you can't get it back. Click Tools (gear icon) on the section you want to change. Click Delete this Section on the menu. On the Delete Section pop-up, click the OK button to confirm. Delete a Custom Lesson Plan Keep in mind that once you delete a customized lesson plan, you can't get it back. Click on the Chapter/Lesson drop-down. Click the X icon to the right of the My Customized Lesson Plans you want to remove. On the Delete Lesson pop-up, click the OK button to confirm.
dts
Customer Support, PreK-12, Classroom Teacher, Elementary School, Middle School, High School, Direct Login & Auto-Rostering, Direct Login & Manual-Rostering, SSO & Auto-Rostering, SSO & Manual-Rostering, Core, Math, Science, Social Studies, Health, World Languages, Glencoe Health 2014, McGraw Hill Health 2014, Glencoe Algebra 1 2014, Glencoe Algebra 1 2018, Glencoe Algebra 2 2014, Glencoe Algebra 2 2018, Glencoe Math, Glencoe Geometry 2014, Glencoe Geometry 2018, Glencoe Math Course 1, Glencoe Math Course 2, Glencoe Math Course 3, Glencoe Math Accelerated, McGraw Hill My Math 2013 & 2016, McGraw Hill My Math 2018, McGraw Hill My Math, Glencoe Science 2017, Glencoe Science, Inspire Science 2017, iScience 2017, Asi se Dice 2016, Plan & Present