Wonders/Maravillas District Planner Manager
Explore Wonders district planners to support curriculum planning and alignment.
- Literacy
- SSO & Manual-Rostering
- Customer Support
- World of Wonders 2017
- Direct Login & Auto-Rostering
- Wonders 2014
- Middle School
- Core
- Direct Login & Manual-Rostering
- Wonders 2023 2020 2017
- SSO & Auto-Rostering
- PreK-12
- School Administrator
- Preschool
- Class Management
- Kindergarten
- 1st Grade
- 2nd Grade
- 3rd Grade
- 4th Grade
- 5th Grade
- 6th Grade


This article walks Curriculum Administrators through managing Wonders/Maravillas District Planners.
For a full page view of the demo, click here.
For a Spanish version of the demo, click here.
McGraw Hill Curriculum Administrators can create and share a district-wide planner for Wonders and Maravillas teachers in their districts. Once you’ve created a class and customized the planner to the desired schedule and instructional plan, you can use the District Planner Manager tool to set that as the default planner for all teachers in the district.
If you choose to create and activate a district Planner, all classes created via the auto-rostering process will use that planner moving forward. Classes created prior to the district planner’s activation will not be affected. If teachers create their own classes, they will have access to the district planner. Teachers can adjust these district planners as needed, and they can still opt to create a new class using their own planner.
Note: You’ll need to create a district-wide planner for each grade level to allow all teachers to create classes utilizing a district planner. If your district auto-rosters students and classes, the district planner will be the starting planner for all classes created using the file. For manual rostering districts and for any class created outside of the auto-rostering process, teachers can choose between using an active district planner or their own custom planner as the starting point for a new class.
Article Contents
District Planner Manager Roles
Access the District Planner Manager
District Planner Manager Roles
To access the District Planner Manager in Wonders, you will need an account with both the Teacher and Curriculum Administrator roles enabled. If you do not have an account, or if you have an existing account but are missing the Teacher or Curriculum Administrator role, reach out to your Organization Administrator to have an account created and/or the proper roles assigned. If you are an Organization Administrator, you can create accounts by following the Create Administrator Accounts and Add Roles article or the Add Roles to an Existing User article depending on if an account needs to be created or an existing account needs to be edited.
Access the District Planner Manager
1. Once you have an account with Teacher and Curriculum Administrator access, SSO or log in to your account at my.mheducation.com.
2. Redeem the Teacher Edition of Wonders and/or Maravillas. Refer to the ConnectED - How to Redeem a Master Code article for steps on redeeming content.
Note: Adding the Teacher Edition of the program to your account will result in you using up one of the purchased licenses.
3. Click on the Teacher Edition program tile.

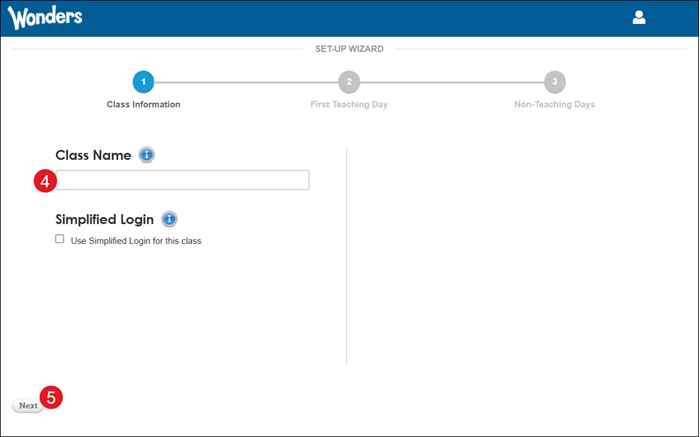
4. On the Set-Up Wizard page, enter a Class Name.
5. Click the Next button.
6. Choose the First Teaching Day to schedule the first lesson for your teachers across the district. The selected day will be marked red.
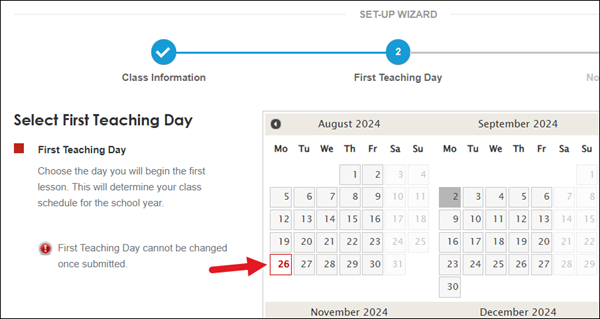
7. Click the Next button at the bottom of the page.
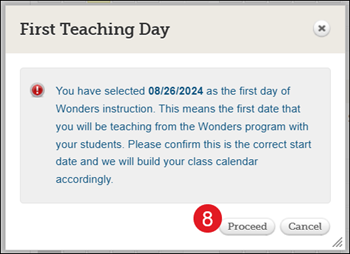
8. On the First Teaching Day pop-up, click the Proceed button.
9. Select any Non-Teaching Days on the provided calendar.
The selected non-teaching dates will be marked in teal. National holidays are automatically marked for you and will show grayed out. Click on the day to remove the non-teaching date.
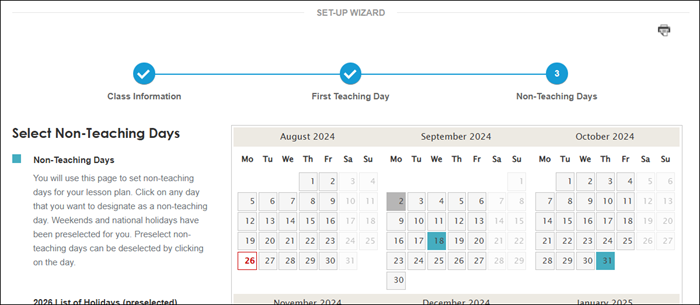
10. Click the Save button at the bottom of the page.
11. On the Confirm Submission pop-up, click the Proceed button.
Click the Change First Teaching Day button to change the first day of the planner.
Create District Planner
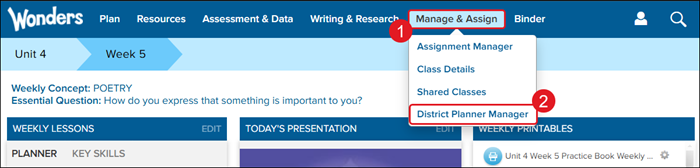
1. Hover over Manage & Assign in the Navigation Menu.
2. Click on District Planner Manager from the menu.
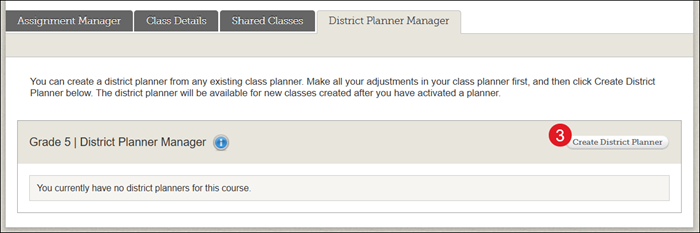
3. On the District Planner Manager tab, click on the Create District Planner button.
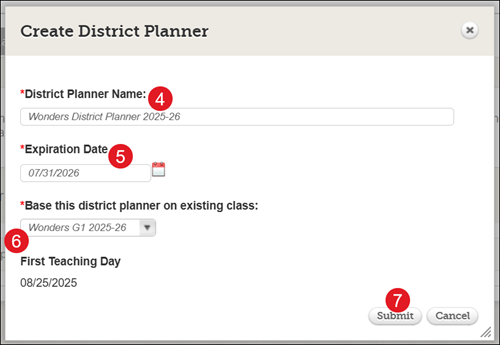
4. Enter a District Planner Name.
5. Select an Expiration Date. This will be the date that the planner deactivates and is no longer usable unless reactivated.
Note: The selected date should be no later than July 31st.
6. Select the class you want to use for the district planner.
7. Click the Submit button.
Activate a District Planner
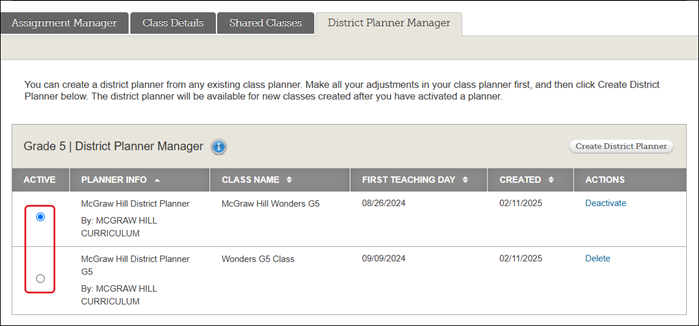
Curriculum Administrators can activate, delete, or deactivate district planners. You can add a new district planner at any time, however, only one district planner can be active at any time for each grade level and Wonders or Maravillas product.
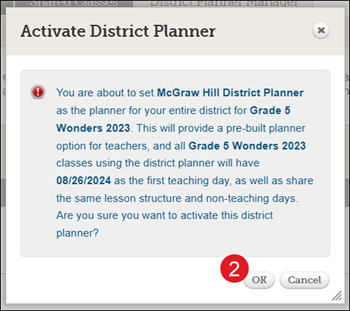
1. On the District Planner Manager tab, select the radio button next to the district planner you want to activate.

2. On the Activate District Planner pop-up, click the OK button to confirm.
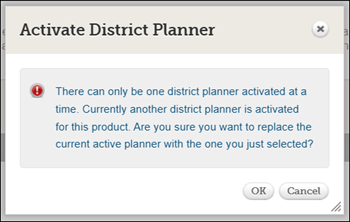
Switch District Planners
1. On the District Planner Manager tab, click the radio button next to the district planner you want to activate.
2. On the Activate District Planner pop-up, click the OK button to confirm.
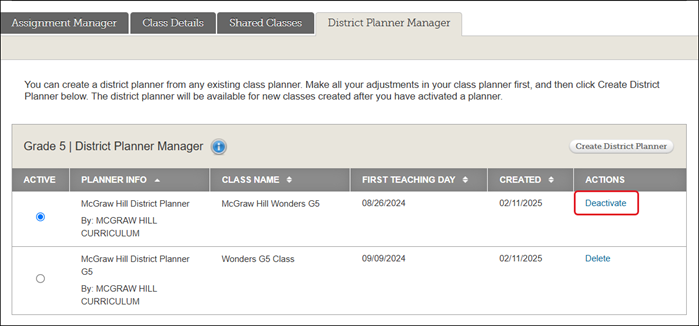
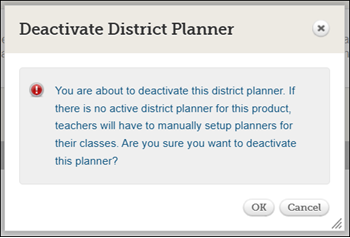
Deactivate a District Planner
If you no longer want to use a district planner for the product, you can deactivate it. If there is no active planner, teachers in the district will build their own planners during class creation. It is necessary that you at least deactivate, if not delete, the old district planner by July 31st to prevent any complications when teachers create their Wonders classes for the new school year.
Note: Deactivating a planner will not affect existing classes that use the planner.
1. On the District Planner Manager tab, click the Deactivate link to the right of the planner in the Actions column.
2. On the Deactivate District Planner pop-up, click the OK button to confirm.
Delete a District Planner
To remove an active district planner from the District Planner Manager tab, you would first need to deactivate the planner or make a different planner active.
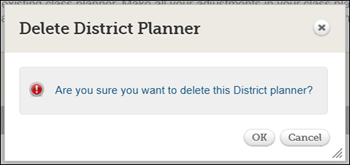
1. On the District Planner Manager tab, click the Delete link under the Actions column.
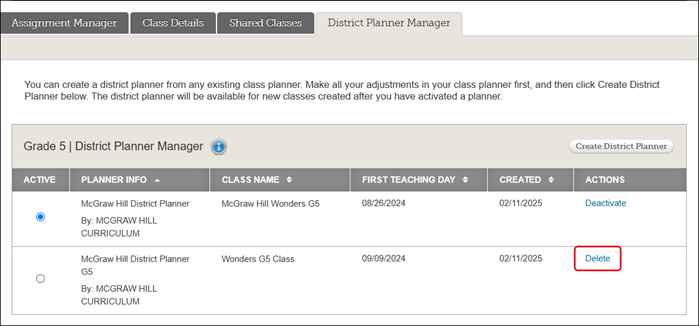
2. On the Delete District Planner pop-up, click the OK button to confirm.