
Create New Student Accounts Using the Students/Rosters Import Process
Learn how teachers create new student accounts using bulk upload templates and tools.
- Customer Support
- PreK-12
- Classroom Teacher
- Preschool
- Elementary School
- Middle School
- High School
- Direct Login & Manual-Rostering
- Core
- Intervention
- Supplemental
- AP, Honors & Electives
- Career & Technical Education
- Literacy
- Math
- Science
- Social Studies
- Health
- Visual & Performing Arts
- World Languages
- AP Biology
- AP Chemistry
- AP History & Geography
- AP Psychology
- AP Economics
- AP African American Studies
- AP Precalculus
- AP Statistics
- AP Computer Science
- AP Language and Composition
- AP Public Speaking
- AP Music Theory
- 5 Steps to a 5 - AP Test Prep
- Glencoe Health 2022
- Teen Health 2021
- Arrive Math
- Building Blocks 2024
- Building Blocks PreK 2025
- Number Worlds 2024
- SRA Reading Laboratory 2025
- SRA Reading Mastery Transformations
- Achieve3000 Literacy
- Actively Learn
- McGraw Hill Literacy Emerge!
- McGraw Hill Literacy Summit!
- McGraw Hill Literacy Soar!
- Open Court Reading 2025
- Redbird
- StudySync 2021
- ALEKS
- ALEKS Adventure
- CA Reveal Math (K-12)
- Illustrative Math
- Redbird Math
- Reveal Math (K-12)
- Texas Math
- CA Inspire Science 2020
- FL Science 2025 (K-12)
- Inspire Science 2020
- TN Science (K-12)
- TX Science 2025 (K-12)
- CA Impact 2019
- FL Social Studies 2024 (K-12)
- Impact Social Studies
- McGraw Hill Social Studies
- All Sorts 2026 (K-5)
- Asi se Dice 2024
- CTE - Health Science
- CTE - Computing and Technology
- CTE - Agriculture
- CTE - Culinary Arts
- CTE - Early Childhood Education
- CTE - Criminal Justice
- Glencoe Health 2014
- McGraw Hill Health 2014
- 2Inform
- Building Blocks 2015
- Connecting Math Concepts
- Number Worlds 2015
- Corrective Reading
- Early Interventions in Reading
- Spelling Mastery
- WonderWorks 2022 & 2014
- Maravillas 2020 & 2017
- OCR Foundational Skills Kit
- OCR Word Analysis Kit
- Open Court Reading 2016, 2018, 2023
- StudySync 2015 & 2017
- Wonders
- Wonders 2014
- Wonders 2023 2020 2017
- Wonders Balanced Literacy 2016
- Wonders EL 2016
- World of Wonders 2017
- Core Plus Math 2015
- Everyday Mathematics 4 (K-6)
- Glencoe Algebra 1 2014
- Glencoe Algebra 1 2018
- Glencoe Algebra 2 2014
- Glenoce Algebra 2 2018
- Glencoe Math
- Glencoe Geometry 2014
- Glencoe Geometry 2018
- Glencoe Math Course 1
- Glencoe Math Course 2
- Glencoe Math Course 3
- Glencoe Math Accelerated
- McGraw Hill My Math
- McGraw Hill My Math 2013 & 2016
- McGraw Hill My Math 2018
- Pre-Algebra 2012
- Glencoe Science 2017
- Glencoe Science
- Inspire Science 2017
- iScience 2017
- Networks
- Networks 2014 (K-5)
- Networks 2014 & 2016
- Networks 2018
- Music! Its Role
- Spotlight on Music
- Asi se Dice 2016
- CTE - Business, Marketing, and Finance
- Level Up K–5
- Level Up 6–8
- Level Up 9–12
- Getting Started & Orientation
- Account Management
- User Management
- Back-to-School Setup
- Class Management
- Log-In & Passwords
- Tools & Resources


Direct Login and Manual Rostering
This article applies to Direct Login and Manual Rostering districts.
Direct Login means that teachers, students, and administrators log in at my.mheducation.com.
Manual Rostering means that teachers redeem their own program content and roster their own classes.
Not sure which Access Service your district uses? View the Access Service Descriptions article to learn more about the four Access Services that we support.
View the demo in a separate tab.
View the Spanish version of the demo.
To prevent the creation of duplicate student accounts:
- Check with your school administrator to see if they have already imported your students to your school’s roster or if they plan to.
- We highly recommend that administrators add students to the system to prevent student account duplication.
- You can export a student list directly from the Import Students/Rosters page to see which students already have accounts at your school.
- Use the student’s official school or district ID and email address (if available) when creating their accounts.
Once student accounts are created, teachers can manually add the students to classes using the following resources, depending on the program being used:
Article Content
Enter New Student Info
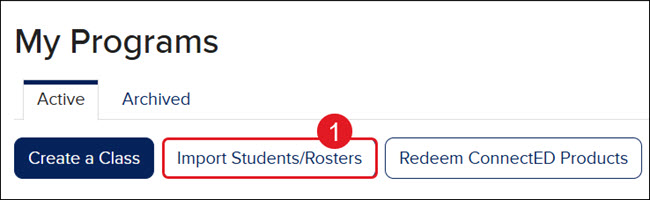
- From your My Programs page, click the Import Students/Rosters button.
Important! If you are connected to multiple schools, click on the Profile button at the top-right of your account and select the correct school from the Organization section of the menu.
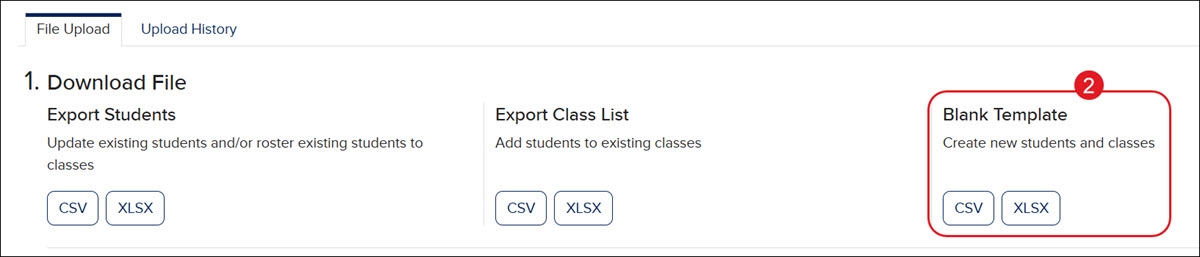
- Download the preferred file format for the Blank Template. If you do not have Excel, download the CSV version.
Note: This tool does not allow the use of Google Sheets.
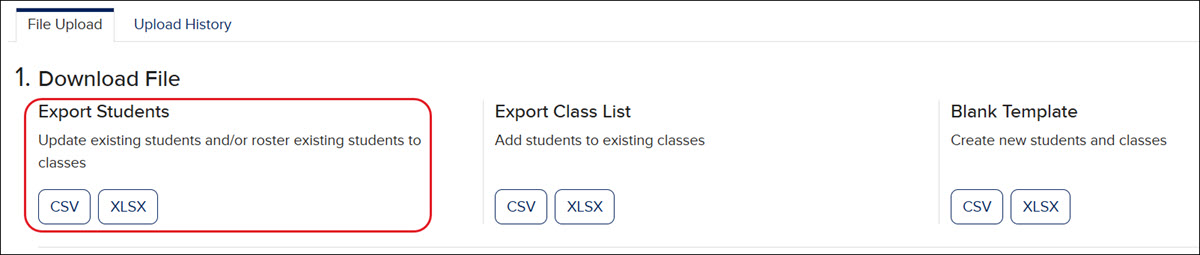
We highly recommend downloading the Export Students file to verify that students do not yet have an account created to avoid creating duplicate accounts.
- For every new student you need to roster, you must enter a Student ID, First Name, and Last Name.
To ensure you are completing each field correctly, we recommend having the Students/Rosters Import Process Template Instructions open as well.

- Enter a Grade Level for every student. We recommend entering an Email for each student if they have one is assigned to them. These are both optional fields.

- Entering a Username and Password for each student is optional. The system will generate a username and temporary password for each student if you leave these fields blank.

- Leave the User GUID field blank, as the system will generate one for each new student.

- Save the roster file somewhere easy to locate on your device.
Upload Students/Rosters File
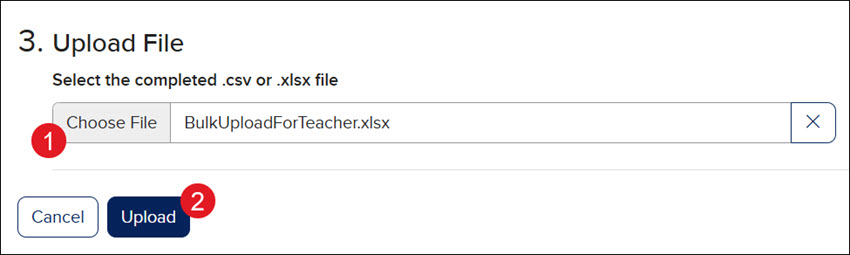
- On the Import Students/Rosters page, click the Choose File button and select the completed copy of the template from your computer.
- Click the Upload button.
The page will automatically navigate to the Upload History page. Depending on how large the file is, the time will vary during the upload process.
The Status of your import shows its current stage of processing:
- Queued means that the import will be processed as soon as possible but has not started yet.
- In Progress means that the import has started processing.
- Completed means the file was uploaded with all entered data.
- Completed with Errors means that some data was unable to be uploaded.
To check the status of your import, click the Refresh button at the top left.

Click Options in the Actions column to Download Original File, Completed File, or the Error File.
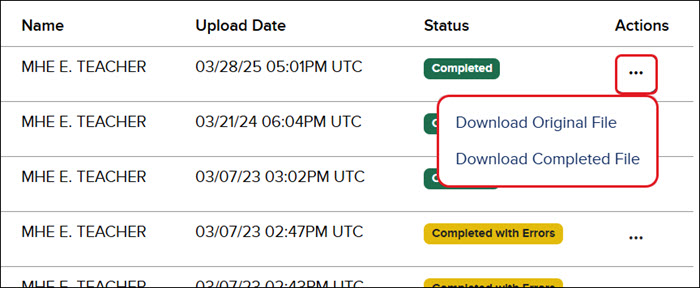
- The Uploaded File is the exact file that you uploaded (minus account passwords if you included those on your original file). It's available so that you can access it later if needed.
- The Completed File is a summary of all student and class information that was processed successfully.
- Each account created via the import process now has a system-generated User GUID.
- If you left the username and password columns blank, the file contains the system-generated usernames along with a temporary password for each account.
- The temporary password will expire when it is initially used; the student will be required to set their own permanent custom password once they log in to their account
- If the student(s) don't access their account within 90 days of the temporary password being set, an administrator or teacher will need to manually reset their password.
- Share the username (and password, if applicable) on this file with your students so they can access their accounts.
- The Error File is a summary of the students and/or classes that did not process successfully. It shows the rows that triggered the error and the specific reason why these rows failed in the Error column on the far right.
- If the data was partially processed and a student and/or class was created, the Error file will include the relevant GUIDs for those student(s) and/or class(es).
- You can review the error message(s) and correct the information. Correct the issues described in the error message, save the updated file to your computer, and re-import it.
- You do not need to remove the Error column from the file to re-import it.
- Refer to the Students/Rosters Import Errors and Resolution Steps document for details on each error received and how to resolve them.
