Wonders/Maravillas - StudySync Blasts
Explore how StudySync Blasts are used in Wonders and Maravillas instruction.
Tags
- Getting Started & Orientation
- Literacy
- SSO & Manual-Rostering
- Customer Support
- Direct Login & Auto-Rostering
- Maravillas 2020 & 2017
- Tools & Resources
- Core
- Direct Login & Manual-Rostering
- Classroom Teacher
- Wonders 2023 2020 2017
- SSO & Auto-Rostering
- PreK-12
- Preschool
- Elementary School


StudySync Blasts engage students in critical thinking activities. By integrating the knowledge they've gained throughout the week, students will respond to fun, thought-provoking questions that will enhance their reading, writing, and research skills through a digital platform.
Note: StudySync Blasts are only available for Wonders Grades 2-6/copyrights 2020 and 2023.
If students are receiving a message when they launch into their StudySync Blast assignment that they do not yet have access, this means that the teacher has not yet accessed the StudySync site as a teacher. To do so, the teacher needs to click on any of the available StudySync Blast resources.

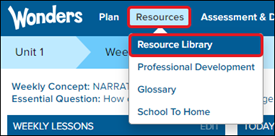
2. Hover over Resources in the Navigation Menu. Select Resource Library from the drop-down menu.
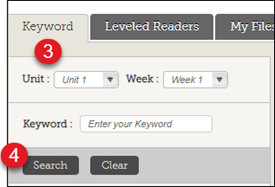
3. On the Keyword tab, select the Unit and Week you want the StudySync Blast for.
4. Click the Search button to filter the resources to your selection.
Note: If the grade level of material you are accessing has 10 days of lessons, the Blasts are only found for the first of the two weeks of lessons. This means that the Blasts can be found for Weeks 1, 3, and 5 for each Unit.
Example: Unit 1 Week 1 has Weekly Lessons for Days 1-5, while Unit 1 Week 2 has Weekly Lessons for Days 6-10. You will want to select Unit 1 Week 1 from the drop-down menus to find the StudySync Blasts.
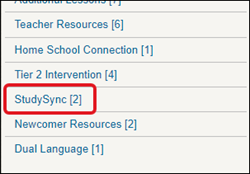
5. Click on StudySync from the resource filter menu.
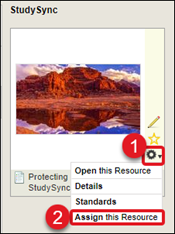
2. Select Assign this Resource from the drop-down menu. The page will then navigate automatically to the Assignment Manager. The resource will be added to the Resources section on the right of the page.
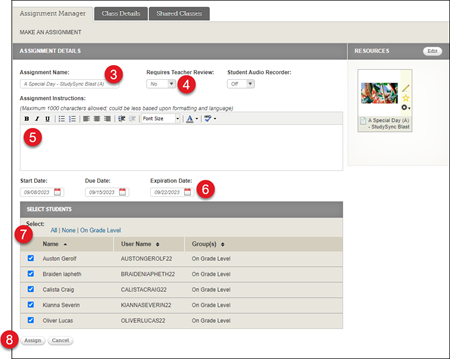
3. Enter an Assignment Name.
4. Select an option from the Requires Teacher Review drop-down. The default is set to No.
5. Enter any Assignment Instructions for the students you want them to follow.
6. Select a Start Date, Due Date, and Expiration Date by clicking on the Calendar icon for each field.
7. Click the check box next to the student(s) you want to assign the resource to.
8. Click the Assign button.
For steps on how to assign the resource directly from the Assignment Manager, or for steps on how to view and grade the assignment, follow the Wonders/Maravillas - Assignment Management document.
Note: StudySync Blasts are only available for Wonders Grades 2-6/copyrights 2020 and 2023.
If students are receiving a message when they launch into their StudySync Blast assignment that they do not yet have access, this means that the teacher has not yet accessed the StudySync site as a teacher. To do so, the teacher needs to click on any of the available StudySync Blast resources.
Locating the StudySync Blasts:
1. Click on the Teacher Edition of Wonders
2. Hover over Resources in the Navigation Menu. Select Resource Library from the drop-down menu.
3. On the Keyword tab, select the Unit and Week you want the StudySync Blast for.
4. Click the Search button to filter the resources to your selection.
Note: If the grade level of material you are accessing has 10 days of lessons, the Blasts are only found for the first of the two weeks of lessons. This means that the Blasts can be found for Weeks 1, 3, and 5 for each Unit.
Example: Unit 1 Week 1 has Weekly Lessons for Days 1-5, while Unit 1 Week 2 has Weekly Lessons for Days 6-10. You will want to select Unit 1 Week 1 from the drop-down menus to find the StudySync Blasts.
5. Click on StudySync from the resource filter menu.
Assigning the StuySync Blasts:
1. On the resource tile, click the Tools icon (gear symbol).2. Select Assign this Resource from the drop-down menu. The page will then navigate automatically to the Assignment Manager. The resource will be added to the Resources section on the right of the page.
3. Enter an Assignment Name.
4. Select an option from the Requires Teacher Review drop-down. The default is set to No.
5. Enter any Assignment Instructions for the students you want them to follow.
6. Select a Start Date, Due Date, and Expiration Date by clicking on the Calendar icon for each field.
7. Click the check box next to the student(s) you want to assign the resource to.
8. Click the Assign button.
For steps on how to assign the resource directly from the Assignment Manager, or for steps on how to view and grade the assignment, follow the Wonders/Maravillas - Assignment Management document.