Create and Roster StudySync 2015/2017 Classes
Create or remove classes in StudySync 2015 to manage enrollment and organize instructional sections.
- Getting Started & Orientation
- Literacy
- SSO & Manual-Rostering
- Customer Support
- Direct Login & Auto-Rostering
- StudySync 2015 & 2017
- Middle School
- Core
- Class Management
- Direct Login & Manual-Rostering
- High School
- Classroom Teacher
- SSO & Auto-Rostering
- PreK-12


For steps on how to create a StudySync class on the Open Learning Platform, read the article: Open Learning Platform - Class Management.
To be able to see your classes within StudySync, you first have to follow the steps of creating and rostering the classes.
Article Contents:
Creating a StudySync Class
Editing a StudySync Class
Deleting a StudySync Class
Add Students
Remove Students
Creating a StudySync Class
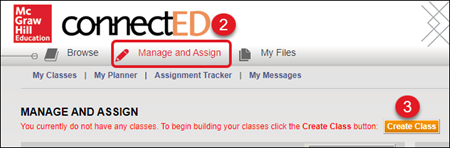
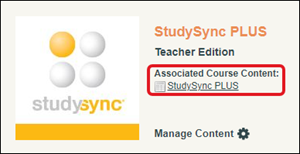
1. Click on the program icon or the Associated Course Content link.

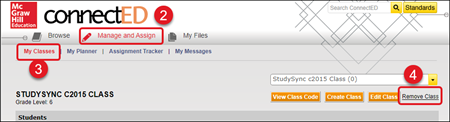
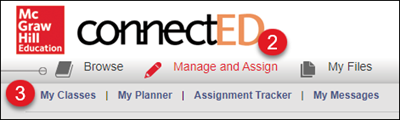
2. Click on Manage & Assign from the Navigation Menu bar.
3. Click the Create Class button.
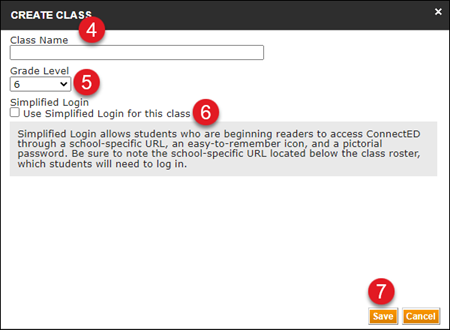
4. In the Create Class pop-up, enter a Class Name.
5. Select the Grade Level of the class.
6. Check the box if you would like to use Simplified Login. This is usually recommended for lower grade levels.
7. Click the Save button.
Editing a StudySync Class
1. Click on the program icon or the Associated Course Content link.

2. Click on Manage & Assign from the Navigation Menu bar.
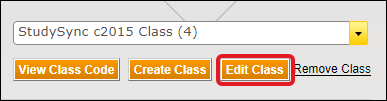
3. Click My Classes from the second menu bar.
4. Click the Edit Class button.
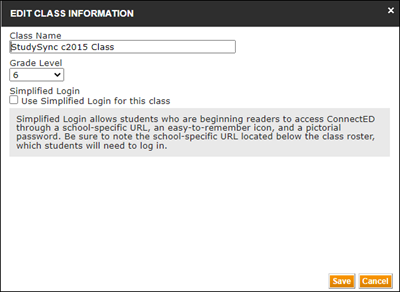
5. In the Edit Class Information pop-up, enter the Class Name and change the Grade Level, if desired.
6. Click the Save button.
Delete a StudySync Class
1. Click on the program icon or the Associated Course Content link.
2. Click on Manage & Assign from the Navigation Menu bar.
3. Click My Classes from the second menu bar.
4. Click the Remove Class link to the right.
Note: If you need to add or remove additional classes, or add and remove students from the class, you will need to do so from the Manage & Assign page.
Add Students to Class
1. Click on the program icon or the Associated Course Content link.

2. Click on Manage & Assign from the Navigation Menu bar.

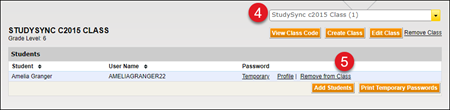
3. Click on the Add Students button in the Students box at the bottom
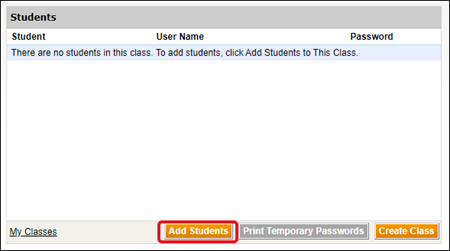
Or you can click on My Classes and then the Add Students button.
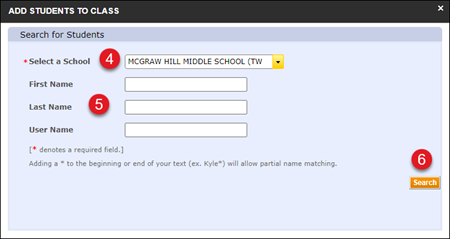
4. In the Search for Students pop-up, Select the School the students are associated with.
5. Enter the student's First Name, Last Name, and/or User Name.
6. Click the Search button.
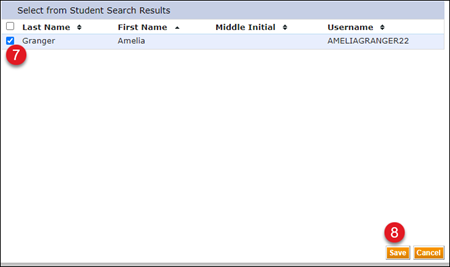
7. Click the check box next to the student you want to add to the class.
8. Click the Save button.
Repeat these steps to add all students to the class.
Remove Students from Class
1. Click on the program icon or the Associated Course Content link.

2. Click on Manage & Assign from the Navigation Menu bar.
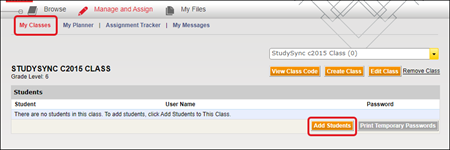
3. Click on My Classes in the second menu.
4. If you have more than one class, select the class the student is associated with.
5. Click the Remove from Class link to the right of the student's name.
6. In the Remove Student pop-up, click the OK button to confirm.