Explore the presentation player used in the student experience for viewing lesson content.
Tags
SSO & Manual-Rostering
Customer Support
Middle School
Direct Login & Manual-Rostering
High School
School Parent
SSO & Auto-Rostering
PreK-12
Elementary School
World Languages
Math
Health
Literacy
Social Studies
Direct Login & Auto-Rostering
School Student
Core
AP, Honors & Electives
Middle School Student
High School Student
Science
Preschool
AP Biology
AP Chemistry
AP History & Geography
AP Psychology
AP Economics
AP African American Studies
AP Precalculus
AP Statistics
AP Computer Science
AP Language and Composition
AP Public Speaking
AP Music Theory
5 Steps to a 5 - AP Test Prep
Glencoe Health 2022
Teen Health 2021
Arrive Math
Building Blocks 2024
Building Blocks PreK 2025
Number Worlds 2024
SRA Reading Laboratory 2025
SRA Reading Mastery Transformations
Open Court Reading 2025
CA Reveal Math (K-12)
Illustrative Math
Reveal Math (K-12)
Texas Math
CA Inspire Science 2020
FL Science 2025 (K-12)
Inspire Science 2020
TN Science (K-12)
TX Science 2025 (K-12)
CA Impact 2019
FL Social Studies 2024 (K-12)
Impact Social Studies
McGraw Hill Social Studies
All Sorts 2026 (K-5)
Asi se Dice 2024
CTE - Health Science
CTE - Agriculture
CTE - Computing and Technology
CTE - Culinary Arts
CTE - Early Childhood Education
CTE - Business, Marketing, and Finance
CTE - Criminal Justice
Dashboard & Navigation Overview
Student Resources
Share:
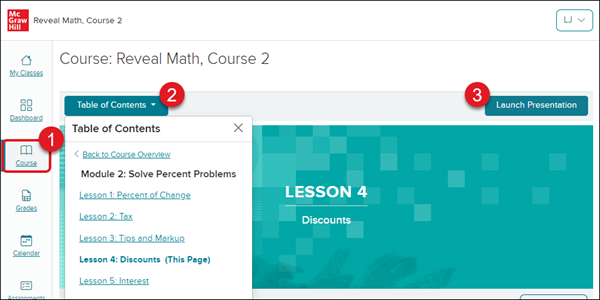
Access Presentation
1. After launching your Open Learning class, click on Course in the Navigation menu.
2. Select the correct Unit/Chapter and Lesson from the Table of Contents.
3. Click the Launch Presentation button to the right of the page.
Note: Not all courses, units/chapters, and lessons will have a presentation available.
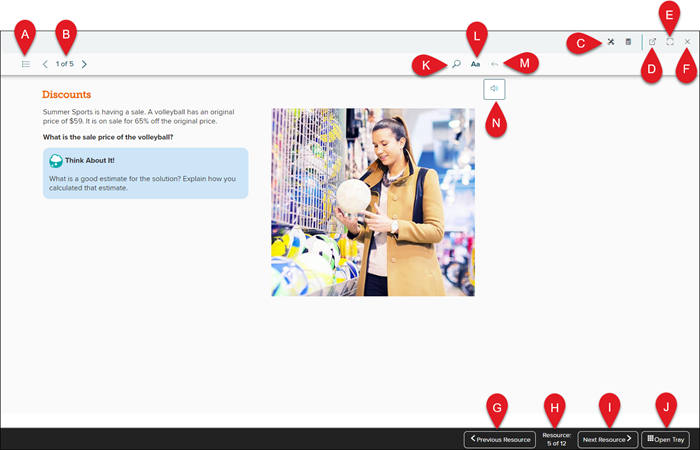
Presentation Player Navigation
A. Table of Contents - if there is more than one page within a Resource slide, you can use the Contents tab to navigate quickly to a different page of the slide. You can also access any Highlights, Notes, and Placemarks.
B. Resource Navigation - if there is more than one page within a Resource slide, you will be able to navigate between the pages by using the back-and-forth arrows.
C. Presentation Tools - some presentations will provide you with additional tools to use, such as a calculator.
D. Open in New Tab - click the icon to open the presentation in a secondary browser tab.
E. Open/Exit Full Screen - click the icon to open or exit full-screen mode for the presentation.
F. Close - click the X icon to close out of the presentation.
G. Previous Resource - click to navigate to the previous Resource page.
H. Resource Page - this will show what Resource page you are currently on and how many pages are within the presentation.
I. Next Resource - click to navigate to the next Resource page.
J. Open Tray - click to open the Resource page tray and quickly navigate to a different page.
K. Search - use to search for particular terms within the presentation.
L. Font Size - click to increase or decrease font size.
M. Go to Previous Location - if there is more than one page within a Resource slide, click to navigate to the previous resource slide you were on.
N. Audio Player - click to have the presentation slide read aloud.
Presentation Tools
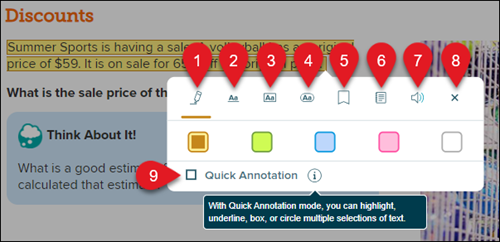
Select text within the presentation page to open the presentation tools menu.
1. Highlighter Text
2. Underline Text
3. Box Text
4. Circle Text
5. Add Placemark
6. Add Note
7. Play Audio of Selected Text
8. Close Toolbar
9. Quick Annotation - allows you to highlight, underline, box, or circle multiple selections of text.
Choose the desired color for the selected option for highlights, underline, box, and circle. Selecting the white box option to the far right will remove the highlight, underline, box, or circle. All highlights, underlines, boxes, circles, placemarks, and notes can be found under the Contents option at the top left of the presentation.
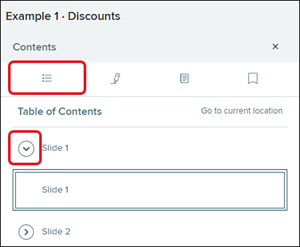
Presentation Contents
Table of Contents
Select the Table of Contents tab to access a list of all the Resource slides within the presentation. Click the arrow to the left of each slide to expand the section to navigate to any additional pages within the one resource page.
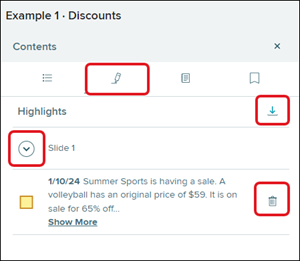
Highlights
Select the Highlights tab to access a list of all highlights made within the presentation. Click the arrow to expand a Slide section, the download button to download all highlights made, and the trash can icon to delete a highlight.
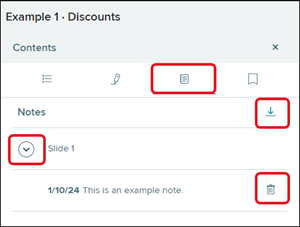
Notes
Select the Notes tab to access a list of all notes saved within the presentation. Click the arrow to expand a Slide section, the download button to download all notes made, and the trash can icon to delete a note.
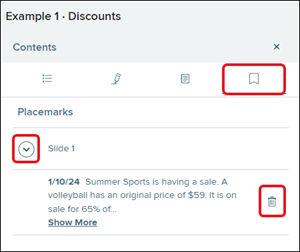
Placemarks
Select the Placemarks tab to access a list of all notes saved within the presentation. Click the arrow to expand a Slide section and the trash can icon to delete a note.
ap-edition
5-steps-to-a-5-test-prep
glencoe-health
teen-health
arrive-math
building-blocks
number-worlds
reading-laboratory
reading-mastery
open-court-reading
reveal-math
illustrative-math
mcgraw-hill-math
inspire-science
mcgraw-hill-science
impact
mh-social-studies
all-sorts
asi-se-dice
mcgraw-hill-cte
school-parent
student
prek-12
SSO & Manual-Rostering, Customer Support, Middle School, Direct Login & Manual-Rostering, High School, School Parent, SSO & Auto-Rostering, PreK-12, Elementary School, World Languages, Math, Health, Literacy, Social Studies, Direct Login & Auto-Rostering, School Student, Core, AP, Honors & Electives, Middle School Student, High School Student, Science, Preschool, AP Biology, AP Chemistry, AP History & Geography, AP Psychology, AP Economics, AP African American Studies, AP Precalculus, AP Statistics, AP Computer Science, AP Language and Composition, AP Public Speaking, AP Music Theory, 5 Steps to a 5 - AP Test Prep, Glencoe Health 2022, Teen Health 2021, Arrive Math, Building Blocks 2024, Building Blocks PreK 2025, Number Worlds 2024, SRA Reading Laboratory 2025, SRA Reading Mastery Transformations, Open Court Reading 2025, CA Reveal Math (K-12), Illustrative Math, Reveal Math (K-12), Texas Math, CA Inspire Science 2020, FL Science 2025 (K-12), Inspire Science 2020, TN Science (K-12), TX Science 2025 (K-12), CA Impact 2019, FL Social Studies 2024 (K-12), Impact Social Studies, McGraw Hill Social Studies, All Sorts 2026 (K-5), Asi se Dice 2024, CTE - Health Science, CTE - Agriculture, CTE - Computing and Technology, CTE - Culinary Arts, CTE - Early Childhood Education, CTE - Business, Marketing, and Finance, CTE - Criminal Justice, Dashboard & Navigation Overview, Student Resources
dts
2026-03-24T18:31:31.396-03:00
Access Presentation 1. After launching your Open Learning class, click on Course in the Navigation menu. 2. Select the correct Unit/Chapter and Lesson from the Table of Contents. 3. Click the Launch Presentation button to the right of the page. Note: Not all courses, units/chapters, and lessons will have a presentation available. Presentation Player Navigation A. Table of Contents - if there is more than one page within a Resource slide, you can use the Contents tab to navigate quickly to a different page of the slide. You can also access any Highlights, Notes, and Placemarks. B. Resource Navigation - if there is more than one page within a Resource slide, you will be able to navigate between the pages by using the back-and-forth arrows. C. Presentation Tools - some presentations will provide you with additional tools to use, such as a calculator. D. Open in New Tab - click the icon to open the presentation in a secondary browser tab. E. Open/Exit Full Screen - click the icon to open or exit full-screen mode for the presentation. F. Close - click the X icon to close out of the presentation. G. Previous Resource - click to navigate to the previous Resource page. H. Resource Page - this will show what Resource page you are currently on and how many pages are within the presentation. I. Next Resource - click to navigate to the next Resource page. J. Open Tray - click to open the Resource page tray and quickly navigate to a different page. K. Search - use to search for particular terms within the presentation. L. Font Size - click to increase or decrease font size. M. Go to Previous Location - if there is more than one page within a Resource slide, click to navigate to the previous resource slide you were on. N. Audio Player - click to have the presentation slide read aloud. Presentation Tools Select text within the presentation page to open the presentation tools menu. 1. Highlighter Text 2. Underline Text 3. Box Text 4. Circle Text 5. Add Placemark 6. Add Note 7. Play Audio of Selected Text 8. Close Toolbar 9. Quick Annotation - allows you to highlight, underline, box, or circle multiple selections of text. Choose the desired color for the selected option for highlights, underline, box, and circle. Selecting the white box option to the far right will remove the highlight, underline, box, or circle. All highlights, underlines, boxes, circles, placemarks, and notes can be found under the Contents option at the top left of the presentation. Presentation Contents Table of Contents Select the Table of Contents tab to access a list of all the Resource slides within the presentation. Click the arrow to the left of each slide to expand the section to navigate to any additional pages within the one resource page. Highlights Select the Highlights tab to access a list of all highlights made within the presentation. Click the arrow to expand a Slide section, the download button to download all highlights made, and the trash can icon to delete a highlight. Notes Select the Notes tab to access a list of all notes saved within the presentation. Click the arrow to expand a Slide section, the download button to download all notes made, and the trash can icon to delete a note. Placemarks Select the Placemarks tab to access a list of all notes saved within the presentation. Click the arrow to expand a Slide section and the trash can icon to delete a note.
Top
Regional Page Available
It looks like you're outside the United States. Do you want to see your regional version of this page?