Music Studio - Class Management
Get started with Voices in Concert using this initial training guide.
- Visual & Performing Arts
- Getting Started & Orientation
- SSO & Manual-Rostering
- Customer Support
- Direct Login & Auto-Rostering
- Middle School
- Core
- Class Management
- Direct Login & Manual-Rostering
- Spotlight on Music
- High School
- Classroom Teacher
- SSO & Auto-Rostering
- PreK-12
- Preschool
- Elementary School
- Music! Its Role


This article walks teachers through creating, rostering, editing, and deleting a class, as well as managing student passwords within Music Studio.
Article Contents
Create a Class
1. Launch Music Studio.
2. Click Menu at the top-left.
3. Click Class Management from the menu.
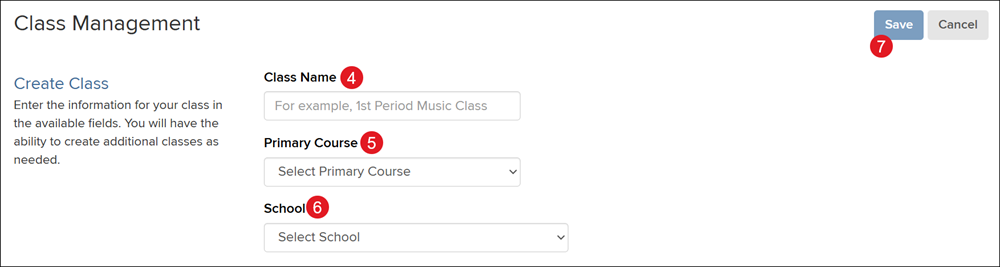
4. Enter a Class Name.
5. Select a Primary Course from the drop menu.
Note: If a lower grade level, such as PreK is selected, Simplified Login is automatically selected for the course. Simplified Login allows students who are beginning readers to access ConnectED through a school-specific URL, an easy-to-remember icon and a pictorial password. Be sure to note the school-specific URL, which students will need in order to log in.
Select a Simplified Login Icon (A) for the class. Click the Simplified Login checkbox (B) to turn it off.
6. Select a School from the drop menu.
7. Click the Save button.
To create additional classes, click the Create Class button.
Important! If you provided students with the Class Code, you will not need to manually roster the students to the class.
1. Launch Music Studio.
2. Click Menu at the top-left.
3. Click Class Management from the menu.
4. Click on the Class Name from the list.
Due to how the Music Studio program is designed, if you have multiple grade levels assigned to your account, you can access all of your classes from within a single grade level teacher edition for easier navigation.
5. Click the Add Student button.
6. Select a School from the drop menu if assigned to multiple schools.
7. Enter a First Name, Last Name, and/or User Name in the provided fields.
Note: Adding a * to the beginning or end of your text (ex. Kyle*) will allow partial matching.
8. Click the Search button.
If the student you need to add to the class does not show in the list to select this means that the student is already in the class, assigned to a different school, or does not yet have an account created.
9. Check the box to the left of each student name.
10. Click the Add button.
Follow these steps for each student you need to add to the class.
11. Click the Cancel button to navigate back to the main Class Management page for the selected class.
Click the trash can icon to the right of a student to remove them from the class roster. Keep in mind, this will also remove any work they have completed.

Password Management
Refer to the Password Policy article for password requirements.
1. Launch Music Studio.
2. Click Menu at the top-left.
3. Click Class Management from the menu.
4. Click on the Class Name from the list.
Due to how the Music Studio program is designed, if you have multiple grade levels assigned to your account, you can access all of your classes from within a single grade level teacher edition for easier navigation.
To set a new permanent password, click the Edit Password link to the right of the student.
Note: Changing the student's password changes it for all classes.
Enter the preferred Permanent Password and click Save to confirm.
Click the Print Temporary Passwords button to print a temporary password for each student on the roster.
Note: If a student enters a temporary password that has been provided, this will override their permanent password and they will be required to create a new password.
1. Launch Music Studio.
2. Click Menu at the top-left.
3. Click Class Management from the menu.
4. Click the Edit Class Details link to the right of the class.

You can also access the class details page by clicking on the Class Name and then clicking the Edit Class Details button.
5. Make preferred changes to the Class Name and/or Simplified Login.
Note: The Simplified Login option only shows for the lower grade levels.
If you need to make changes to the Primary Course or School, a new class will need to be created.
6. Click the Save button to confirm changes.
1. Launch Music Studio.
2. Click Menu at the top-left.
3. Click Class Management from the menu.
4. Click the trash can icon to the right of the class name.
5. Click the OK button on the pop-up to confirm.
