Create Bulk Open Learning Assignments
Create assignments in bulk to quickly and easily assign multiple resources to students at once.
Tags
- Customer Support
- PreK-12
- Classroom Teacher
- Preschool
- Elementary School
- Middle School
- High School
- Direct Login & Auto-Rostering
- Direct Login & Manual-Rostering
- SSO & Auto-Rostering
- SSO & Manual-Rostering
- Core
- Intervention
- Supplemental
- AP, Honors & Electives
- Career & Technical Education
- Literacy
- Math
- Science
- Social Studies
- Health
- Visual & Performing Arts
- World Languages
- AP Biology
- AP Chemistry
- AP History & Geography
- AP Psychology
- AP Economics
- AP African American Studies
- AP Precalculus
- AP Statistics
- AP Computer Science
- AP Language and Composition
- AP Public Speaking
- AP Music Theory
- 5 Steps to a 5 - AP Test Prep
- Glencoe Health 2022
- Teen Health 2021
- Arrive Math
- Building Blocks 2024
- Building Blocks PreK 2025
- Number Worlds 2024
- SRA Reading Laboratory 2025
- SRA Reading Mastery Transformations
- McGraw Hill Literacy Emerge!
- McGraw Hill Literacy Summit!
- McGraw Hill Literacy Soar!
- Open Court Reading 2025
- CA Reveal Math (K-12)
- Illustrative Math
- Reveal Math (K-12)
- Texas Math
- CA Inspire Science 2020
- FL Science 2025 (K-12)
- Inspire Science 2020
- TN Science (K-12)
- TX Science 2025 (K-12)
- CA Impact 2019
- FL Social Studies 2024 (K-12)
- Impact Social Studies
- McGraw Hill Social Studies
- Asi se Dice 2024
- CTE - Health Science
- CTE - Computing and Technology
- CTE - Agriculture
- CTE - Culinary Arts
- CTE - Early Childhood Education
- CTE - Criminal Justice
- CTE - Business, Marketing, and Finance
- Level Up K–5
- Level Up 6–8
- Level Up 9–12
- Grades & Assignments


View the demo in a separate tab.
View the Spanish version of the demo.
- SSO or sign in at my.mheducation.com.
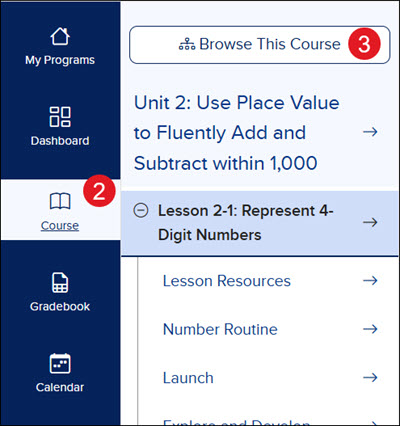
- Click on Course from the navigation menu.
- Click Browse This Course and select the lesson you want to assign resources from.
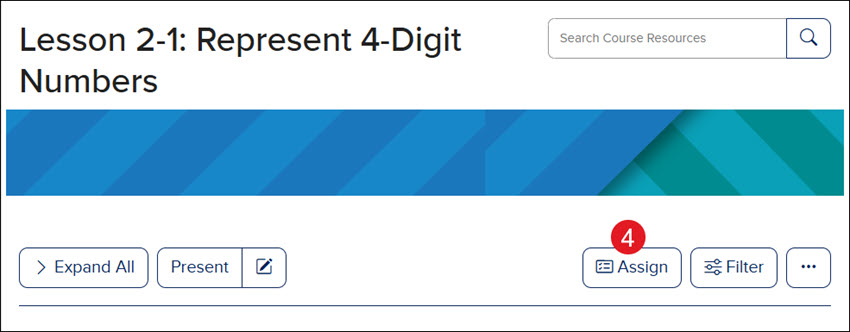
- Click the Assign button at the top-right of the lesson page.
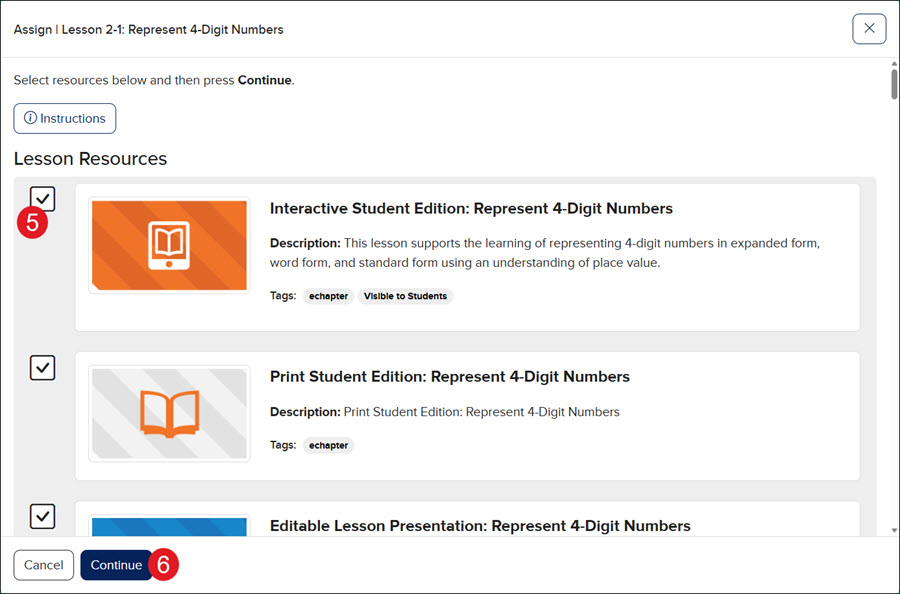
- Check the box next to the resources you want to assign.
- Click the Continue button.
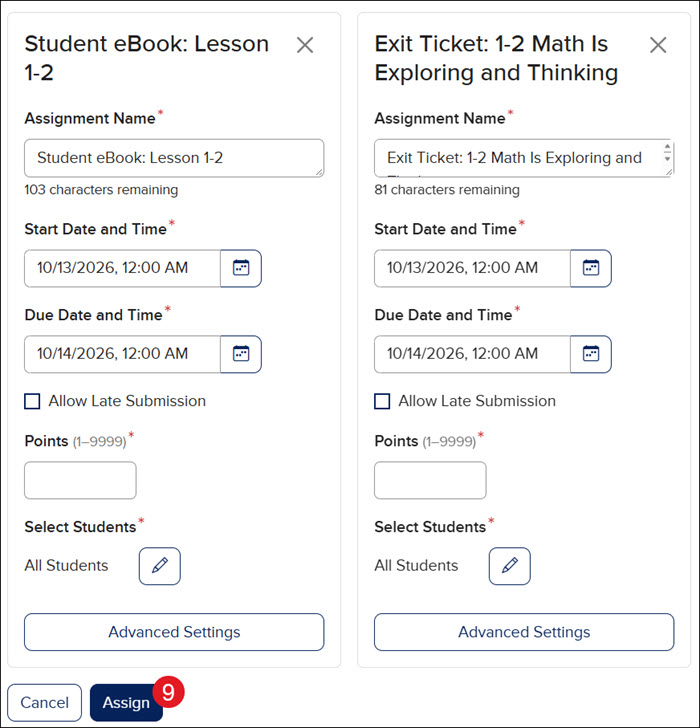
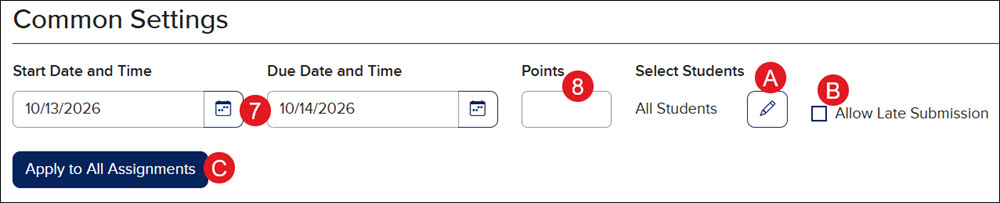
The following can be selected at once and applied to all selected resources, or they can be selected on the individual resource tiles:
- Select the Start and Due Date and Time.
- Enter the number of Points for the assignments.
A. The assignment defaults to all students being assigned. Click the Edit (pencil) button to select specific students.
B. If you would like students to be able to submit past the End Date and Time, check the Allow Late Submission box.
C. If applying settings to all resource assignments, click the Apply to All Assignments button.
All assignments:
Individual assignments:
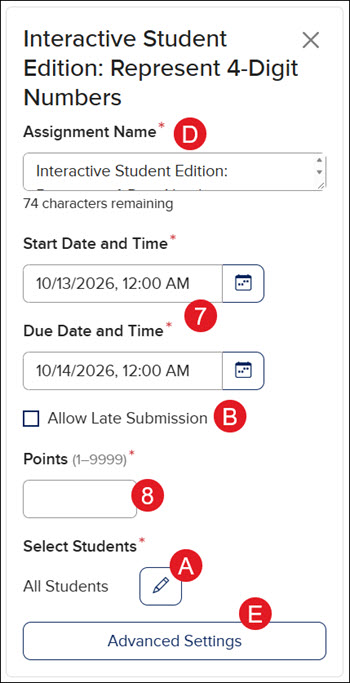
D. For individual assignments, enter an Assignment Name if you would like to change it from the default name.
E. Click Advanced Settings to select additional assignment options for each individual resource assignment. The Advanced Settings are optional.
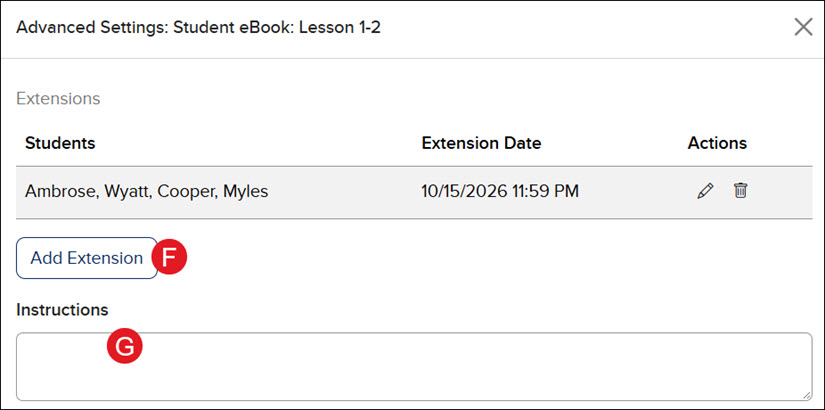
The following are settings available within the Advanced Settings:
F. Click Add Extension to provide specific students with a different end date and time.
- To Edit the Students and/or Extension Date provided, click the pencil icon.
- To Delete the provided extension, click the trash can icon.
G. Add any Instructions you want students to have for the assignment.
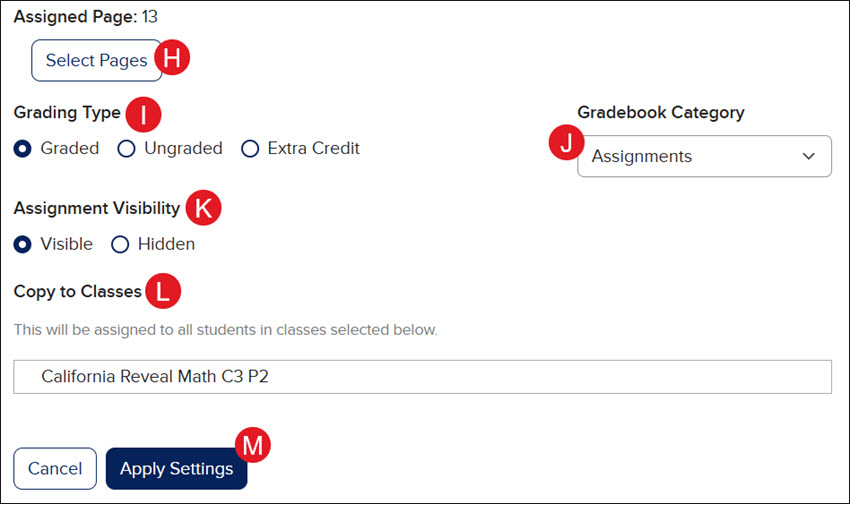
H. If it's an eBook assignment, click the Select Pages button to adjust the pages that are assigned.
On the pop-up, navigate to the first page you want to assign and click the Set Start Page button. Then, navigate to the last page you want to assign and click the Set End Page button. Click the Apply Settings button.
Ex: You want to assign pages 13-15 - navigate to page 13 and click the Set Start Page button, then navigate to page 15 and click the Set End Page button.
I. Select the Grading Type.
J. Select the Gradebook Category.
To add additional categories, refer to the Access and Navigate the Open Learning Gradebook article.
K. Select the Assignment Visibility.
Note: If Hidden is selected, students will be unable to see and access the assignment.
L. If you have more than one class created for the same program, you can also select classes to share the assignment with in the Copy to Classes section. Select the Start and End date and time for the assignment for each additional class you selected.
N. Click the Apply Settings button.
- Click Assign at the bottom.