Networks - My Files
Learn how to upload files in Networks 2017 to share resources with students.
Tags
- Getting Started & Orientation
- SSO & Manual-Rostering
- Customer Support
- Social Studies
- Direct Login & Auto-Rostering
- Tools & Resources
- Middle School
- Core
- Direct Login & Manual-Rostering
- High School
- Classroom Teacher
- Networks 2018
- SSO & Auto-Rostering
- PreK-12
- Networks 2014 2016


The My Files option allows you to upload your own resource files to use for class and assignments.
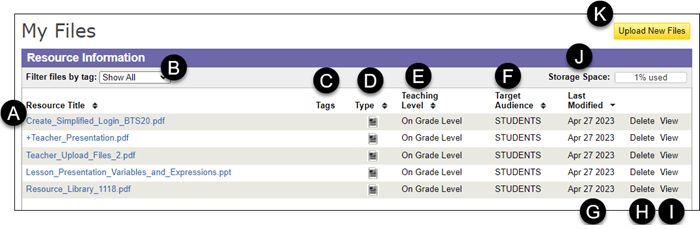
A. Click the file name to see more information about the file.
B. If you have added a Tag to the uploaded resource files, you can then filter the files by the Tag assigned.
C. The Tags column provides the tag that is assigned to the resource file. You can also filter the resources by the Tag column by clicking on the arrows to the right of the Tags title.
D. Hover over the Document icon in the Type column to view the type of file that has been uploaded.
E. The Teaching Level column shows the level that is assigned to the resource file.
F. The Target Audience column shows who the resource is directed to. To be able to assign the resource file to students, the Target Audience needs to be assigned to the Students option.
G. The Last Modified date shows the date the resource file was last edited.
H. Click the Delete link to remove the file from the program.
I. Click the View link to open the resource file.
J. The Storage Space shows the amount of space that has been used based on the size of resource files uploaded.
K. Click the Upload New Files button to add new resource files to the program.
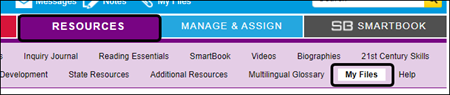
1. Click on the My Files link above the Navigation Menu of the course.

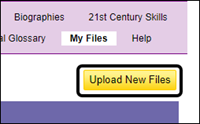
2. Click the Upload New Files button to the right of the page.
3. On the Upload to My Files upload, click the Select File button at the bottom.
You can also drag and drop the file into the middle area of the pop-up.
4. After the file is selected, click the Upload button.
Note: For the upload to succeed, the file name cannot have any space characters.
5. Once the file uploads successfully, click the Done button.

Navigate My Files Page
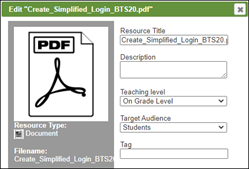
A. Click the file name to see more information about the file.
- You can also change the Resource Title, add a Description, change the Teaching Level, switch the Target Audience, and add a Tag to the resource file.
B. If you have added a Tag to the uploaded resource files, you can then filter the files by the Tag assigned.
C. The Tags column provides the tag that is assigned to the resource file. You can also filter the resources by the Tag column by clicking on the arrows to the right of the Tags title.
D. Hover over the Document icon in the Type column to view the type of file that has been uploaded.
E. The Teaching Level column shows the level that is assigned to the resource file.
F. The Target Audience column shows who the resource is directed to. To be able to assign the resource file to students, the Target Audience needs to be assigned to the Students option.
G. The Last Modified date shows the date the resource file was last edited.
H. Click the Delete link to remove the file from the program.
I. Click the View link to open the resource file.
J. The Storage Space shows the amount of space that has been used based on the size of resource files uploaded.
K. Click the Upload New Files button to add new resource files to the program.
Upload New File
1. Click on the My Files link above the Navigation Menu of the course.
My Files can also be found under the
Resources tab.
2. Click the Upload New Files button to the right of the page.
3. On the Upload to My Files upload, click the Select File button at the bottom.
You can also drag and drop the file into the middle area of the pop-up.
4. After the file is selected, click the Upload button.
Note: For the upload to succeed, the file name cannot have any space characters.
5. Once the file uploads successfully, click the Done button.