Create McGraw Hill Administrator Accounts
Learn how to create administrator accounts to manage access, permissions, create assessments, and view reports.
- Direct Login & Manual-Rostering
- High School
- SSO & Auto-Rostering
- SSO & Manual-Rostering
- PreK-12
- Customer Support
- School Administrator
- Direct Login & Auto-Rostering
- Preschool
- Middle School
- Elementary School
- Core
- Intervention
- Supplemental
- AP, Honors & Electives
- Literacy
- Math
- Science
- Social Studies
- Health
- Visual & Performing Arts
- World Languages
- Reveal Math (K-12)
- AP Biology
- AP Chemistry
- AP History & Geography
- AP Psychology
- AP Economics
- AP African American Studies
- AP Precalculus
- AP Statistics
- AP Computer Science
- AP Language and Composition
- AP Public Speaking
- AP Music Theory
- 5 Steps to a 5 - AP Test Prep
- Glencoe Health 2022
- Teen Health 2021
- Arrive Math
- Building Blocks 2024
- Building Blocks PreK 2025
- Number Worlds 2024
- SRA Reading Laboratory 2025
- SRA Reading Mastery Transformations
- Achieve3000 Literacy
- Actively Learn
- McGraw Hill Literacy Emerge!
- McGraw Hill Literacy Summit!
- McGraw Hill Literacy Soar!
- Open Court Reading 2025
- Redbird
- StudySync 2021
- ALEKS
- ALEKS Adventure
- CA Reveal Math (K-12)
- Illustrative Math
- Redbird Math
- CA Inspire Science 2020
- FL Science 2025 (K-12)
- Inspire Science 2020
- TN Science (K-12)
- TX Science 2025 (K-12)
- CA Impact 2019
- FL Social Studies 2024 (K-12)
- Impact Social Studies
- McGraw Hill Social Studies
- All Sorts 2026 (K-5)
- Asi se Dice 2024
- CTE - Health Science
- CTE - Agriculture
- CTE - Computing and Technology
- CTE - Culinary Arts
- CTE - Early Childhood Education
- CTE - Business, Marketing, and Finance
- CTE - Criminal Justice
- Glencoe Health 2014
- McGraw Hill Health 2014
- 2Inform
- Building Blocks 2015
- Connecting Math Concepts
- Number Worlds 2015
- Corrective Reading
- Early Interventions in Reading
- Spelling Mastery
- WonderWorks 2022 & 2014
- Maravillas 2020 & 2017
- OCR Foundational Skills Kit
- OCR Word Analysis Kit
- Open Court Reading 2016, 2018, 2023
- StudySync 2015 & 2017
- Wonders
- Wonders 2014
- Wonders 2023 2020 2017
- Wonders Balanced Literacy 2016
- Wonders EL 2016
- World of Wonders 2017
- Core Plus Math 2015
- Everyday Mathematics 4 (K-6)
- Glencoe Algebra 1 2014
- Glencoe Algebra 2 2014
- Glencoe Algebra 1 2018
- Glenoce Algebra 2 2018
- Glencoe Math
- Glencoe Geometry 2014
- Glencoe Geometry 2018
- Glencoe Math Course 1
- Glencoe Math Course 2
- Glencoe Math Course 3
- Glencoe Math Accelerated
- McGraw Hill My Math
- McGraw Hill My Math 2013 & 2016
- McGraw Hill My Math 2018
- Pre-Algebra 2012
- Glencoe Science
- Glencoe Science 2017
- Inspire Science 2017
- iScience 2017
- Networks
- Networks 2014 (K-5)
- Networks 2018
- Networks 2014 & 2016
- Music! Its Role
- Spotlight on Music
- Asi se Dice 2016
- Texas Math
- User Management
- Account Management


For a full page view of the demo, click here.
For a Spanish version of the demo, click here.
1. Log into your Administrator account.
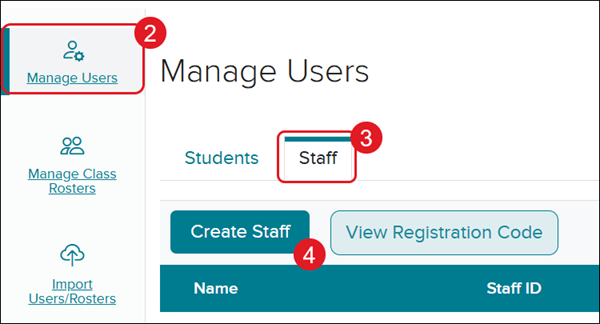
2. Click on Manage Users.
3. Click on the Staff tab.
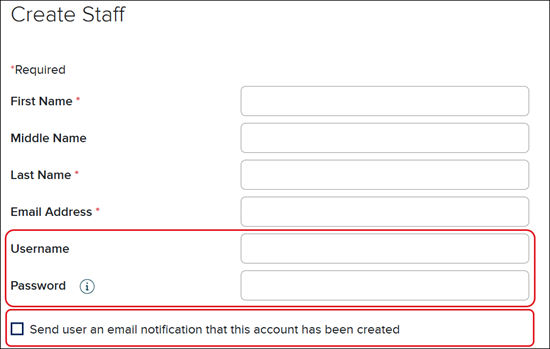
4. Click the Create Staff button.
5. Enter a First Name, Last Name, and Email Address.
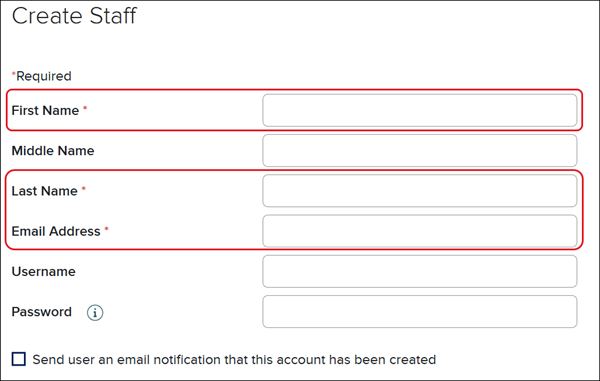
Entering a Middle Name, Username, and Password are optional fields.
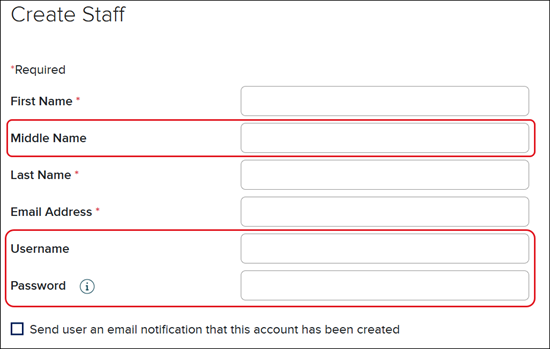
If you enter a Username and Password, you will want to check the box to send the user an email notification with their login information.
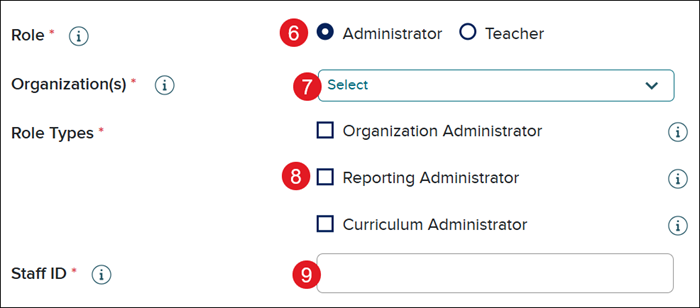
6. Select the radio button for the Administrator role.
7. Select the Organization from the drop-down.
8. Check the box next to the preferred Role Types.
- Organization Administrator: The District/Purchasing Account Organization Administrator can manage users, class rosters, and products for all schools/organizations assigned to the district/purchasing account. They also have access to usage data and the Admin Dashboard reports for all schools/organizations.
- (School) Organization Administrator: The Organization Administrator role would be selected for this option, but only at the school level. The (School) Organization Administrator can manage users and class rosters for the school(s) they are assigned to, as well as access to usage data and the Admin Dashboard reports for the assigned school(s).
- Reporting Administrator: The Reporting Administrator can create and view reports on student performance and product usage for student and teacher users affiliated with the organizations assigned to the administrator.
- Curriculum Administrator: The Curriculum Administrator can create and share curricular assessments for select programs for the organizations assigned to the administrator as well as create Wonders District Planners.
9. Enter a Staff ID.
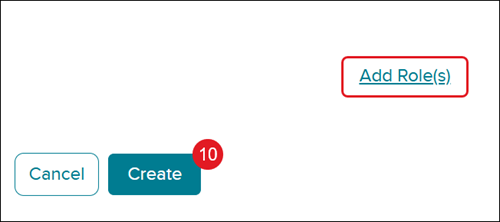
To add additional roles to the user, click the Add Role(s) link.
10. Click the Create button.