Create and Manage the Music Studio Planner
Learn how to set up and customize the Music Studio planner.
- Visual & Performing Arts
- SSO & Manual-Rostering
- Customer Support
- Direct Login & Auto-Rostering
- Middle School
- Core
- Plan & Present
- Direct Login & Manual-Rostering
- Spotlight on Music
- High School
- Classroom Teacher
- SSO & Auto-Rostering
- PreK-12
- Elementary School
- Music! Its Role


This article walks teachers through creating and editing class planners for Music Studio.
Article Contents
Create a Planner
1. If a planner has not yet been created for a class, you can click the Create/Edit Planners button under Planner on the right side of the home page.

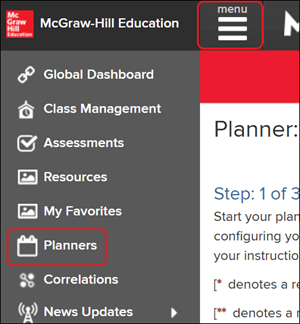
Another option is to click on Menu at the top-left and then click on Planners.

2. On the Set-up Wizard, select a Class Name from the drop menu.
3. Enter a Planner Name. If no name is entered it will default to the class name.
4. Select a School Year Start Date by typing it in or selecting it by clicking the calendar icon to the right.
5. Select a School Year End Date by typing it in or selecting it by clicking the calendar icon to the right.
6. Select a Schedule Type from the drop menu.
A. If Traditional is selected, select the Instructional Days.
7. Click the Next button to set non-instructional days.
B. Click Finish if you do not want to add anything additional to your planner.

8. Click each date on the provided calendars to set them as non-instructional days.
Note: U.S. holidays are automatically marked as non-instructional days. To set them as instructional days, click on the date.
9. Click the Next button at the top or bottom of the page.

10. Select the program from the drop menu.
11. Select the Section.
12. Check the box next to each unit/lesson you want to schedule.
C. Enter a number in each Lesson Order field if you want to change the scheduled order.
D. Click the X icon in the Remove column to remove the selection from the schedule.
13. Click the Finish button at the top or bottom of the page.

You can create additional planners by clicking the gear button on the Planner page and selecting Create from the menu.

Edit a Planner
1. Click the Create/Edit Planners button under Planner on the right side of the home page.

Another option is to click on Menu at the top-left and then click on Planners.
2. If you have multiple classes created, select the class from the drop-down.
3. Click the gear button to the right of the Planner page.
4. Click Edit from the menu.

5. Make any preferred changes to the Class Name, Planner Name, and Schedule Type.
Note: If you need to make changes to the School Year Start and End Dates, you will need to delete the planner and create a new one.
6. Click the Next button.
A. If you only needed to make changes to this first screen and no further adjustments, click the Finish button.

7. Add/remove any non-instructional days as needed.
8. Click the Next button at the top or bottom of the page.

9. Add/remove any lessons you want added to the planner.
Note: If you select to add units/lessons and you already had units/lessons scheduled on the planner, it will create duplicates of the lesson on the planner once changes are saved.
B. Select the program from the drop menu.
C. Select the Section.
D. Check the box next to any units/lessons you want to add to the planner.
E. Rearrange the Lesson Order by entering the preferred order in the appropriate field.
F. Click the X in the Remove column to remove the lesson from the planner.
10. Click the Finish button to confirm changes.

Edit Individual Planner Days
1. Click the Create/Edit Planners button under Planner on the right side of the home page.

Another option is to click on Menu at the top-left and then click on Planners.

2. If you have multiple classes created, select the class from the drop-down.
A. Click the back and forth arrows to navigate to the week you need to edit.
3. Click the Edit icon on the day.

B. To move the lesson to a different date, enter or select the preferred New Date.
C. To add additional lessons to the day, select the program from the drop menu, select the Section, and check the box next to the option you want to add.
D. If you have multiple lessons for the day, you can change the Lesson Order by changing the number field.
E. Click the X in the Remove column to remove the lesson from the planner.
4. Click the Save button to confirm changes.

Delete a Planner
1. Click the Create/Edit Planners button under Planner on the right side of the home page.

Another option is to click on Menu at the top-left and then click on Planners.

2. If you have multiple classes created, select the class from the drop-down.
3. Click the gear button to the right of the Planner page.
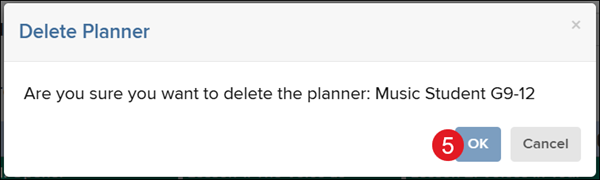
4. Click Delete from the menu.

5. On the Delete Planner pop-up, click the OK button to confirm.