eAssessment - Backup Instructions
Learn how to back up eAssessment tests, question banks, and reports by exporting and saving assessment data.
- Networks 2014 (K-5)
- SSO & Manual-Rostering
- Customer Support
- iScience 2017
- End-of-Year Tasks
- Middle School
- Direct Login & Manual-Rostering
- Glencoe Algebra 1 2014
- High School
- Glencoe Algebra 1 2018
- Classroom Teacher
- Building Blocks 2015
- SSO & Auto-Rostering
- Glencoe Science 2017
- Pre-Algebra 2012
- PreK-12
- Elementary School
- World Languages
- Inspire Science 2017
- Math
- Asi se Dice 2016
- Health
- Getting Started & Orientation
- Glenoce Algebra 2 2018
- Intervention
- Literacy
- Social Studies
- Glencoe Math Course 1
- Direct Login & Auto-Rostering
- McGraw Hill Health 2014
- Wonders 2014
- Glencoe Math Course 2
- Glencoe Math Course 3
- Glencoe Science
- Number Worlds 2015
- Core
- Core Plus Math 2015
- Glencoe Health 2014
- My Math 2013 & 2016
- Glencoe Algebra 2 2014
- Glencoe Math
- Science
- Networks 2014 2016
- Preschool


This article walks teachers through save custom assessments and/or question sets created within eAssessment.
For a full page view of the demo, click here.
For a Spanish version of the demo, click here.
To save any assessments or question banks you have created or customized, export the files and save them to your computer. You will then be able to import them to your eAssessment account at a later time.
Article Contents
Export Assessments/Question Banks
Import Assessments/Question Banks
Export Assessments/Question Banks
1. From your program menu, go to Assessment or Assess. Options vary based on the program being used.
2. Click to open eAssessment.
3. On the Test Generator page, click and drag the test or question set you wish to export to the Editor pane on the right side.
4. Click File at the top of the page.
5. Click Export, and then click on Cognero XML from the menu.
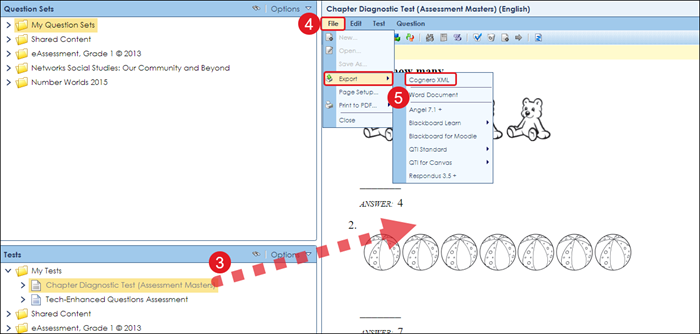
The file will then download to your computer. Repeat steps 3-5 for all assessments or question sets you wish to save.
Import Assessments/Question Banks
1. From your program menu, go to Assessment or Assess. Options vary based on the program being used.
2. Click to open eAssessment.

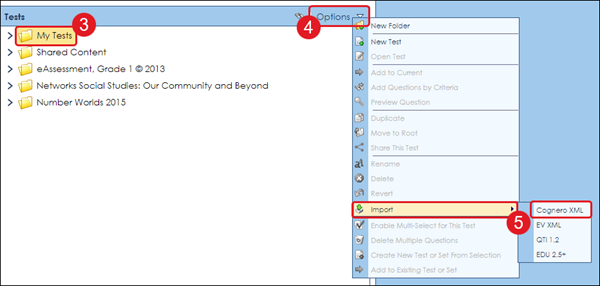
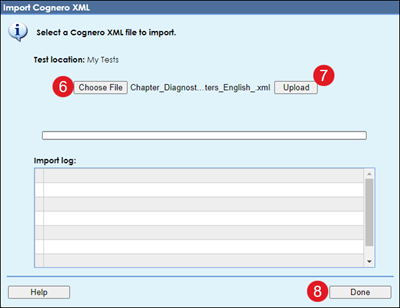
3. Under Question Sets or Tests, select the folder you would like the import to be located under. The selected folder will be highlighted.
4. Under Question Sets or Tests on the left, click Options.
5. Click Import, and then click on Cognero XML.
6. Select the file you want to import.
7. Click Upload.
8. Click Done once all selected files have been uploaded.
Back-up Assessment Data
The eAssessment platform has the option to export any of the reports generated to a CSV file. Follow the steps below to generate a report and save it as a CSV file that can be saved to your computer to create a backup of your data.
1. From your program menu, go to Assessment or Assess. Options vary based on the program being used.
2. Click to open eAssessment.

3. From the Section menu, select Reporting.
Note: If you have access as an Organization Administrator, you will also have an Administrative Reporting option. These steps will work for both options.
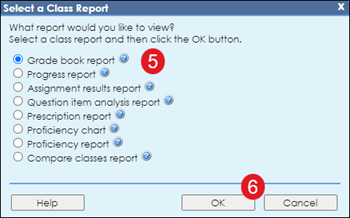
4. To generate a class report, click and drag the class to the Editor pane on the right side.

5. In the Select a Class Report pop-up menu, select the radio button next to a Class Report type.
6. Click the OK button.
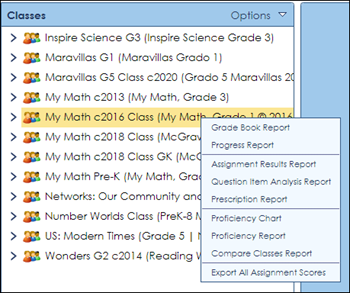
You can also right-click the class name and select the report type from the pop-up menu.
To learn more about the available report types, read the article: eAssessment - Assessment Reports.
6. Click the Export to CSV button  in the upper right to save the report as a CSV.
The file will then download to your computer. Repeat steps 4-6 for all reports you wish to save. This file can then be opened in most spreadsheet applications and imported into many grade book applications.
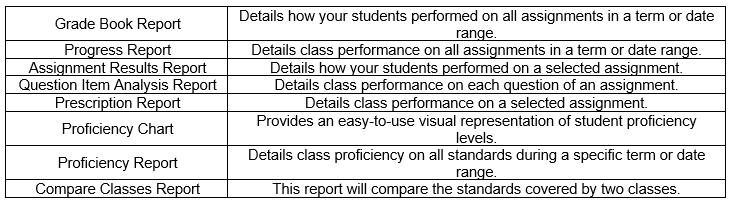
Types of Class Reports
You can view these descriptions by selecting the report or clicking the question mark (?) icon to the right of each report type.