Customized lessons in ConnectED can be printed as PDFs, which can be saved to your computer or printed. The printed PDF will include any updates you made to the lesson plan. As a note, this will back up any content updates you made to the lesson plan, but it will not back up any customizations to the interactive digital resources or ePresentation.
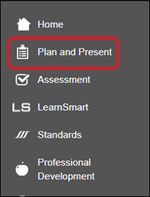
1. Select Plan and Present or Lesson Plans from the program Navigation menu.
The option will vary based on the program being used.
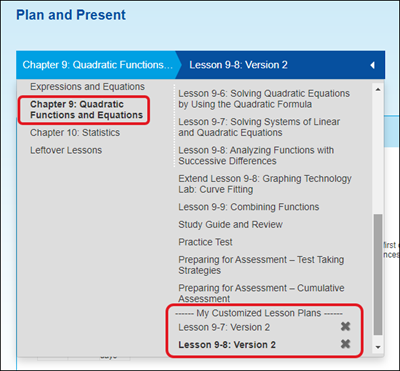
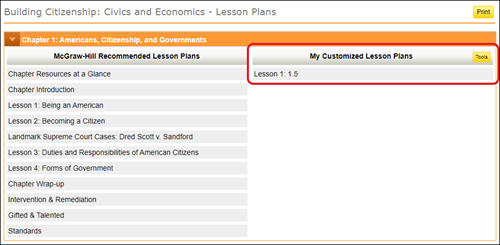
2. Select the Chapter from the Plan and Present or Lesson Plans Navigation menu where you created your customized lesson plan.
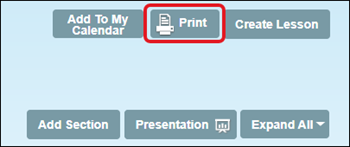
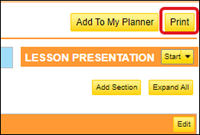
3. Select Print at the top right of the page.
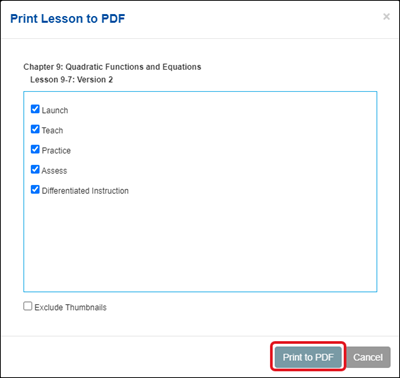
4. The default setting is that all blades of the lesson plan will print to PDF, this can be customized as needed by unchecking the box next to the blade title.
5. Select Print to PDF to create the PDF.
networks
iscience
glencoe-math
glencoe-science
inspire-science
asi-se-dice
mcgraw-hill-health
core-plus-math
glencoe-health
my-math
instructor
prek-12
Networks 2014 (K-5), SSO & Manual-Rostering, Customer Support, iScience 2017, End-of-Year Tasks, Middle School, Direct Login & Manual-Rostering, Glencoe Algebra 1 2014, High School, Glencoe Algebra 1 2018, Classroom Teacher, Networks 2018, SSO & Auto-Rostering, Glencoe Science 2017, PreK-12, Elementary School, World Languages, Visual & Performing Arts, Inspire Science 2017, Math, Asi se Dice 2016, Health, Glenoce Algebra 2 2018, Social Studies, Glencoe Math Course 1, Direct Login & Auto-Rostering, McGraw Hill Health 2014, Glencoe Math Course 2, Glencoe Math Course 3, Glencoe Science, Core, Core Plus Math 2015, Glencoe Health 2014, McGraw Hill My Math 2013 & 2016, McGraw Hill My Math 2018, Glencoe Algebra 2 2014, Glencoe Math, Science, Networks 2014 & 2016, Preschool, Plan & Present, McGraw Hill My Math, Networks
dts
2026-03-24T18:48:37.151-03:00
For a full page view of the demo, click here. For a Spanish version of the demo, click here. Customized lessons in ConnectED can be printed as PDFs, which can be saved to your computer or printed. The printed PDF will include any updates you made to the lesson plan. As a note, this will back up any content updates you made to the lesson plan, but it will not back up any customizations to the interactive digital resources or ePresentation. 1. Select Plan and Present or Lesson Plans from the program Navigation menu. The option will vary based on the program being used. 2. Select the Chapter from the Plan and Present or Lesson Plans Navigation menu where you created your customized lesson plan. 3. Select Print at the top right of the page. 4. The default setting is that all blades of the lesson plan will print to PDF, this can be customized as needed by unchecking the box next to the blade title. 5. Select Print to PDF to create the PDF.
Top
Regional Page Available
It looks like you're outside the United States. Do you want to see your regional version of this page?