First, teachers will want to create a class for the program. For steps on this process, refer to the Create and Edit a Class article.
An alternative option to the following process is to provide students with the class and/or redemption codes for them to manually redeem the content to their account to gain access to the class and student materials. For steps on this process, refer to the How to Join a McGraw Hill Class and Redeem Content article.
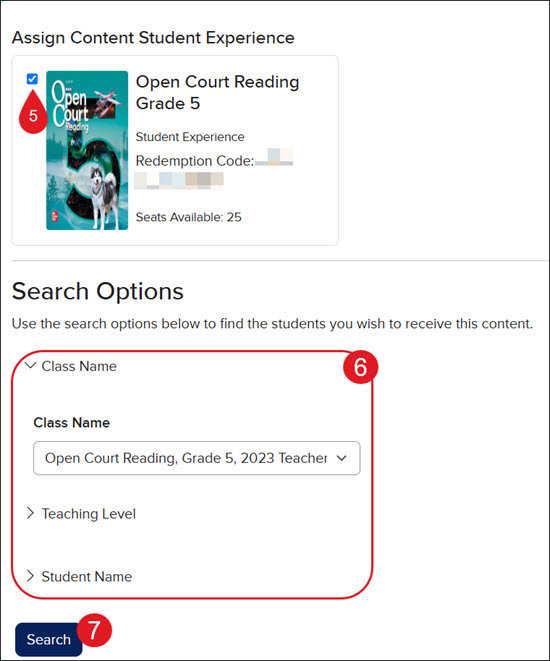
5. Checkmark the box next to the Student Experience content.
6. Use the provided Search Options to locate the student(s) you need to add to the class.
7. Click the Search button.
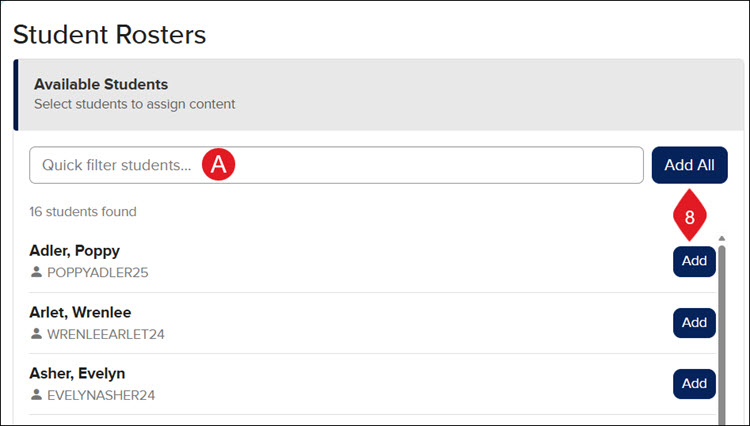
8. In the Available Students section, click the Add All or the Add button next to each student.
A. Use the Quick filter search to look for a specific student.
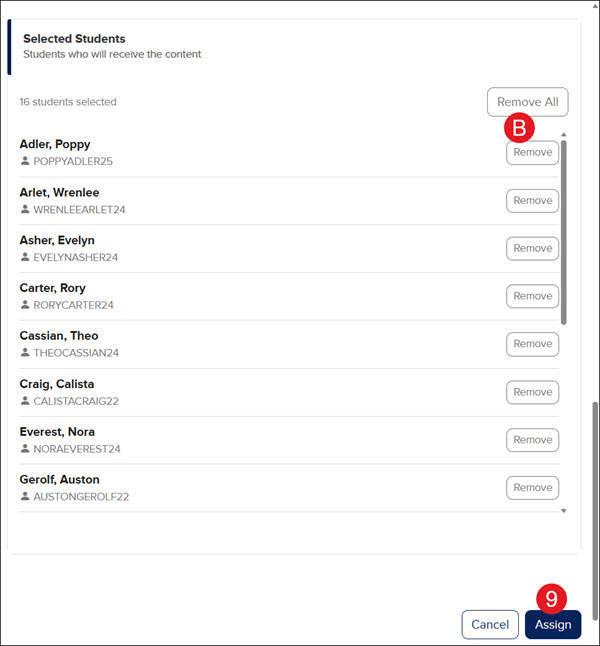
B. In the Selected Students section, click the Remove All or Remove button for students that no longer need access to that student material.
9. Click the Assign button.
glencoe-health
mcgraw-hill-health
building-blocks
connecting-math-concepts
number-worlds
corrective-reading
early-interventions-in-reading
spelling-mastery
wonderworks
maravillas
ocr-foundational-skills-kit
open-court-reading
studysync
wonders
wow
core-plus-math
everyday-math
glencoe-math
my-math
mcgraw-hill-pre-algebra
glencoe-science
inspire-science
iscience
networks
music-its-role
spotlight-on-music
asi-se-dice
instructor
prek-12
Customer Support, PreK-12, Classroom Teacher, Preschool, Elementary School, Middle School, High School, Direct Login & Auto-Rostering, Direct Login & Manual-Rostering, SSO & Auto-Rostering, SSO & Manual-Rostering, Core, Intervention, Supplemental, AP, Honors & Electives, Career & Technical Education, Literacy, Math, Science, Social Studies, Health, Visual & Performing Arts, World Languages, Glencoe Health 2014, McGraw Hill Health 2014, Building Blocks 2015, Connecting Math Concepts, Number Worlds 2015, Corrective Reading, Early Interventions in Reading, Spelling Mastery, WonderWorks 2022 & 2014, Maravillas 2020 & 2017, OCR Foundational Skills Kit, OCR Word Analysis Kit, Open Court Reading 2016, 2018, 2023, StudySync 2015 & 2017, Wonders, Wonders 2014, Wonders 2023 2020 2017, Wonders Balanced Literacy 2016, Wonders EL 2016, World of Wonders 2017, Core Plus Math 2015, Everyday Mathematics 4 (K-6), Glencoe Algebra 1 2014, Glencoe Algebra 1 2018, Glencoe Algebra 2 2014, Glenoce Algebra 2 2018, Glencoe Math, Glencoe Geometry 2014, Glencoe Geometry 2018, Glencoe Math Course 1, Glencoe Math Course 2, Glencoe Math Course 3, Glencoe Math Accelerated, McGraw Hill My Math, McGraw Hill My Math 2013 & 2016, McGraw Hill My Math 2018, Pre-Algebra 2012, Glencoe Science 2017, Glencoe Science, Inspire Science 2017, iScience 2017, Networks, Networks 2014 (K-5), Networks 2014 & 2016, Networks 2018, Music! Its Role, Spotlight on Music, Asi se Dice 2016, Class Management, Back-to-School Setup, Getting Started & Orientation
dts
2026-03-24T18:34:50.667-03:00
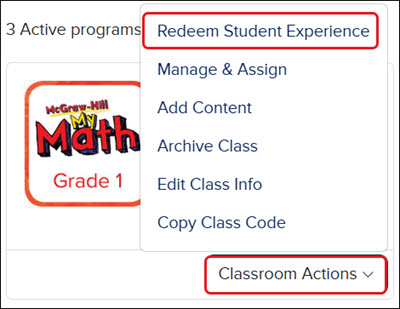
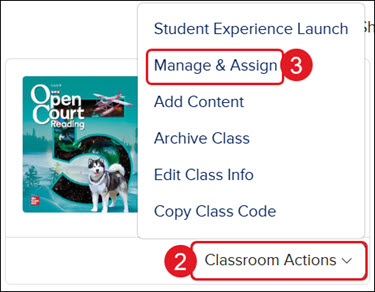
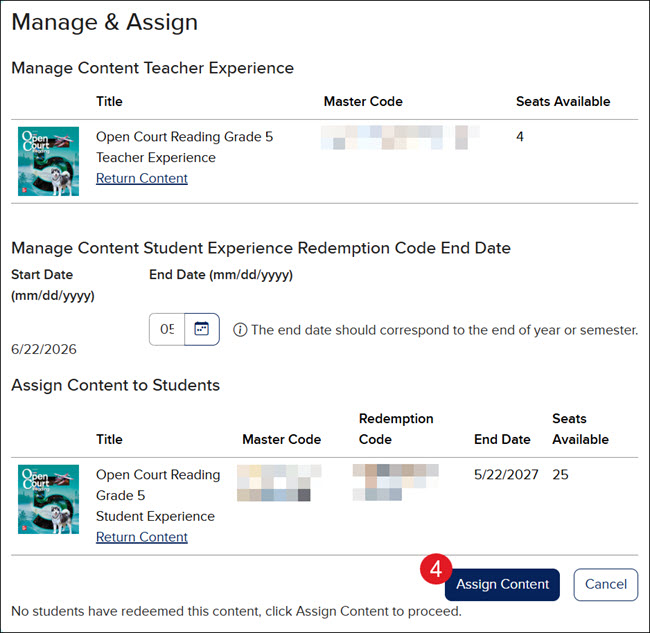
View the demo in a separate tab. View the Spanish version of the demo. First, teachers will want to create a class for the program. For steps on this process, refer to the Create and Edit a Class article. An alternative option to the following process is to provide students with the class and/or redemption codes for them to manually redeem the content to their account to gain access to the class and student materials. For steps on this process, refer to the How to Join a McGraw Hill Class and Redeem Content article. 1. SSO or log in at my.mheducation.com. You will need to Redeem the Student Experience first before being able to assign the content to students. 2. On the class card, click on Classroom Actions. 3. Click Manage & Assign from the menu. 4. Click the Assign Content button. 5. Checkmark the box next to the Student Experience content. 6. Use the provided Search Options to locate the student(s) you need to add to the class. 7. Click the Search button. 8. In the Available Students section, click the Add All or the Add button next to each student. A. Use the Quick filter search to look for a specific student. B. In the Selected Students section, click the Remove All or Remove button for students that no longer need access to that student material. 9. Click the Assign button.
Top
Regional Page Available
It looks like you're outside the United States. Do you want to see your regional version of this page?