Schedule a Classic ALEKS View QuickTables Assessment
Schedule and administer QuickTables assessments in classic ALEKS view.
- Supplemental
- SSO & Manual-Rostering
- Customer Support
- Online Assessments
- Direct Login & Auto-Rostering
- Middle School
- ALEKS
- Direct Login & Manual-Rostering
- High School
- Classroom Teacher
- SSO & Auto-Rostering
- PreK-12
- Math
- Grades & Assignments


This article walks teachers through creating and editing QuickTables Scheduled Assessments.
For a full page view of the demo, click here.
For a Spanish version of the demo, click here.
Article Contents
Scheduled Assessment
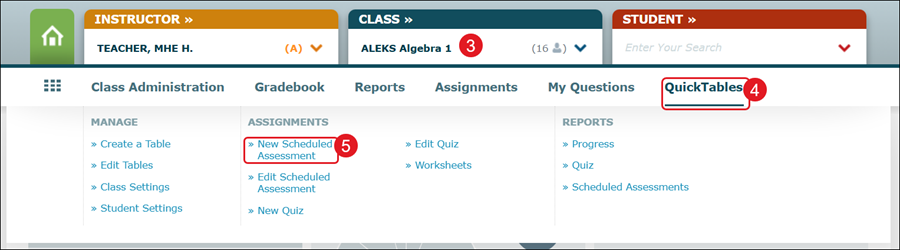
1. SSO or log in at my.mheducation.com.
2. Launch ALEKS.
3. Select a Class from the drop-down.
4. Hover over QuickTables.
5. Click on New Scheduled Assessment from the menu.
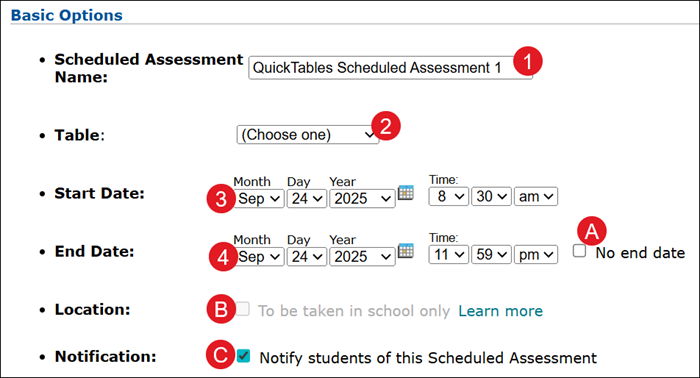
6. Enter a Scheduled Assessment Name.
7. Select a Table from the drop-down.
8. Select a Start Date and Time.
9. Select an End Date and Time.
A. If you want the assessment to stay open until you manually close it, check the No end date box.
B. Check the Location box if you want students to only complete the assessment in school.
If selected, students can only take this Scheduled Assessment using a school computer.
To use this option, the domain name or IP address needs to be entered for your school computers. Your school administrator for ALEKS must enter this information.
C. Uncheck the Notification box if you do not want students notified of the Scheduled Assessment.
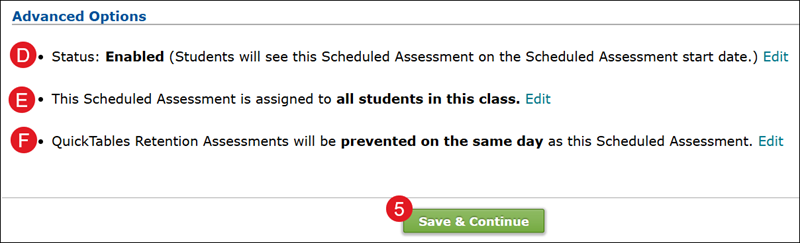
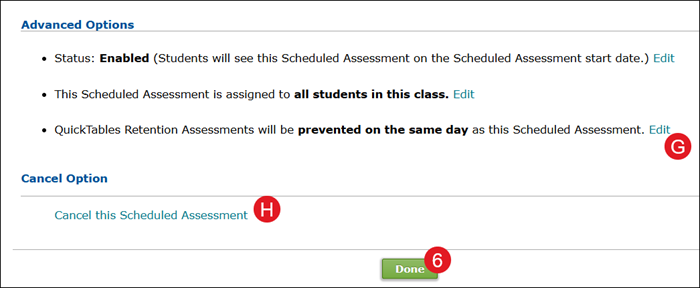
D. In the Advanced Options section, the Status defaults to Enabled. This means that students will see the Scheduled Assessment on the selected start date.
To change to Disabled, click the Edit link to the right and select Disabled from the drop-down.

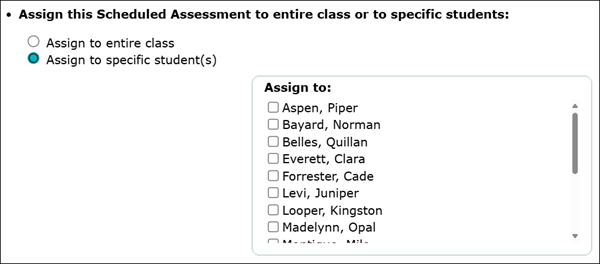
E. The Scheduled Assessment assigns all students in this class by default.
To select certain students for the Scheduled Assessment, click the Edit link to the right. Select the Assign to specific student(s) radio button and checkmark the students you want assigned.
F. The QuickTables Retention Assessments is set to be prevented on the same day as the Scheduled Assessment.
Note: A Retention Assessment is automatically given to a student a certain amount of time after the student completes a table. The goal is to assess the student's long-term progress of the table.
To prevent the QuickTables Retention Assessment from coming up days prior to the Scheduled Assessment, click the Edit link to the right. Select up to 7 days prior from the drop-down.

5. Click the Save & Continue button.
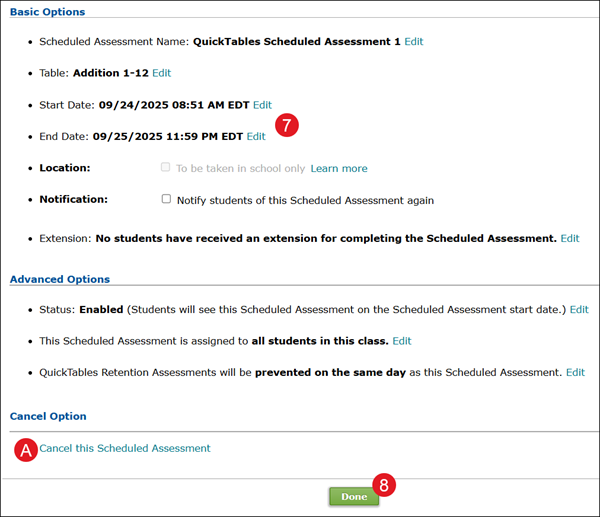
G. On the summary page, review the selections made. Click the Edit link to the right of an option to make changes.
H. Click the Cancel this Scheduled Assessment to delete the assessment.
6. Click the Done button.
Edit Scheduled Assessment
1. SSO or log in at my.mheducation.com.
2. Launch ALEKS.
3. Select a Class from the drop-down.
4. Hover over QuickTables.
5. Click on Edit Scheduled Assessment from the menu.
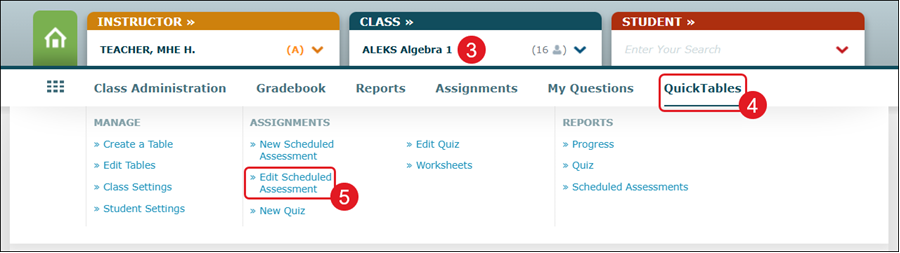
6. Click on the Scheduled Assessment Name.

7. Click the Edit link next to option you want to make changes to.
A. Click Cancel this Scheduled Assessment to delete the assessment.
8. Click the Done button.