Support Topics/Assessments & Reporting/Grades & Assignments
Context/Integration Type/SSO & Manual-Rostering
prek-12
2026-03-24T19:17:12.893-03:00
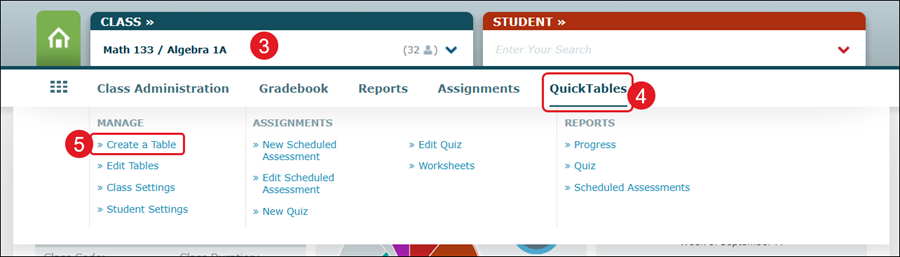
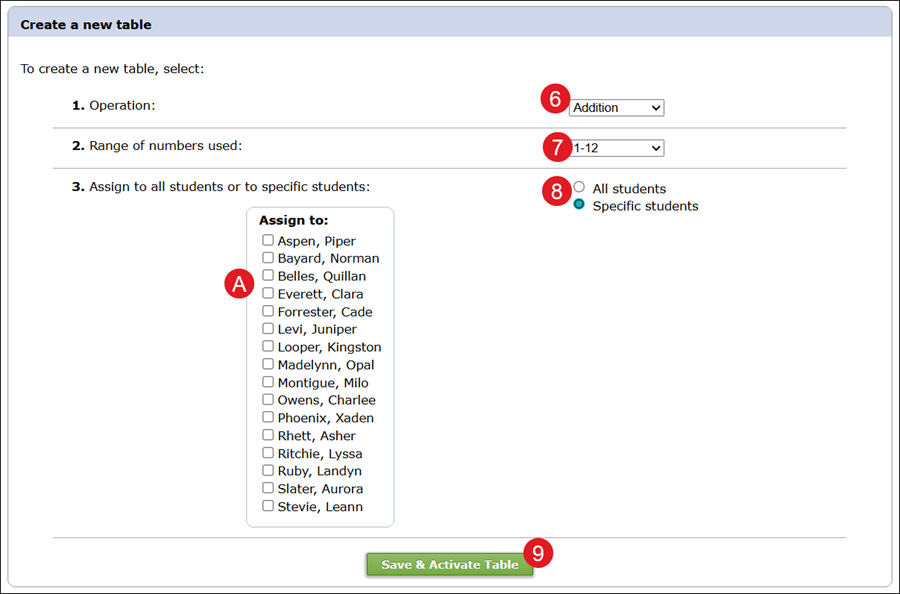
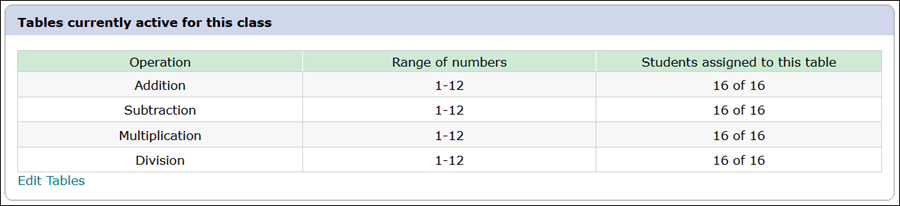
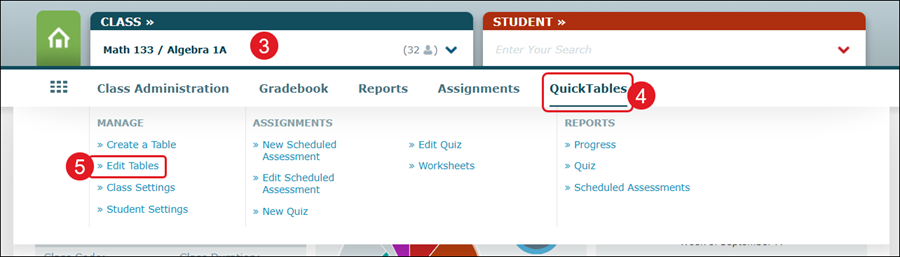
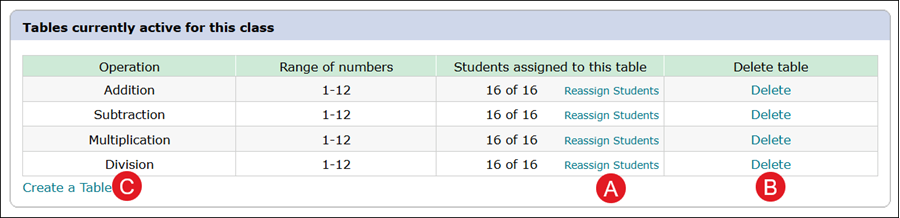
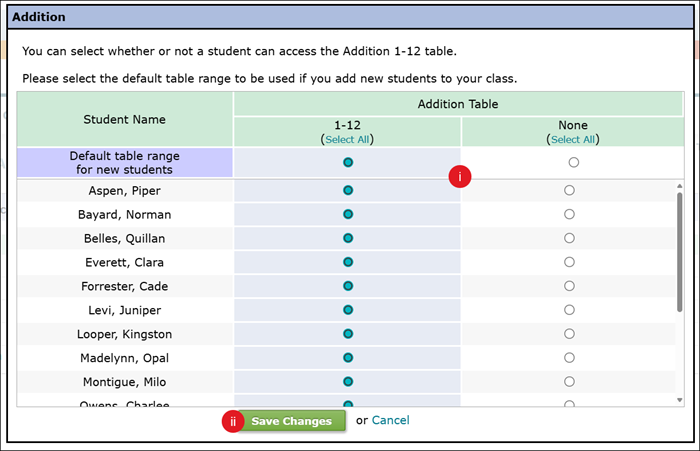
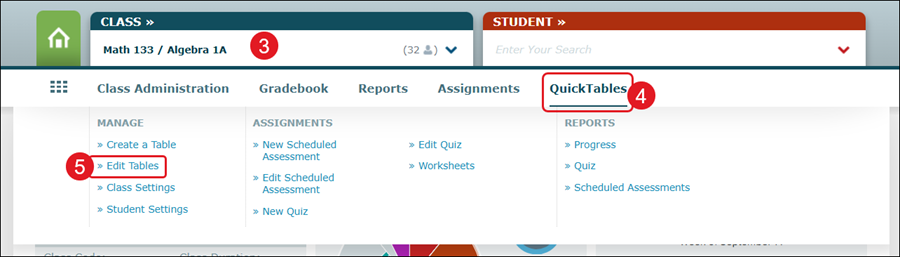
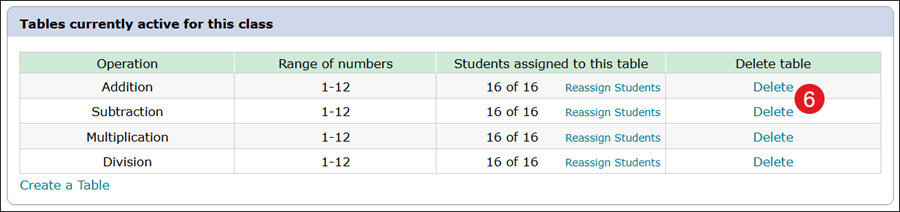
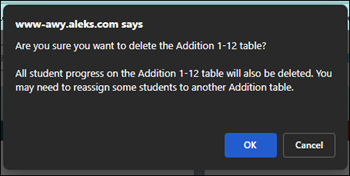
<p>For a full page view of the demo, <a href="https://hub.mheducation.com/share/zpz80tlvbr7s" target="_blank">click here</a>.</p> <p>For a Spanish version of the demo, <a href="https://hub.mheducation.com/share/cp0ir7iruzmy" target="_blank">click here</a>.</p> <p><a id="top"> </a></p> <p><span><span><strong>Article Contents</strong></span></span></p> <p><a href="#create_table" target="_self">Create a Table</a></p> <p><a href="#edit_tables" target="_self">Edit Tables</a></p> <p><a href="#delete_tables" target="_self">Delete Tables</a></p> <p> </p> <h3><a id="create_table"></a>Create a Table</h3> <p>1. SSO or log in at <a href="https://my.mheducation.com/" target="_blank">my.mheducation.com</a>.</p> <p>2. Launch <strong>ALEKS</strong>.</p> <p>3. Select the <strong>Class </strong>from the drop menu.</p> <p>4. Hover over <strong>QuickTables</strong>.</p> <p>5. Click <strong>Create a Table</strong> from the menu.</p> <p><img src="/content/dam/mhe/support/support-images/migrated/rtaImage-1084784388.jpeg" data-assetref="rtaImage-1084784388-1777321171272"></p> <p>6. Under <strong>Create a new table</strong>, select the <strong>Operation </strong>from the drop-down.</p> <p>7. Select the <strong>Range of numbers</strong> used from the drop-down.</p> <p>8. Select the radio button to assign to <strong>All students</strong> or <strong>Specific students</strong>.</p> <p>A. If <strong>Specific students</strong> is selected, checkmark the student(s) you want assigned to that table.</p> <p>9. Click the <strong>Save & Activate Table</strong> button.</p> <p><img src="/content/dam/mhe/support/support-images/migrated/rtaImage-1084816896.jpeg" data-assetref="rtaImage-1084816896-1777321171272"></p> <p>All active QuickTables will show at the bottom of the page.</p> <p><img src="/content/dam/mhe/support/support-images/migrated/rtaImage-1084784180.jpeg" data-assetref="rtaImage-1084784180-1777321171272"></p> <p><a href="#top" target="_self">Return to top</a></p> <p> </p> <h3><a id="edit_tables"></a>Edit Tables</h3> <p>1. SSO or log in at <a href="https://my.mheducation.com/" target="_blank">my.mheducation.com</a>.</p> <p>2. Launch <strong>ALEKS</strong>.</p> <p>3. Select the <strong>Class </strong>from the drop menu.</p> <p>4. Hover over <strong>QuickTables</strong>.</p> <p>5. Click <strong>Edit Tables</strong> from the menu.</p> <p><img src="/content/dam/mhe/support/support-images/migrated/rtaImage-1084796095.jpeg" data-assetref="rtaImage-1084796095-1777321171273"></p> <p>A. Click the <strong>Reassign Students</strong> link to select which students are assigned to that table.</p> <p><img src="/content/dam/mhe/support/support-images/migrated/rtaImage-1084802398.jpeg" data-assetref="rtaImage-1084802398-1777321171273"></p> <p>i. Select the radio button for each student to be assigned to the selected QuickTables or have None assigned.</p> <p>ii. Click the <strong>Save Changes</strong> button.</p> <p><img src="/content/dam/mhe/support/support-images/migrated/rtaImage-1084828443.jpeg" data-assetref="rtaImage-1084828443-1777321171273"></p> <p>B. Click the <strong><a href="#delete_tables" target="_self">Delete</a> </strong>link to remove the QuickTables from student access.</p> <p>C. Click the <a href="#create_table" target="_self"><strong>Create a Table</strong></a> link to create a new QuickTables assignment.</p> <p><a href="#top" target="_self">Return to top</a></p> <p> </p> <h3><a id="delete_tables"></a>Delete Tables</h3> <p>1. SSO or log in at <a href="https://my.mheducation.com/" target="_blank">my.mheducation.com</a>.</p> <p>2. Launch <strong>ALEKS</strong>.</p> <p>3. Select the <strong>Class </strong>from the drop menu.</p> <p>4. Hover over <strong>QuickTables</strong>.</p> <p>5. Click <strong>Edit Tables</strong> from the menu.</p> <p><img src="/content/dam/mhe/support/support-images/migrated/rtaImage-1084796095-1.jpeg" data-assetref="rtaImage-1084796095-1-1777321171273"></p> <p>6. Click the <strong>Delete </strong>link next to the table.</p> <p><img src="/content/dam/mhe/support/support-images/migrated/rtaImage-1084803908.jpeg" data-assetref="rtaImage-1084803908-1777321171274"></p> <p>7. On the pop-up, click the <strong>OK </strong>button to confirm.</p> <p><img src="/content/dam/mhe/support/support-images/migrated/rtaImage-1084807661.jpeg" data-assetref="rtaImage-1084807661-1777321171274"></p> <p><a href="#top" target="_self">Return to top</a></p> dts Create and manage QuickTables activities in Classic ALEKS. 2026-03-09 Create and Manage Classic ALEKS View QuickTables Create and manage QuickTables activities in Classic ALEKS. Create and manage QuickTables activities in the classic ALEKS view.
Create and manage QuickTables activities in the classic ALEKS view.
For a full page view of the demo, click here. For a Spanish version of the demo, click here. Article Contents Create a Table Edit Tables Delete Tables Create a Table 1. SSO or log in at my.mheducation.com. 2. Launch ALEKS. 3. Select the Class from the drop menu. 4. Hover over QuickTables. 5. Click Create a Table from the menu. 6. Under Create a new table, select the Operation from the drop-down. 7. Select the Range of numbers used from the drop-down. 8. Select the radio button to assign to All students or Specific students. A. If Specific students is selected, checkmark the student(s) you want assigned to that table. 9. Click the Save & Activate Table button. All active QuickTables will show at the bottom of the page. Return to top Edit Tables 1. SSO or log in at my.mheducation.com. 2. Launch ALEKS. 3. Select the Class from the drop menu. 4. Hover over QuickTables. 5. Click Edit Tables from the menu. A. Click the Reassign Students link to select which students are assigned to that table. i. Select the radio button for each student to be assigned to the selected QuickTables or have None assigned. ii. Click the Save Changes button. B. Click the Delete link to remove the QuickTables from student access. C. Click the Create a Table link to create a new QuickTables assignment. Return to top Delete Tables 1. SSO or log in at my.mheducation.com. 2. Launch ALEKS. 3. Select the Class from the drop menu. 4. Hover over QuickTables. 5. Click Edit Tables from the menu. 6. Click the Delete link next to the table. 7. On the pop-up, click the OK button to confirm. Return to top