Create Custom Classic ALEKS Adventure Administrator Reports
Create and review custom administrator reports in ALEKS Adventure to analyze student progress.
- PreK-12
- Customer Support
- School Administrator
- Elementary School
- Direct Login & Auto-Rostering
- Direct Login & Manual-Rostering
- SSO & Auto-Rostering
- SSO & Manual-Rostering
- Supplemental
- Math
- ALEKS Adventure
- Reports & Analytics


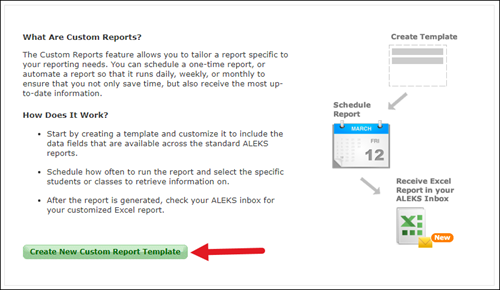
Custom Reports allow you to tailor a report specific to your progress monitoring needs by creating a template and choosing the data to include in your report. You can schedule a one-time report or automate a report to run daily, weekly, or monthly to ensure that you save time and receive the most up-to-date information.
Article Contents
Access Custom Report Template
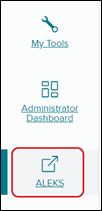
1. SSO or sign in to your Admin account at my.mheducation.com
2. Launch ALEKS from your left-side navigation menu in your admin tools.
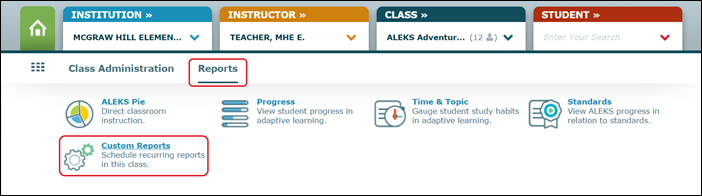
3. Select your Institution, Instructor, and Class.

4. Hover over Reports and click Custom Reports from the menu.
5. Click Create New Custom Report Template.
Create the Report Template
1. In the Basic Information section, enter a Name for your template.

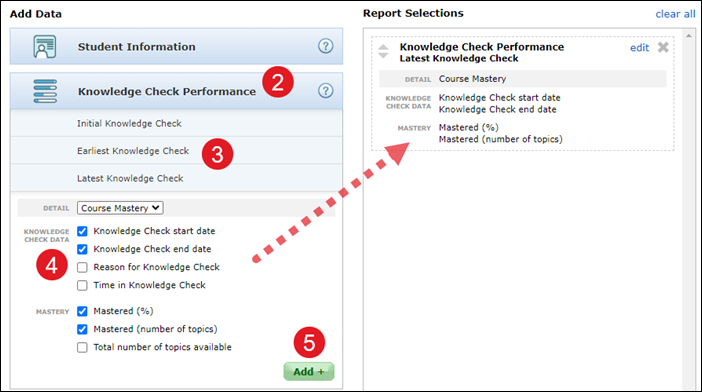
2. Click on a box under the Add Data section to expand the section.
3. Click on a link to expand the section further.
4. Check the box next to the options you want to add to the report.
5. Click the Add+ button to add them to the Report Selections section on the right.
Repeat these steps until you have added all the desired options you want for the report to the Report Selections section.

A. Click the Clear All link to remove all selections from the Report Selections box.
B. Click Edit to open the section and check/uncheck any selections for that section.
C. Click the X to remove the section from the Report Selections box.
D. Click Cancel to exit out of the Edit box.
E. Check/Uncheck any options you want to add or remove from the report.
F. Click the Save button to save any changes made.
G. Click Undo/Redo to go back to the previous click in the Report Selections box.
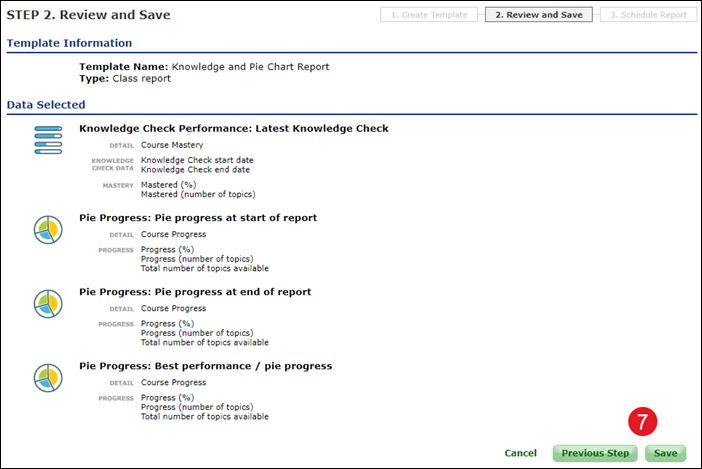
6. Click the Next Step button at the bottom right of the page.

7. After reviewing your selections for the report, click the Save button.
Schedule the Report
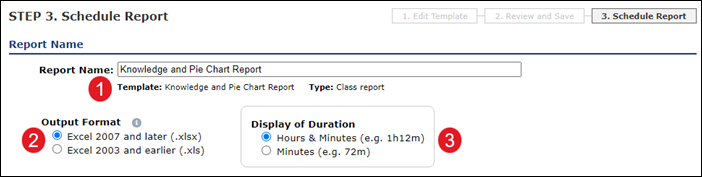
1. On the Schedule Report page, enter a Report Name.
2. Select the radio button next to the correct Output Format.
Note: Due to data limitations, Excel 2003 and earlier versions (.xls) will only display up to 256 columns per tab.
3. Select a radio button next to the desired Display of Duration option.
4. Under Scheduling Options, select the radio button next to if you want a One time report or a Recurring report.
5. For a One time report, select the Report Start and End Date. The date range cannot extend past 12 months. Check the box next to Set report date range to and select a number and Days or Weeks from the appropriate drop-downs, if desired.
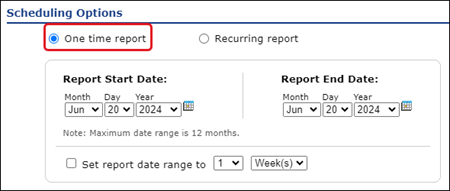
For a Recurring report, select how often you want the report to run from the drop-down. Select the Last report date.
Check the box next to Cumulative report, if desired.
- Select this option if you will run this report repeatedly and want to track growth from one report to the next. Rather than using a new start date for each instance of the report, a cumulative report will use the same start date for each instance of the report and include all selected data from that start date to the date the report is due.

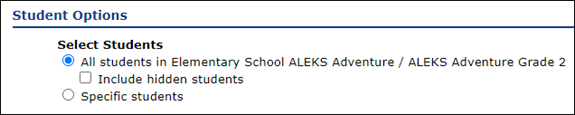
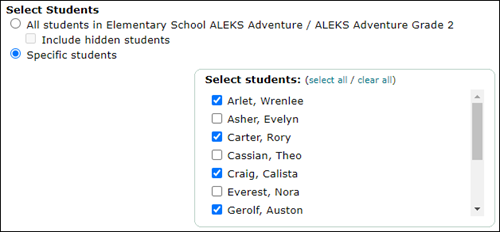
6. In the Student Options section, select the radio button next to the option of including all students assigned to the class, and if you want to include hidden students, or for the report to include only specific students. You will only see these options if you selected a class before creating a Custom Report.
If you select the option to only include specific students, check the students you want to be included in the report from the pop-up box.
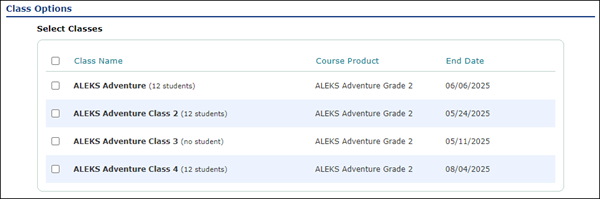
If you did not select a class before creating a Custom Report, in the Select Classes section, check the box next to the class(es) you want to generate the report for. You will not see this option if you selected a class before creating a Custom Report.
7. Select the Type of Data you want for the report. The options available will depend on if you selected a class or not before creating a Custom Report.
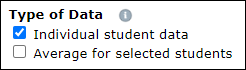
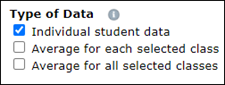
Individual student data – Show the selected data for each student on a single line in the Excel report.
Average for selected students – Include for all the students selected an average summary for the data selected. One average line for all students selected will be added to the report.
8. Click the Schedule Report button at the bottom right of the page.
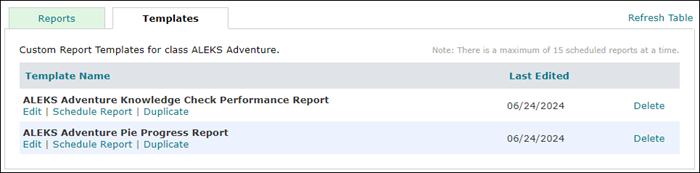
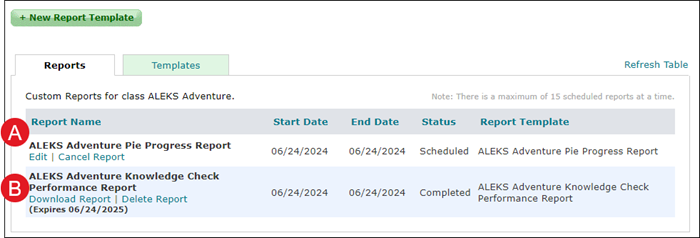
Once you have created a report or template, they can be found on the Custom Reports page under their respective tabs.
A. Under the Reports tab, if a report is showing as Scheduled in the Status column, you can Edit or Cancel Report by clicking on the associated link.
B. If the report has already been created, you can Download Report or Delete Report.
Under the Templates tab, you can Edit, Schedule Report, Duplicate, or Delete the report template.