Create, Duplicate, Merge, and Import Actively Learn Assignments
Create assignments in Actively Learn to engage students with reading content.
- Customer Support
- PreK-12
- Classroom Teacher
- Elementary School
- Middle School
- High School
- Direct Login & Auto-Rostering
- Direct Login & Manual-Rostering
- SSO & Auto-Rostering
- SSO & Manual-Rostering
- Supplemental
- Literacy
- Science
- Social Studies
- Actively Learn
- Grades & Assignments


Article Content
Unassign, Archive, or Delete Assignments
Create Assignments
Note: When creating assignments, the settings available for selection will vary based on what is being assigned.
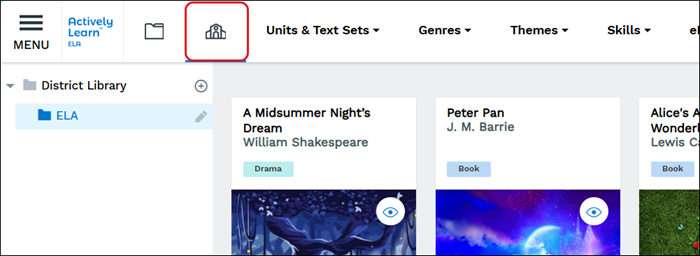
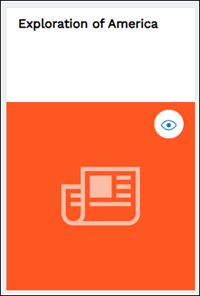
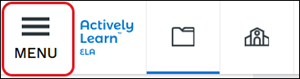
1. Click on Menu.

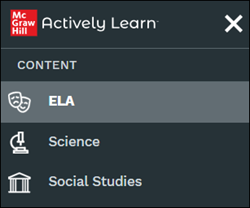
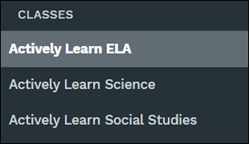
2. From the Content section, select ELA, Social Studies, or Science.
Note: Options available for content will depend on what was purchased by the district.

You can also assign resources from the District Library by clicking on the school icon.
3. Hover over the resource tile and click the Click here to assign to classes (plus icon) button.
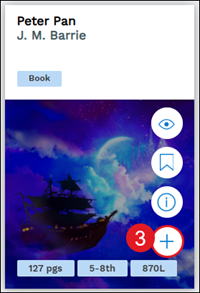
Another option is to click on the resource tile and clicking the +Assign to Your Classes button at the bottom.

4. If assigning a book/text, Choose sections or chapters from the drop-down.
5. Check the class(es) to assign to.
6. Select to assign to All students or select specific students from the drop-down.
7. Select a Start date.
A. Select a Due date. This is optional.
Note: Students will not be able to access the assignments before or after the start and due dates.
8. In the Assignment Settings, check/uncheck to See classmates' responses after answering questions.
If checked, select the radio button to view All, Only proficient and advanced, or Only advanced.
9. Check/uncheck to See classmates' names with their responses.
10. Check/uncheck Allow students to like classmates' responses.
B. Click the +Show more assignment settings link to make further customizations to the assignment settings.
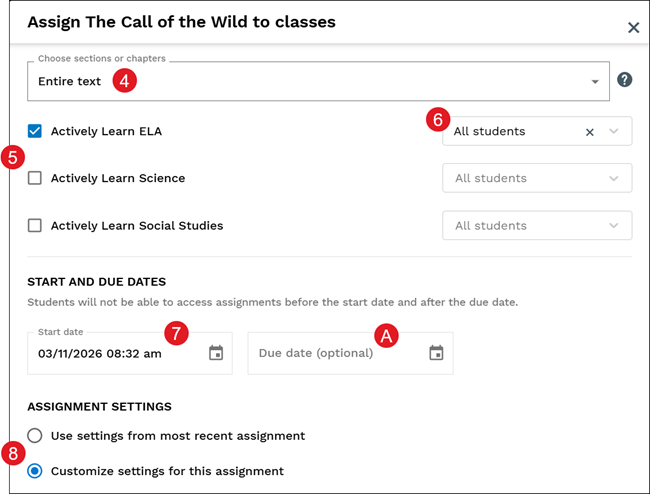
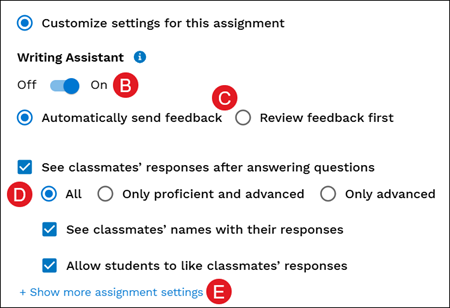
If Customize settings for this assignment was selected:
B. Toggle On/Off the Writing Assistant. This will allow students access to the AI-powered tool for short answer/essay type questions. For more information on the Writing Assistant, refer to the Actively Learn - Writing Assistant article.
Note: If you do not have this option it may be turned off for the district. You will need to reach out to your Organization Administrator about this access.
C. If the Writing Assistant is toggled On, select to Automatically send feedback or Review feedback first.
D. Check/uncheck to allow students to See classmates' responses after answering questions.
If selected, select the radio button for All responses, Only proficient and advanced, or Only advanced responses. You can also check/uncheck for them to be able to see names and/or allow the Like option to be available.
E. Click the Show more assignment settings link for more options to select.
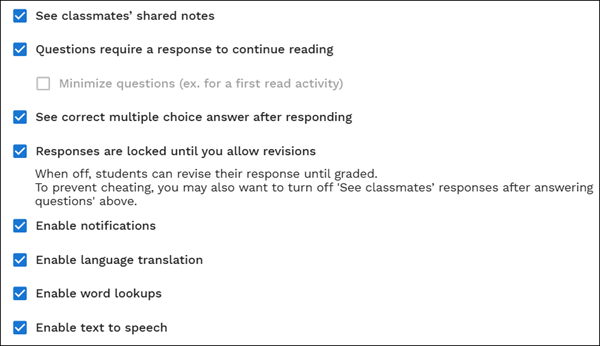
Additional assignment settings include:
- See classmates' shared notes
- Questions require a response to continue reading
- See correct multiple choice answer after responding
- Responses are locked until you allow revisions
- When off, students can review their response until graded. To prevent cheating, you may also want to turn off 'See classmates' responses after answering questions'
- Enable notifications
- Enable language translation
- Enable word lookups
- Enable text to speech
9. Click the Assign button.
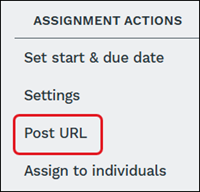
Once the assignment is created, on the Assignments page, teachers can copy the assignment URL by clicking on the Post URL option in the side panel.
Duplicate Assignments
Duplicating text assignments allows teachers to create multiple assignments for the same text while also allowing different customizations for each assignment. Duplicating assignments is helpful for teachers that want to create reading groups within a class create a different assignment for each group.
1. Click on Menu.

2. From the Content section, select ELA, Social Studies, or Science.
Note: Options available for content will depend on what was purchased by the district.
3. Click on a text tile.
4. Click the Customize button.

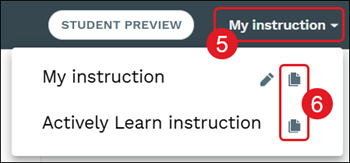
5. Click on the My Instruction drop-down.
6. Click the Duplicate (paper) icon next to the preferred option.
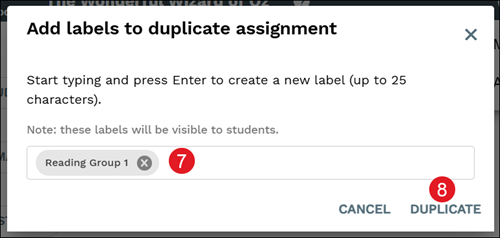
7. Enter a Label for the duplicated assignment.
Note: The label entered will be visible to students.
8. Click the Duplicate button.
All assignment versions will then be listed on the My instruction drop-down. Select an option to make customizations for each text assignment before assigning it to students.

Merge Assignments
Teachers may have more than one internet article or text that have been assigned or uploaded that are on the same topic, merging assignments allows everything for that same topic to be merged into one assignment for students to access.
Note: Copyrighted texts from the catalog, PDFs, and video assignments cannot be merged.
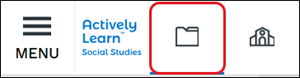
1. Click on Menu.
2. Click the My Workspace & Imports (folder) button.

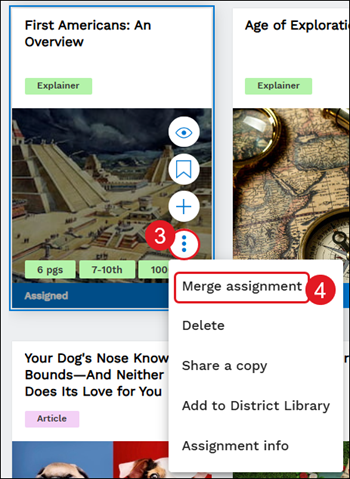
3. Hover over the resource or assignment tile and click the more info (kebob) icon.
4. Click Merge assignment on the menu.
Do this for every assignment resource you want merged together into one assignment.
5. Click Next at the bottom.

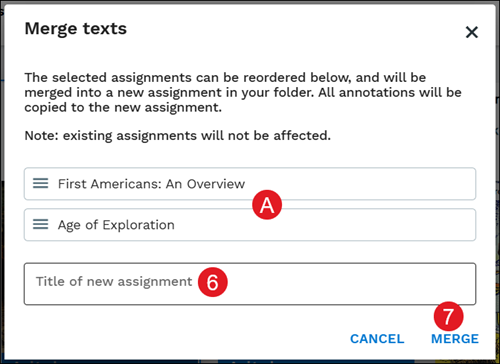
A. On the Merge text pop-up, hover over an assignment option to reorganize it in the list.
6. Enter a Title of new assignment.
7. Click the Merge button.
The merged resources will be added as a new assignment resource to assign to students.
Import Assignments
Teachers have the option to import assignments from another class with a few simple steps. This makes it easy for teachers to teach the same class and provide the same assignments year after year. Assignments can be imported from active and archived classes.
Any assignment settings that were set for the assignment in the other class will transfer over with the imported version as well. Also, unassigning, archiving, or deleting the assignment in one class does not do the same to the assignment in the class it was imported from.
1. Click on Menu.
2. Click the My Workspace & Imports (folder) button.
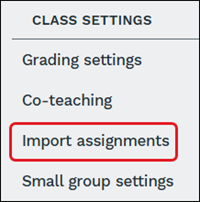
3. From under Class Settings, click Import assignments.
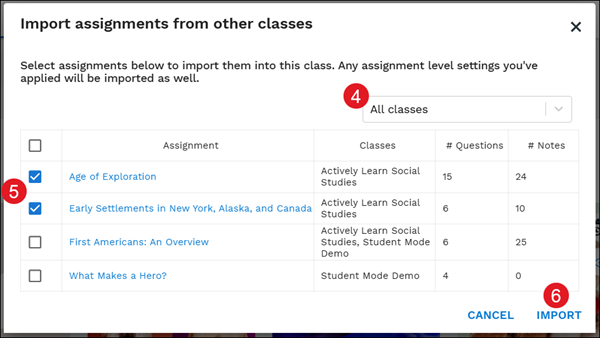
4. On the pop-up, select All classes or a specific class from the drop-down.
5. Check the box next to the assignment(s) to import.
6. Click the Import button.
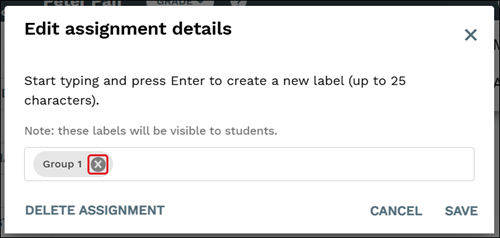
Label Assignments
Labels are visible to both teachers and students and can be used to differentiate assignments in a class. Students can then filter their assignments using a teacher's labels.
1. Click on Menu.
2. From the Content section, select ELA, Social Studies, or Science.
Note: Options available for content will depend on what was purchased by the district.

3. Click on a text tile.
4. Click the Customize button.

They can also be added/changed once an assignment is created by clicking on the Class from the Menu and going to Assignments.

Click on an assignment tile and click the Edit button.

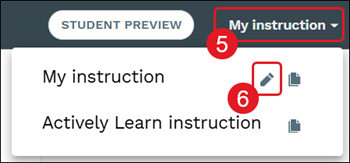
5. Click on the My Instruction drop-down.
6. Click the Edit (pencil) icon.
7. On the Edit assignment details pop-up, enter a label in the provided field.
8. Click the Save button.

Click the X on the label to delete the label and click the Save button.