Navigating the Achieve3000 Literacy My Lesson Dashboard
Explore the My Lessons student view in Achieve3000 Literacy to track assigned content.
- Customer Support
- PreK-12
- School Student
- School Parent
- Elementary School
- Middle School
- High School
- Direct Login & Auto-Rostering
- Direct Login & Manual-Rostering
- SSO & Auto-Rostering
- SSO & Manual-Rostering
- Supplemental
- Literacy
- Achieve3000 Literacy
- Dashboard & Navigation Overview
- Grades & Assignments


Students can easily see the specific lessons scheduled by their teachers on their My Lessons Dashboard. Giving students the tools to monitor and track their own lesson completion and performance allows them to take control of their learning.
The new My Lessons Dashboard provides students with information on lesson status (completed vs. not started vs. in progress) and includes grades for any scored lesson steps. Icons and sortable columns help students easily find the work that needs to be completed and linked lesson steps help students jump right into the lesson and finish any incomplete assignments.
Note: Students cannot preview content that is scheduled for a future date. Lessons will only “unlock” on or after the lesson’s scheduled start date.
Article Contents
Access and Navigate the My Lesson Dashboard
Access and Navigate the My Lesson Dashboard
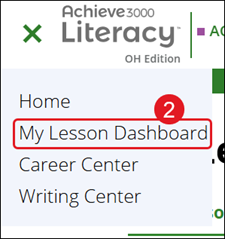
1. Click the Main Menu icon at the top-left.
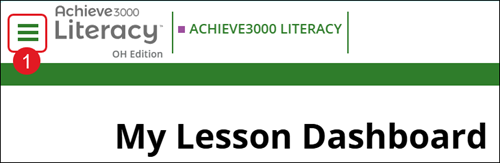
2. Click My Lesson Dashboard from the menu.
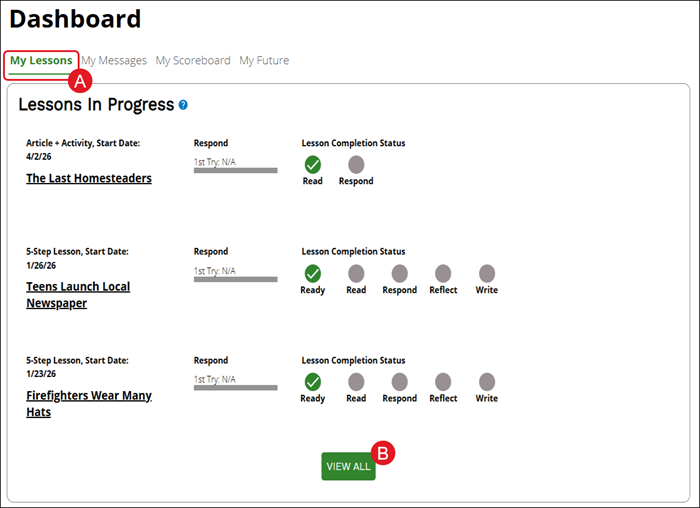
The Lesson Dashboard can also be accessed from the home page by under the My Lessons (A) Dashboard tab and clicking the View All button (B).
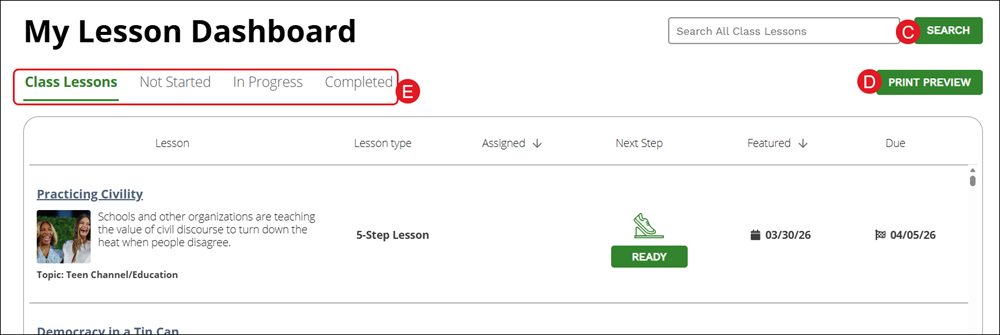
C. Use the Search to locate a specific lesson to complete/view.
D.. Click the Print Preview button to download/save the list of lessons for the currently selected tab.
E. Click on Class Lessons, Not Started, In Progress, and Completed to navigate between the different lesson list views.
F. The columns available will vary based on which tab is selected. The Class Lessons page is sorted by most recent and teacher-assigned first. Clicking on a header for a column will reorganize the list by that option.
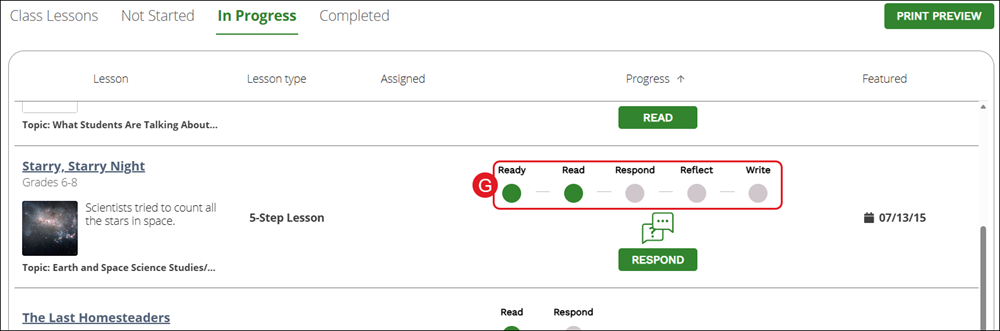
G. Under the In Progress tab, students can see where they are in a particular lesson. In the Progress column, students can hover to see where they are and if they already submitted work. This section updates as soon as the lesson is completed and will move it to the Completed Tab.
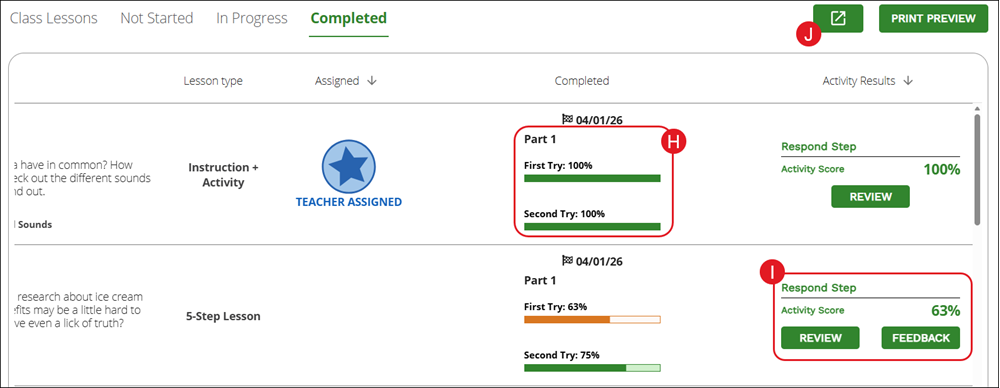
H. On the Completed tab, students are able to quickly & easily see how they are performing. Completed shows Part 1* (1st and 2nd try scores) along with colored temperature gauges for the scores listed.
*If there are any multi-part lessons completed, those will be listed as well.
I. Activity Results shows activity scores and grades (written response grades from teacher and comments). Students can click on Review to review their score and click Feedback to see the feedback to their teacher.
J. Click the Export to CSV button to download the lesson data on the Completed tab into an Excel worksheet.
Lesson Navigation
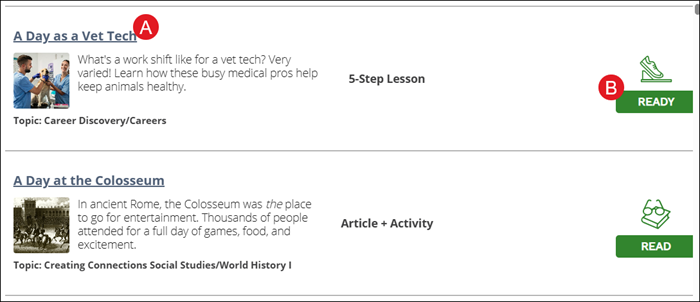
To open a lesson, click on the Title (A) or click on the Next Step (Ready or Read) button (B).
Each lesson is separated into two distinct sides – the left panel will present the lesson article, while the right panel is where student work is completed and other supporting materials are accessed.
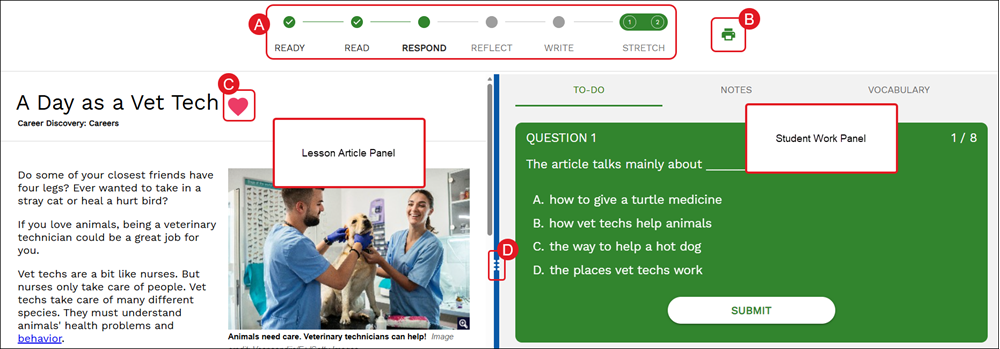
A. The Lesson Steps are located at the top of the page and show which step you are current on for completing the lesson. Some lessons will have only two steps - Read and Respond - and some have five steps to complete.
The lessons that have five steps to complete, these are also known as the 5-Step Literacy Routine. The 5-Step Literacy Routine is our proven method for developing the core skills that are essential to success in college & career, including the independent reading of complex texts. Each step reinforces specific literacy skills and standards.
Step 1: Ready, Step 2: Read, Step 3: Respond, Step 4: Reflect, Step 5: Write
The Stretch Article - step 1 of the Stretch section- is designed to expose students to more rigorous text while the Stretch Activity - step 2 of the Stretch section - is used as an opportunity to reinforce key test-taking strategies.
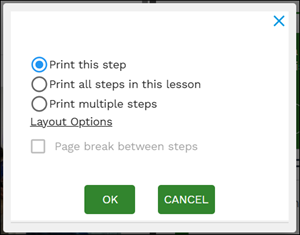
B. Click the Print icon to download/save the lesson article. You can print just the step you're currently on, all steps in the lesson, or multiple steps.
Note: Some lessons may be blocked by the teacher from being able to print them.
C. Click the Favorites button (heart icon) on an article to save it to your My Favorites collection.
Favorited articles can then be accessed at the bottom of your Achieve3000 Literacy home page by clicking on the My Favorites tab in the Collections section.

D. Click on the Slider (6 dots in between the two panels) to enlarge/shrink the panels on the left and right of the lesson. This could be helpful in allowing you to focus on one part of the lesson at a time.
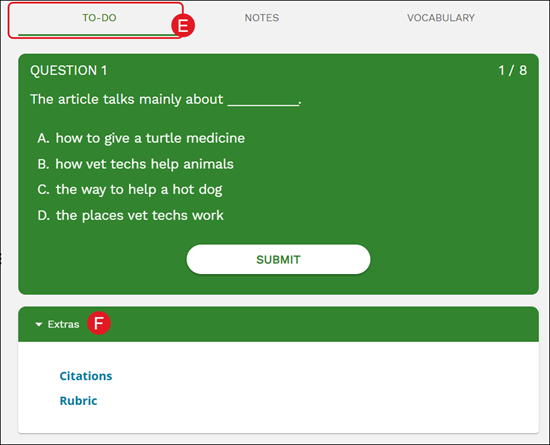
E. The To-Do portion of the student work panel is where students will answer any Questions presented as they go through the lesson.
F. Expand the Extras blade to access Citations and Rubrics for the lesson.
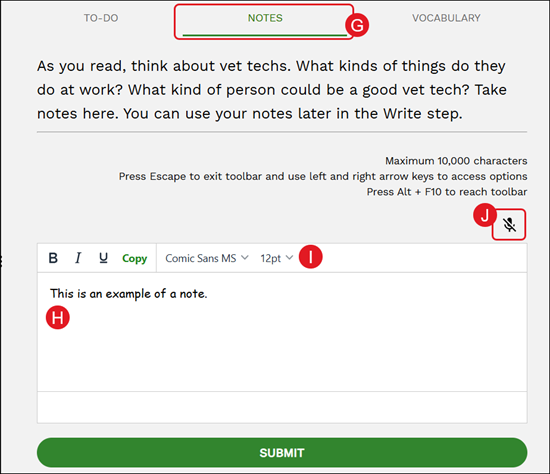
G. The Notes portion allows students to enter any notations they want to keep handy as they read through the lesson.
H. Enter the note in the provided field. The maximum of 10,000 characters can be used.
I. Use the toolbar to make adjustments to your notes such as making them bold or underlined, change the font, and the size.
J. Click on the microphone to turn on/off voice recognition.
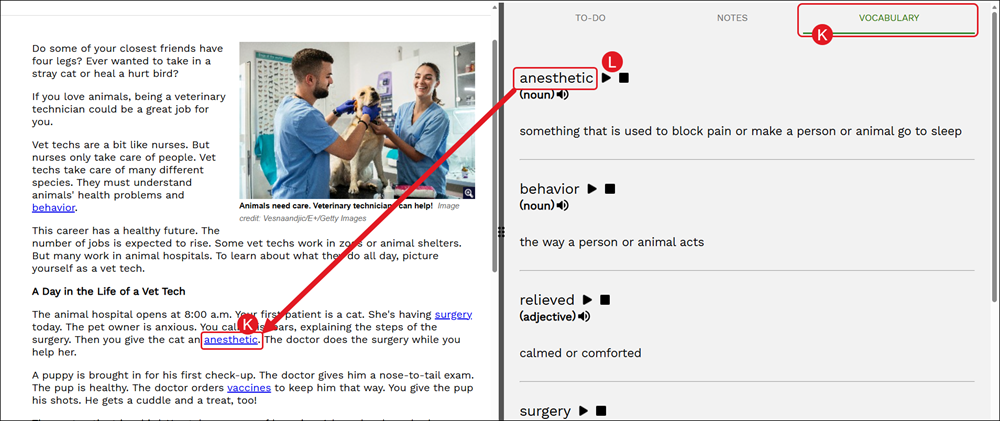
K. The Vocabulary section is where students can view definitions of the underlined words that are found throughout the lesson article.
Clicking on the word in the article will bring up a pop-up with the definition where it can also be read aloud.
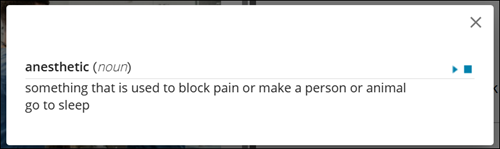
L. Click the Play and Stop buttons to have the definition read aloud.
Lesson Tools
By default, the only tool available for use is the highlighter. To have additional tools made available, you will need to reach out to your teacher.
To activate the tools within a lesson, highlight a word, a group of words, or a sentence within the article.
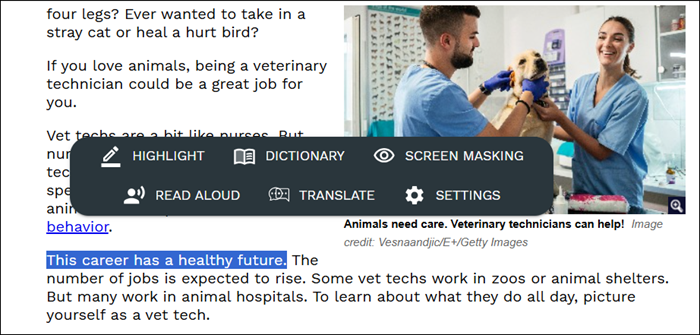
Highlight
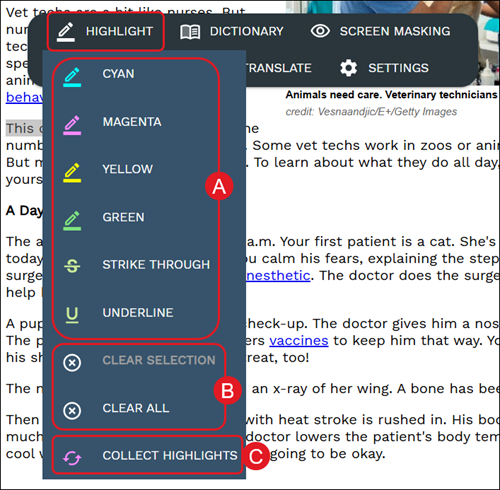
A. The Highlight option provides many selections to choose from including different colors, strike through, and underline.
B. To remove any highlights, select the word(s)/sentence(s) you want to remove the highlight from, click Highlight on the tool menu, and then the Clear Selection or Clear All options.
C. To view all markings made in the article, select a word/sentence and click Collect Highlights from the Highlight menu. More than one highlight will need to be created for this option to function.

Dictionary
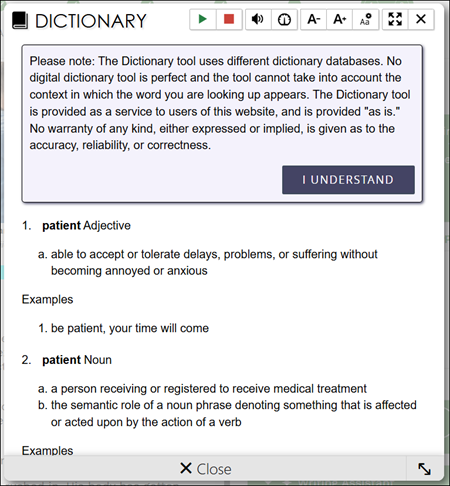
To look up a definition for an unknown word, click and highlight the word within the lesson. Click on Dictionary from the toolbar.
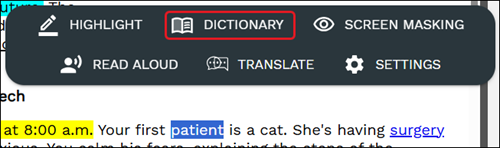
On the Dictionary pop-up, students can listen to the definition aloud, zoom in/out, and change reading speed.
Note: The Dictionary tool uses different dictionary databases. No digital dictionary tool is perfect and the tool cannot take into account the context in which the word you are looking up appears. The Dictionary tool is provided as a service to users of this website, and is provided "as is." No warranty of any kind, either expressed or implied, is given as to the accuracy, reliability, or correctness.
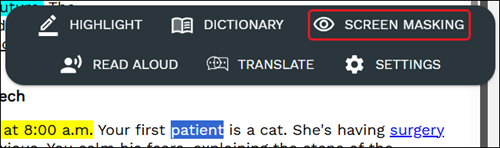
Screen Masking
Screen Mask is a document reading tool that follows your mouse or touch to help eliminate page distractions so you can focus on reading one passage at a time.
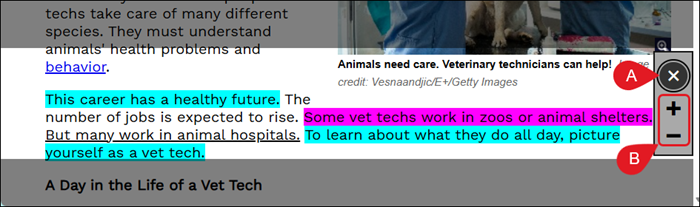
To turn the feature on, highlight any word within the lesson and click Screen Masking from the toolbar.
A. Click the Close (x icon) button to close out the Screen Masking tool.
B. Click the Enlarge (plus icon) or the Shrink (minus icon) buttons to make the highlighted space larger or smaller.
Read Aloud
To have the text of the article read to you, select the text you want read aloud and click the Read Aloud button on the toolbar.
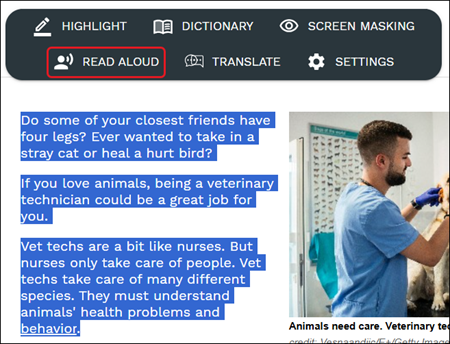
From the Read Aloud player, you can Play, Pause, and Stop the text being read. Clicking the speaker icon allows you to change the volume, while clicking the speedometer icon allows you to adjust the reading speed.

To make adjustments to the Read Aloud settings, click the Settings option from the toolbar.

The additional settings include highlighting sentences and auto-scrolling as it reads through the text.

Translate
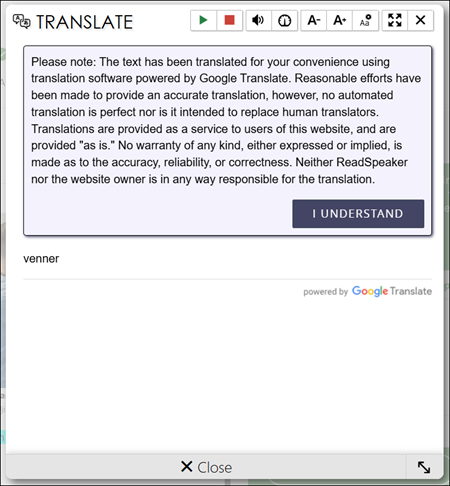
Students can translate words within the lesson to a different language by highlighting the word(s) and clicking on Translate from the toolbar.
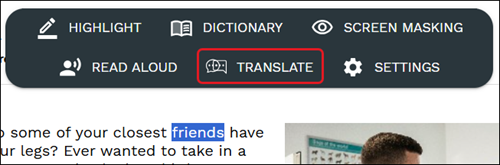
Select the language from the drop-down list.
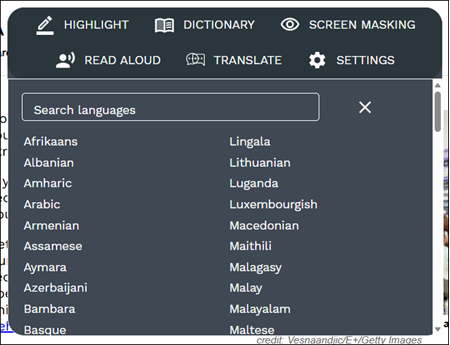
The Translate pop-up will then open with the translated word(s). Students can have the word(s) read aloud from here as well.
Note: The text has been translated for your convenience using translation software powered by Google Translate. Reasonable efforts have been made to provide an accurate translation, however, no automated translation is perfect nor is it intended to replace human translators. Translations are provided as a service to users of this website, and are provided "as is." No warranty of any kind, either expressed or implied, is made as to the accuracy, reliability, or correctness. Neither ReadSpeaker nor the website owner is in any way responsible for the translation.