ocr foundational skills kit
spotlight on music
music! its role
everyday-math
open-court-reading
wonders
maravillas
music-its-role
my-math
networks
ocr-foundational-skills-kit
spotlight-on-music
instructor
Programs & Solutions
Programs & Solutions/Everyday Mathematics
Programs & Solutions/Everyday Mathematics/Everyday Mathematics 4 (K-6)
Programs & Solutions/Open Court Reading
Programs & Solutions/Open Court Reading/OCR Word Analysis Kit
Context
Context/Integration Type
Context/Integration Type/Direct Login & Manual-Rostering
Business Unit
Business Unit/PreK-12
Context/Curriculum Type
Context/Curriculum Type/Core
Context/Education Level
Context/Education Level/High School
Programs & Solutions/OCR Foundational Skills Kit
Context/Subject
Context/Subject/Literacy
Context/Subject/Science
Context/Integration Type/Direct Login & Auto-Rostering
Programs & Solutions/Spotlight on Music
Context/Integration Type/SSO & Auto-Rostering
Programs & Solutions/Networks
Programs & Solutions/Networks/Networks 2018
Programs & Solutions/Music! Its Role
Context/Subject/World Languages
Context/Subject/Visual & Performing Arts
Programs & Solutions/McGraw Hill My Math
Programs & Solutions/McGraw Hill My Math/McGraw Hill My Math 2018
Asset Format Type
Asset Format Type/Customer Support
Context/Curriculum Type/Supplemental
Context/Subject/Social Studies
Context/Education Level/Middle School
Programs & Solutions/Wonders
Programs & Solutions/Wonders/Wonders 2023 2020 2017
Programs & Solutions/Maravillas
Programs & Solutions/Maravillas/Maravillas 2020 & 2017
Context/Education Level/Preschool
Context/Subject/Health
Context/Education Level/Elementary School
Programs & Solutions/Open Court Reading/Open Court Reading 2016, 2018, 2023
Personas
Personas/School Educator
Personas/School Educator/Classroom Teacher
Context/Subject/Math
Programs & Solutions/Wonders/Wonders Balanced Literacy 2016
Context/Curriculum Type/AP, Honors & Electives
Context/Curriculum Type/Intervention
Support Topics
Support Topics/Assessments & Reporting
Support Topics/Assessments & Reporting/Grades & Assignments
Context/Integration Type/SSO & Manual-Rostering
prek-12
2026-03-24T18:37:01.958-03:00
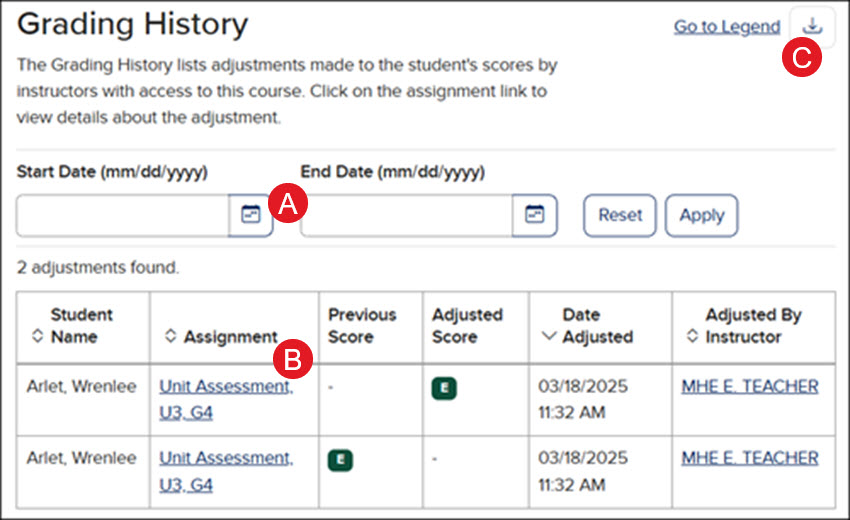
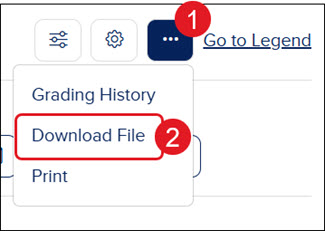
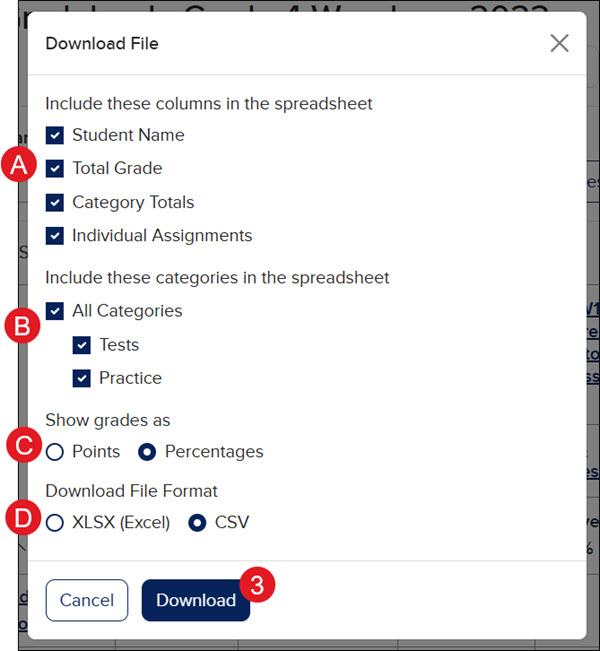
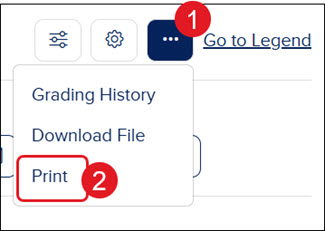
<p><a href="https://hub.mheducation.com/share/bin6btymovuv" target="_blank">View the demo in a separate tab.</a></p> <p><a href="https://hub.mheducation.com/share/pfrzhbyagk6t" target="_blank">View the Spanish version of the demo.</a></p> <p> </p> <p>The McGraw Hill Assessment Gradebook is only available for select ConnectED programs. These programs use the McGraw Hill Assessment program. If your program uses eAssessment, you will want to view the <a href="https://www.mheducation.com/prek-12/support/knowledge/eassessment-management-resources" target="_blank">eAssessment Management Resources</a> article.</p> <p> </p> <h2><span class="fs-5">Article Contents</span></h2> <p><a href="#Access" target="_self">Access the Gradebook</a></p> <p><a href="#Navigate" target="_self">Navigate the Gradebook</a></p> <p><a href="#Student_Gradebook" target="_self">Individual Student Gradebook</a></p> <p><a href="#Grading_Options" target="_self">Grading Options</a></p> <p><a href="#Display_Options" target="_self">Display Options</a></p> <p><a href="#Grading_History" target="_self">Grading History</a></p> <p><a href="#Download_Gradebook" target="_self">Download Gradebook File</a></p> <p><a href="#Print_Gradebook" target="_self">Print Gradebook</a></p> <p> </p> <h3 class="fs-5"><a id="Access"></a>Access the Gradebook</h3> <p>For <em>Wonders</em> ©2017, 2020, & 2023, hover over <strong>Assessment & Data</strong> (A) and click <strong>Online Assessment Center</strong> (B) from the menu.</p> <p><img src="/content/dam/mhe/support/support-images/dts-k12-images/ced-mh-assess-gradebook/ced-mhassess-gradebook-1.jpg" data-assetref="ced-mhassess-gradebook-1-1793366379327"></p> <p>For Networks, click on <strong>Assess </strong>(C) from the navigation bar.</p> <p><img src="/content/dam/mhe/support/support-images/dts-k12-images/ced-mh-assess-gradebook/ced-mhassess-gradebook-2.jpg" data-assetref="ced-mhassess-gradebook-2-1793366386260"></p> <p>For other ConnectED programs, click on <strong>Menu </strong>(D) and then on <strong>Assessments </strong>(E).</p> <p><img src="/content/dam/mhe/support/support-images/dts-k12-images/ced-mh-assess-gradebook/ced-mhassess-gradebook-3.jpg" data-assetref="ced-mhassess-gradebook-3-1793366392470"></p> <p>Click on the <strong>Gradebook </strong>tab (F).</p> <p><strong>Note:</strong> The McGraw Hill Assess gradebook displays assigned assessments exclusively and will not reflect any other assignment types given to students.</p> <p><img src="/content/dam/mhe/support/support-images/dts-k12-images/ced-mh-assess-gradebook/ced-mhassess-gradebook-4.jpg" data-assetref="ced-mhassess-gradebook-4-1793366520359"></p> <p> </p> <h3 class="fs-5"><a id="Navigate"></a>Navigate the Gradebook</h3> <p>The Gradebook page lists each assigned assessment, rostered students, and their scores for each assessment.</p> <p style="margin-left: 40.0px;"><img src="/content/dam/mhe/support/support-images/dts-k12-images/ced-mh-assess-gradebook/ced-mhassess-gradebook-5.jpg" data-assetref="ced-mhassess-gradebook-5-1793366768097"></p> <ol class="list-type-alphabet-uppercase"> <li>Enter a <strong>Start </strong>and <strong>End Date</strong> and click the <strong>Apply </strong>button to view assigned assessments for a selected date range.<br> <br> </li> <li>Click the <strong>Reset </strong>button to clear the selected dates.<br> <br> </li> <li>Click the <strong>Filters </strong>button to select Student and Assignment Filters.<br> <br> </li> <li>Click the <strong>Gradebook Settings</strong> button to make changes to the <a href="#Display_Options">Display Options</a> and the <a href="#Grading_Options">Grading Options</a>.<br> <br> </li> <li>Click the <strong>Options </strong>button to view the <a href="#Grading_History">Grading History</a> and <a href="#Download_Gradebook">download</a> or <a href="#Print_Gradebook">print the gradebook</a>.<br> <br> </li> <li>Click on an assessment name to navigate to the<strong> Assigned Assessments</strong> page for that assessment.<br> <br> </li> <li>Click on the <a href="https://www.mheducation.com/prek-12/support/knowledge/mh-assess---class-scoresheet.html" target="_blank"><strong>Class Scoresheet</strong></a> to manually score the assessment.<br> <br> </li> <li><a href="#Student_Gradebook">Click the <strong>Student </strong>name</a> to navigate to that student's gradebook.</li> </ol> <p> </p> <h3 class="fs-5"><a id="Student_Gradebook"></a>Individual Student Gradebook</h3> <ol class="list-type-alphabet-uppercase"> <li>An individual student's gradebook can be accessed by clicking on their name in the <strong>Student </strong>column.<br> <br> <img src="/content/dam/mhe/support/support-images/dts-k12-images/ced-mh-assess-gradebook/ced-mhassess-gradebook-6.jpg" data-assetref="ced-mhassess-gradebook-6-1793367472656"><br> <br> <img src="/content/dam/mhe/support/support-images/dts-k12-images/ced-mh-assess-gradebook/ced-mhassess-gradebook-7.jpg" data-assetref="ced-mhassess-gradebook-7-1793368136104"><br> <br> </li> <li>Switch between students by clicking the back and forth arrows or selecting a student name from the drop-down.<br> <br> </li> <li>Narrow down the list of assignments by selecting options from the <strong>Categories </strong>and <strong>Filter by</strong> drop-downs and clicking the <strong>Apply </strong>button.<br> <br> </li> <li>Click the <strong>Clear </strong>button to clear any selected filters.<br> <br> </li> <li>Assessment assignments are broken into <strong>Tests </strong>and <strong>Practice</strong> sections.<br> <br> </li> <li>Each assignment will show the <strong>assignment name</strong>, the student's <strong>Score</strong>, any associated <strong>Score Notes</strong>, as well as the <strong>Due </strong>and <strong>Submission Dates</strong>.<br> <br> </li> <li>Click on the <strong>Assignment </strong>name to navigate to the <strong>Assigned Assessments</strong> page for that selection.<br> <br> </li> <li>Click the <strong>Print </strong>button to print or save the student's gradebook.<br> <br> </li> <li>Click the <strong>Options </strong>button in the <strong>Actions </strong>column to <strong>Excuse Score</strong>, <strong>Add a Note</strong>, <strong>View Scoresheet</strong>, <strong>Give Extension</strong>, or <strong>View Results</strong>.</li> </ol> <p> </p> <h3 class="fs-5"><a id="Grading_Options"></a>Grading Options</h3> <p>The Grading Options allow you to make changes to the grading scale and grade percentages. </p> <ol> <li>Click the <strong>Gradebook Settings</strong> (gear icon) button.<br> <br> </li> <li>Click on <strong>Grading Options</strong> from the menu.<br> <br> <img src="/content/dam/mhe/support/support-images/dts-k12-images/ced-mh-assess-gradebook/ced-mhassess-gradebook-8.jpg" data-assetref="ced-mhassess-gradebook-8-1793368688608"><br> <br> A. Click the pencil icon in each column and row to make changes to the <strong>Grade Scale</strong>, <strong>Percentage Low</strong>, and/or <strong>Percentage High.<br> <br> </strong>B. Click the <strong>Delete</strong> (trash can) button to remove the grading scale row.<br> <br> C. Click the <strong>Add Grade </strong>button to add a new Grading Scale row.<br> <br> D. Select an option from the <strong>Rounding</strong> drop-down to reorganize the rows in the gradebook.<br> <br> </li> <li>Click the <strong>Save </strong>button to save any changes made.<br> <br> <img src="/content/dam/mhe/support/support-images/dts-k12-images/ced-mh-assess-gradebook/ced-mhassess-gradebook-9.jpg" data-assetref="ced-mhassess-gradebook-9-1793369016626"></li> </ol> <p> </p> <h3 class="fs-5"><a id="Display_Options"></a>Display Options</h3> <p>The Display Options allow you to adjust what is seen within the Gradebook.</p> <ol> <li>Click the <strong>Gradebook Settings</strong> (gear icon) button.<br> <br> </li> <li>Click on <strong>Display Options</strong> from the menu.<br> <br> <img src="/content/dam/mhe/support/support-images/dts-k12-images/ced-mh-assess-gradebook/ced-mhassess-gradebook-10.jpg" data-assetref="ced-mhassess-gradebook-10-1793369132227"><br> <br> A. The <strong>Total Grade</strong> appears in the Gradebook by default. To remove it from view, uncheck the option.<br> <br> B. Select the <strong>Show Assignments</strong> radio button to view the Individual Assignments or Category Totals.<br> <br> C. Select the <strong>Show grades as</strong> radio button to view grades by <strong>Percentage </strong>or <strong>Points</strong>.<br> <br> D. Click the <strong>Sort assignments by</strong> drop-down to select how you want to sort the grades columns.<br> <br> </li> <li>Click the <strong>Save </strong>button to save any changes made.<br> <br> <img src="/content/dam/mhe/support/support-images/dts-k12-images/ced-mh-assess-gradebook/ced-mhassess-gradebook-11.jpg" data-assetref="ced-mhassess-gradebook-11-1793369302401"></li> </ol> <p> </p> <h3 class="fs-5"><a id="Grading_History"></a>Grading History</h3> <p>The Grading History lists adjustments made to the student's scores by instructors with access to this course.</p> <ol> <li>Click the <strong>Options </strong>button.<br> <br> </li> <li>Click on <strong>Grading History</strong> from the menu.<br> <br> <img src="/content/dam/mhe/support/support-images/dts-k12-images/ced-mh-assess-gradebook/ced-mhassess-gradebook-12.jpg" data-assetref="ced-mhassess-gradebook-12-1793370232001"><br> <br> The page will show details as to which student the grade change was for, the assignment name, their previous score, and their current score. It will also show the date and time of the adjustment and the teacher who made the change.<br> <br> A. Enter a <strong>Start </strong>and/or <strong>End Date</strong> to narrow down the list of changes.<br> <br> B. Click on an <strong>Assignment </strong>name to navigate to the<strong> Assignment Details</strong> page for that selection.<br> <br> C. Click the <strong>Download</strong> button to save/print the Grading History.<br> <br> <img src="/content/dam/mhe/support/support-images/dts-k12-images/ced-mh-assess-gradebook/ced-mhassess-gradebook-17.jpg" data-assetref="ced-mhassess-gradebook-17-1793712937809"></li> </ol> <p> </p> <h3 class="fs-5"><a id="Download_Gradebook"></a>Download Gradebook File</h3> <p>The Download File option allows you to export the gradebook into an XLSX or CSV file.</p> <ol> <li>Click the <strong>Options </strong>button.<br> <br> </li> <li>Click <strong>Download File</strong> from the menu.<br> <br> <img src="/content/dam/mhe/support/support-images/dts-k12-images/ced-mh-assess-gradebook/ced-mhassess-gradebook-14.jpg" data-assetref="ced-mhassess-gradebook-14-1793372028227"><br> <br> A. Choose which columns to include in your spreadsheet by checking the boxes next to: <strong>Student Name</strong>, <strong>Total Grade</strong>,<strong> Category Totals</strong>, and/or <strong>Individual Assignments</strong>.<br> <br> B. Select whether to include <strong>All Categories</strong> or a specific type, such as <strong>Tests</strong> or <strong>Practice </strong>assignments.<br> <br> C. Select the radio button to view the grades as <strong>Points </strong>or <strong>Percentages</strong>.<br> <br> D. Select the radio button to download the file as an <strong>XLSX (Excel)</strong> or a<strong> CSV</strong>.<br> <br> </li> <li>Click the <strong>Download </strong>button.<br> <br> <img src="/content/dam/mhe/support/support-images/dts-k12-images/ced-mh-assess-gradebook/ced-mhassess-gradebook-15.jpg" data-assetref="ced-mhassess-gradebook-15-1793372462440"></li> </ol> <p> </p> <h3 class="fs-5"><a id="Print_Gradebook"></a>Print Gradebook</h3> <p>The <strong>Print</strong> option allows you to print or save the current view of the gradebook.</p> <ol> <li>Click the <strong>Options </strong>button.<br> <br> </li> <li>Click on <strong>Print</strong> from the menu.<br> <br> <img src="/content/dam/mhe/support/support-images/dts-k12-images/ced-mh-assess-gradebook/ced-mhassess-gradebook-16.jpg" data-assetref="ced-mhassess-gradebook-16-1793372594889"><br> <br> </li> <li>Select the preferred printing specs from the pop-up.<br> <br> </li> <li>Click the <strong>Print </strong>button.</li> </ol> dts Learn how teachers use the McGraw Hill ConnectED assessment gradebook to view scores, manage assessments, and track student performance. 2026-11-03 McGraw Hill Assessment ConnectED Gradebook Learn how teachers use the McGraw Hill ConnectED assessment gradebook to view scores, manage assessments, and track student performance. Learn how teachers use the McGraw Hill ConnectED assessment gradebook to view scores, manage assessments, and track student performance.
Learn how teachers use the McGraw Hill ConnectED assessment gradebook to view scores, manage assessments, and track student performance.
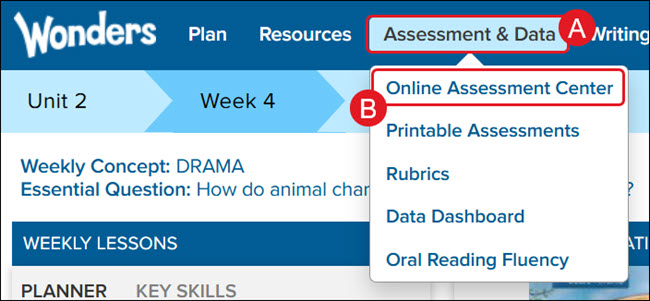
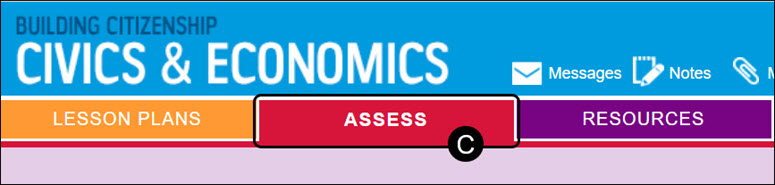
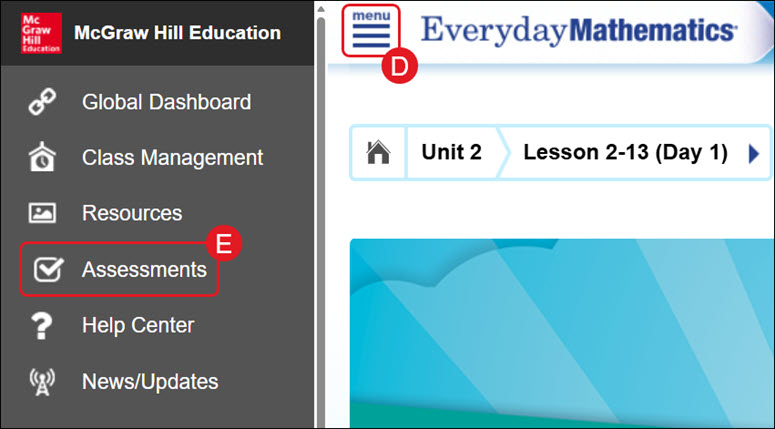
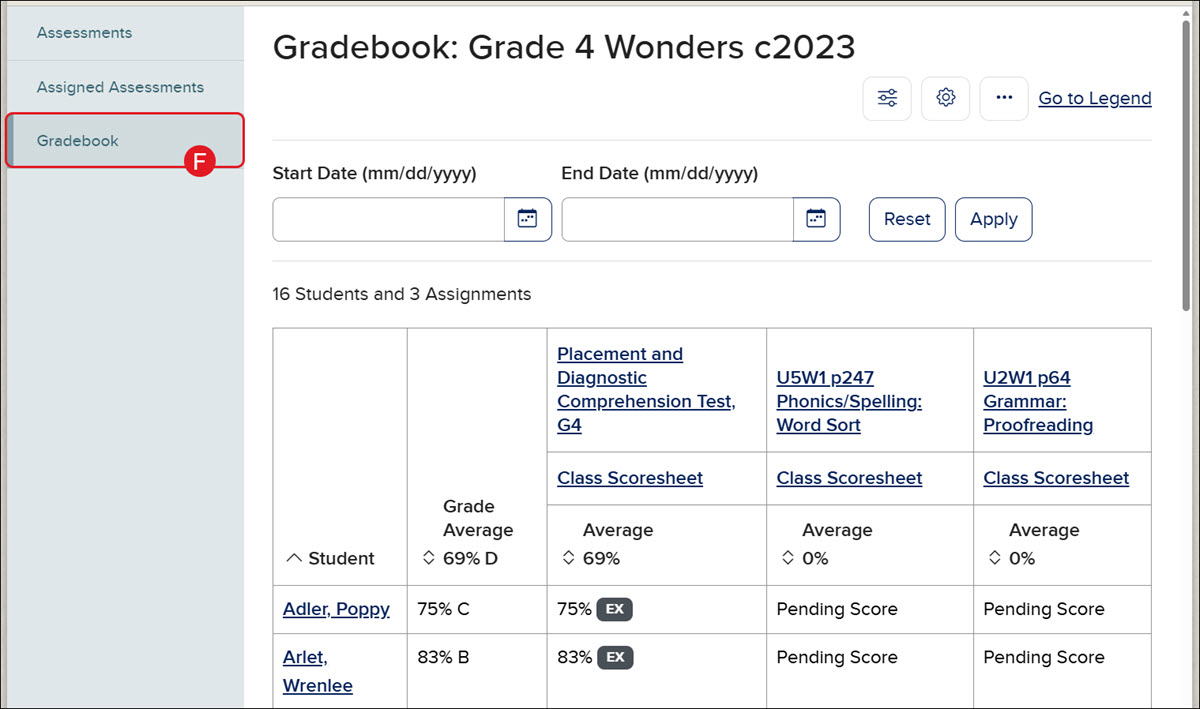
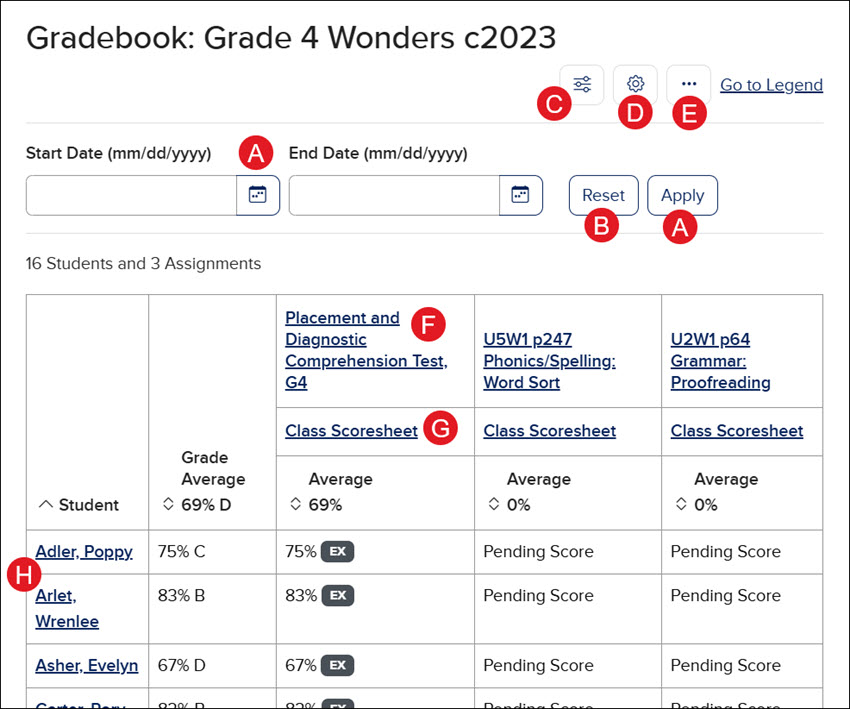
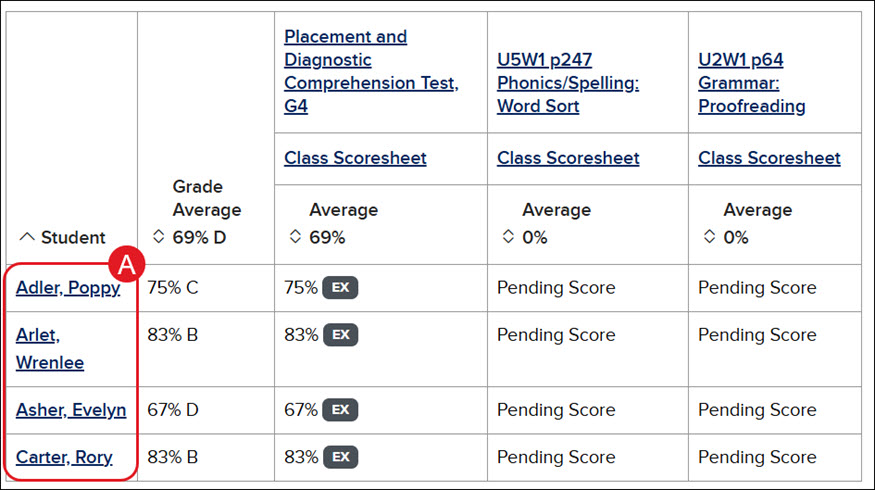
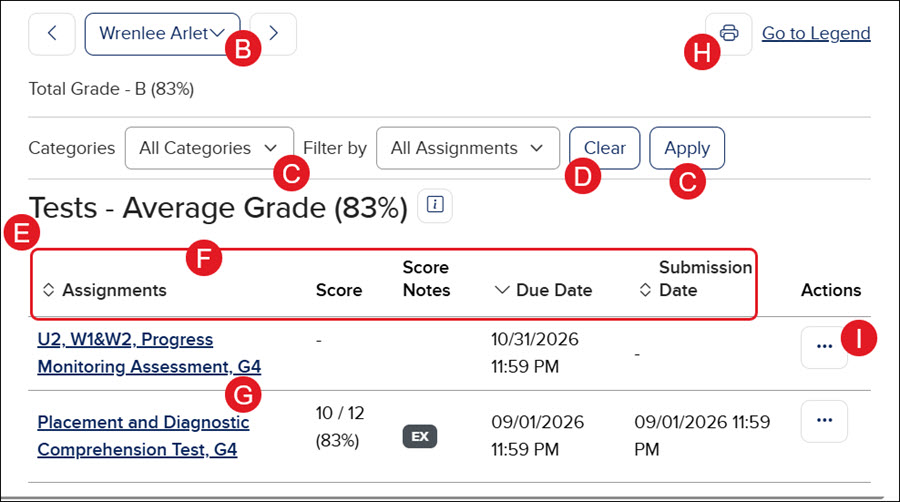
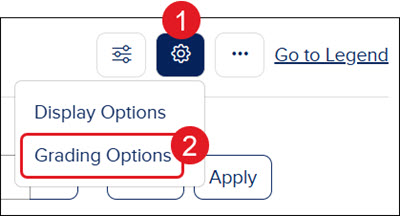
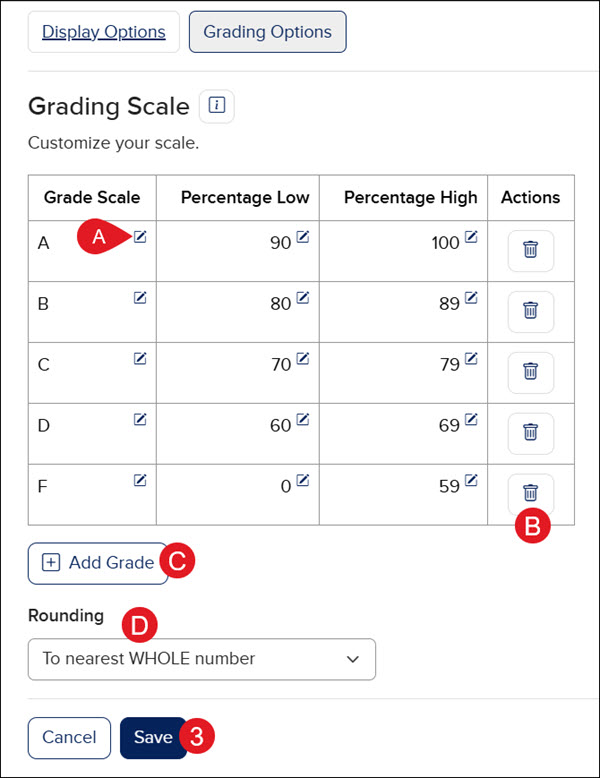
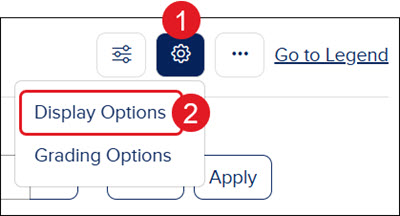
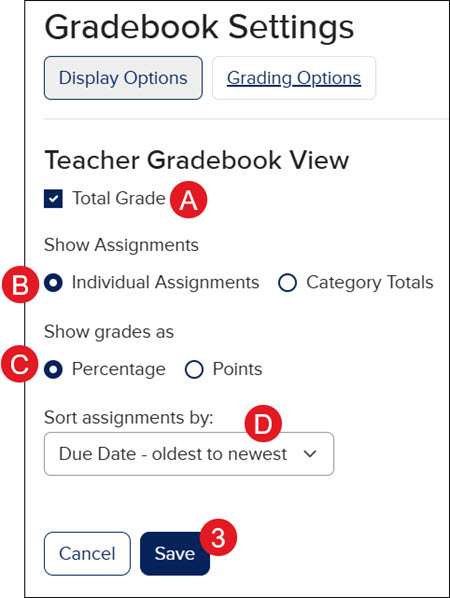
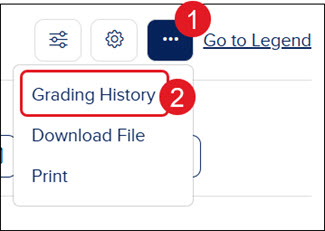
View the demo in a separate tab. View the Spanish version of the demo. The McGraw Hill Assessment Gradebook is only available for select ConnectED programs. These programs use the McGraw Hill Assessment program. If your program uses eAssessment, you will want to view the eAssessment Management Resources article. Article Contents Access the Gradebook Navigate the Gradebook Individual Student Gradebook Grading Options Display Options Grading History Download Gradebook File Print Gradebook Access the Gradebook For Wonders ©2017, 2020, & 2023, hover over Assessment & Data (A) and click Online Assessment Center (B) from the menu. For Networks, click on Assess (C) from the navigation bar. For other ConnectED programs, click on Menu (D) and then on Assessments (E). Click on the Gradebook tab (F). Note: The McGraw Hill Assess gradebook displays assigned assessments exclusively and will not reflect any other assignment types given to students. Navigate the Gradebook The Gradebook page lists each assigned assessment, rostered students, and their scores for each assessment. Enter a Start and End Date and click the Apply button to view assigned assessments for a selected date range. Click the Reset button to clear the selected dates. Click the Filters button to select Student and Assignment Filters. Click the Gradebook Settings button to make changes to the Display Options and the Grading Options. Click the Options button to view the Grading History and download or print the gradebook. Click on an assessment name to navigate to the Assigned Assessments page for that assessment. Click on the Class Scoresheet to manually score the assessment. Click the Student name to navigate to that student's gradebook. Individual Student Gradebook An individual student's gradebook can be accessed by clicking on their name in the Student column. Switch between students by clicking the back and forth arrows or selecting a student name from the drop-down. Narrow down the list of assignments by selecting options from the Categories and Filter by drop-downs and clicking the Apply button. Click the Clear button to clear any selected filters. Assessment assignments are broken into Tests and Practice sections. Each assignment will show the assignment name, the student's Score, any associated Score Notes, as well as the Due and Submission Dates. Click on the Assignment name to navigate to the Assigned Assessments page for that selection. Click the Print button to print or save the student's gradebook. Click the Options button in the Actions column to Excuse Score, Add a Note, View Scoresheet, Give Extension, or View Results. Grading Options The Grading Options allow you to make changes to the grading scale and grade percentages. Click the Gradebook Settings (gear icon) button. Click on Grading Options from the menu. A. Click the pencil icon in each column and row to make changes to the Grade Scale, Percentage Low, and/or Percentage High. B. Click the Delete (trash can) button to remove the grading scale row. C. Click the Add Grade button to add a new Grading Scale row. D. Select an option from the Rounding drop-down to reorganize the rows in the gradebook. Click the Save button to save any changes made. Display Options The Display Options allow you to adjust what is seen within the Gradebook. Click the Gradebook Settings (gear icon) button. Click on Display Options from the menu. A. The Total Grade appears in the Gradebook by default. To remove it from view, uncheck the option. B. Select the Show Assignments radio button to view the Individual Assignments or Category Totals. C. Select the Show grades as radio button to view grades by Percentage or Points. D. Click the Sort assignments by drop-down to select how you want to sort the grades columns. Click the Save button to save any changes made. Grading History The Grading History lists adjustments made to the student's scores by instructors with access to this course. Click the Options button. Click on Grading History from the menu. The page will show details as to which student the grade change was for, the assignment name, their previous score, and their current score. It will also show the date and time of the adjustment and the teacher who made the change. A. Enter a Start and/or End Date to narrow down the list of changes. B. Click on an Assignment name to navigate to the Assignment Details page for that selection. C. Click the Download button to save/print the Grading History. Download Gradebook File The Download File option allows you to export the gradebook into an XLSX or CSV file. Click the Options button. Click Download File from the menu. A. Choose which columns to include in your spreadsheet by checking the boxes next to: Student Name, Total Grade, Category Totals, and/or Individual Assignments. B. Select whether to include All Categories or a specific type, such as Tests or Practice assignments. C. Select the radio button to view the grades as Points or Percentages. D. Select the radio button to download the file as an XLSX (Excel) or a CSV. Click the Download button. Print Gradebook The Print option allows you to print or save the current view of the gradebook. Click the Options button. Click on Print from the menu. Select the preferred printing specs from the pop-up. Click the Print button.
dts
Customer Support, PreK-12, Classroom Teacher, Preschool, Elementary School, Middle School, High School, Direct Login & Auto-Rostering, Direct Login & Manual-Rostering, SSO & Auto-Rostering, SSO & Manual-Rostering, Core, Intervention, Supplemental, AP, Honors & Electives, Literacy, Math, Science, Social Studies, Health, Visual & Performing Arts, World Languages, Everyday Mathematics 4 (K-6), Open Court Reading 2016, 2018, 2023, Wonders Balanced Literacy 2016, Maravillas 2020 & 2017, Music! Its Role, McGraw Hill My Math 2018, Networks 2018, OCR Foundational Skills Kit, OCR Word Analysis Kit, Spotlight on Music, Wonders 2023 2020 2017, Grades & Assignments