
Higher Ed Event Page Setup in AEM

Whether you're new to creating Event pages using Adobe Experience Manager (AEM) or just need a refresher, this training hub is your go-to resource. You'll find best practices for writing and formatting event pages along with step-by-step video guides to help you confidently publish Higher Ed events on mheducation.com

I want to know more about: 

Event Process Overview for AEM

Step 1: Gather Event Content in Template

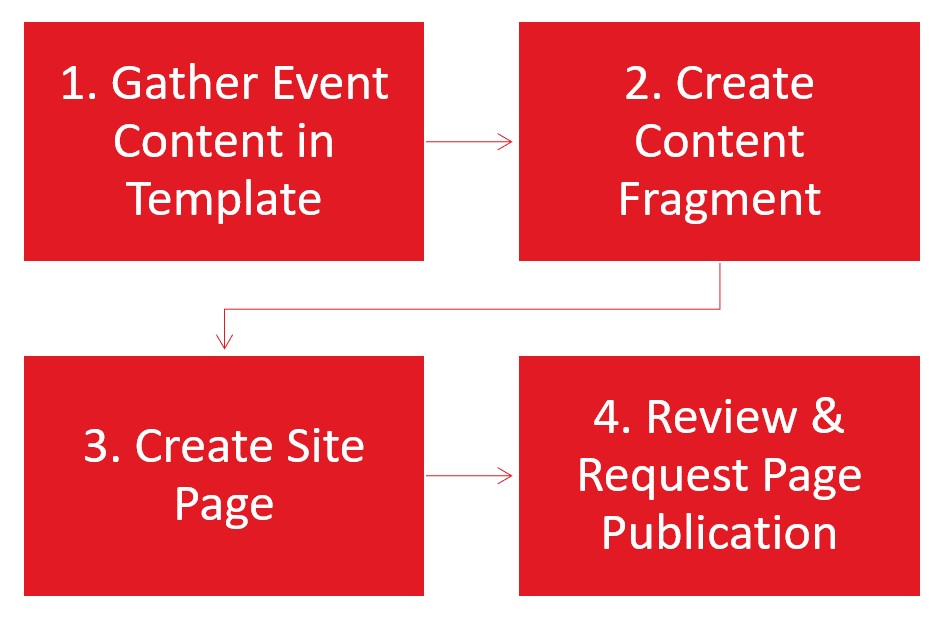
Use the Content Gathering Toolkit to finalize event details so it's easy to copy and paste into AEM. If using a Marketo form, submit this info to the Marketo team via Asana before proceeding to the next step.

Step 2: Create Event Content Fragment

Create the blog content fragment by entering event details from the template and save it.

Step 3: Create Event Website Page

Create the blog website page with the content fragment using a Workflow to generate the page automatically.

Step 4: Review & Request Event Page Publication

Review the event website page and use Workflow to request publication. Note: you can schedule it for future publication in this step.

Event Journey Map

Learn about the step-by-step process for creating and managing Higher Ed Event pages for: 

  • Live Webinar pages (with Zoom + Marketo registration)
  • On-Demand Webinar pages (using Vidyard recordings)

Follow the full journey from planning a live webinar with a registration page to launching an on-demand recording and get best practices for setup and timing.

Planning Phase

Setting up an Event and preparing webpage content

  • 1

    Decide to Host an Event

    Make the decision to host a webinar or live event

  • 2

    Setup Zoom Event

    Create your Zoom meeting or webinar to get a Meeting/Event ID

  • 3

    Gather Content

    Optional

    Prepare content for AEM page creation using Content Gathering Toolkit.

  • 4

    Create Content Fragment in AEM

    Choose the Live Event with Marketo content fragment template in AEM & enter event details.

  • 5

    Build Site Page from Content Fragment

    Submit a Workflow to automatically create website page using content entered in the Content Fragment.

  • 6

    Confirm Zoom Details with Marketo Team

    Create Asana request using the [MKTO: Webinar Reg] task template for Marketo Team to create the registration program and start the approval process.

Review Phase

Having your event page approved and published live

  • 7

    Review Page & Submit Approval Workflow

    Triggers review by Creative, Marketo & Digital Content Teams

  • 8

    Reviewer Approval & Publish

    (allow 2-3 business days)

    Teams review and publish your page live.

Execution Phase

Hosting your event and generating recordings

  • 9

    Host the Event

    Celebrate! People have registered and your event is happening.

  • 10

    Receiving Recording

    (processing time: 5 business days)

    Get the finalized recording file post-event

  • 11

    Submit for Vidyard Upload

    Send to Higher Ed Video Team for Vidyard upload

On-Demand Phase

Creating and publishing your on-demand event page

  • 12

    Create On-Demand Content Fragment

    Choose the On-Demand Webinar template and use same description content as on event registration page.

  • 13

    Build Webinar Site Page using Workflow

    Submit a Workflow to automatically create website page using content entered in the Content Fragment.

  • 14

    Review Page & Submit Approval Workflow

    (allow 1 business day)

    This kicks-off the review & publication process by the Digital Content Team.


  • Event Creation Guide

    Product Marketing Managers download this step-by-step guide with screenshots and expert AEM tips.

How Create an Event Page in AEM

AEM Training Videos

  • Watch step-by-step videos with expert nariation.  
  • Use the "Guide Me" button in the bottom right corner of each video to launch step-by-step walkthroughs.
  • First-time users: it will prompt you to install the Scribe extension (quick and easy).

Still have questions? Email an AEM expert: DCMteam@mheducation.com (expect responses within 24 hours during standard business hours)
 

Click the arrow icon in the lower right corner of any video to launch a guided walkthrough. This will open a side panel with step-by-step instructions:

How to Choose a Content Fragment Template

There are three types of Event Content Fragment templates available in AEM, plus a dedicated template for Speaker/Author Bios.

Each template has its own layout and fields tailored to the media type, so selecting the right one from the start helps ensure proper formatting and user experience.

1. Live Event with Marketo Registration

  • Best for: future events that use Marketo form for registration
  • Includes: Online Virtual and In-person event types

2. Live Event with External Registration Link

  • Best for: future events that do not use Marketo Form for registratoin
  • Includes: Online Virutal and In-person event types

3. Recorded Webinar

  • Best for: On-demand video-focused content
  • Includes: Vidyard video embed only

4. Speaker/Author Bio

  • Best for: Creating a reusable bio snipit with image and text
  • Note: Do not duplicate existing speakers/authors in AEM. Only create a new Bio when one does not yet exist

Create an Event Website Page

After creating an Event Content Fragment run a workflow that automatically builds the Event webpage. 

Event Publishing Process

After creating the Event website page, confirm it looks good then start the Approval & Publication workflow. Live events with Marketo will be reviewed by Creative & Marketo teams with a final review and publication by the Digital Content Team. On-Demand events will only be reviewed by the Digital Content Team. 

Uploading Assets to the DAM in AEM

Use for uploading Author Bio images or Social Share images.

Image Best Practices:

1.   Avoid text in images – it can be difficult to read for users who rely on screen readers or have visual impairments. It also doesn’t scale well for responsive designs, causing issues on various devices.

2.  Image File Name – all lowercase letters, use hyphen to replace spaces & no special characters.

Social & Main Image Specs:

Size: 617 x 347px

File size: >200KB

Format: JPG or PNG

Location: /content/dam/mhe/blog/[current-year]/image

Social Share Image: 

This is an image that displays when the blog is shared on social media and as the thumbnail when post is referenced on mheducation.com If no image is submitted, a default placeholder McGraw Hill logo will be used.

Author Bio Image:

Design a square image (Aspect Ratio: 1:1 Square; 150x150 px; .jpg or .png or .webp) with the subject centered and enough margin around the edges so it looks good when styled as a circle using border-radius: 50%

File name format example: [first-name]-[last-name].jpg

  • all lowercase letters
  • hyphen between first and last name (no spaces or underscores)
  • no special characters (e.g., no accents, apostrophes, or punctuation)

Image file name format examples:

jane-smith.jpg

john-oconnor.png

Creating a Speaker Bio Content Fragment

Do not duplicate existing speakers in AEM. Only create a new Bio when one does not yet exist

Pro Tip: Bio images can be requested from Creative with these specs:

Design a square image (Aspect Ratio: 1:1 Square; 400x400 px; .jpg or .png or .webp) with the subject centered and enough margin around the edges so it looks good when styled as a circle using border-radius: 50%

File name format example: [first-name]-[last-name].jpg

  • all lowercase letters
  • hyphen between first and last name (no spaces or underscores)
  • no special characters (e.g., no accents, apostrophes, or punctuation)

Image file name format examples:

jane-smith.jpg

john-oconnor.png

How to Search and Sort in AEM Assets

Top