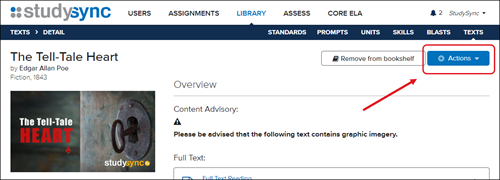
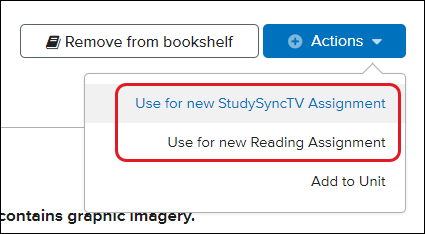
4. Click on the assignment option you would like to assign.
Options will vary by title.
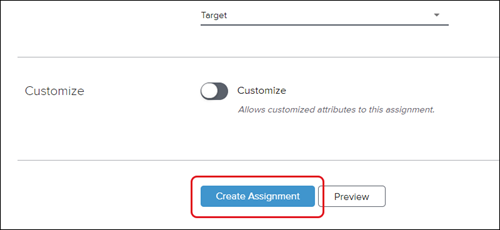
6. Complete the assignment configuration to suit instructional needs.
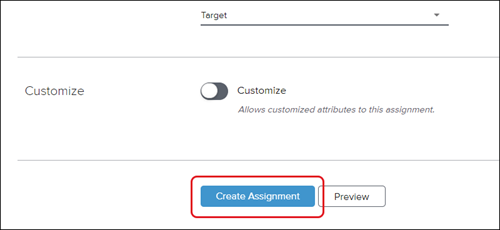
7. Click Create Assignment button at the bottom.
Find and reactivate an inactive assignment:
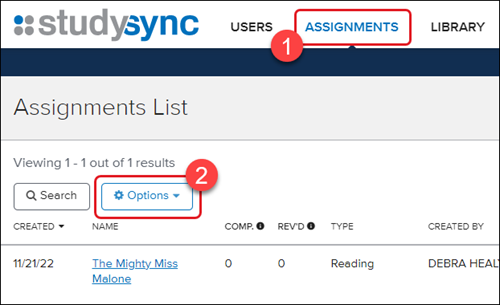
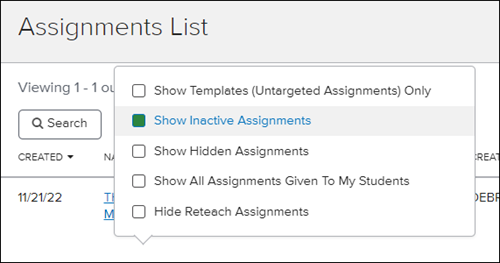
1. From the Assignments tab, click the Options button on the top-left.
2. Select the Show Inactive Assignments box.
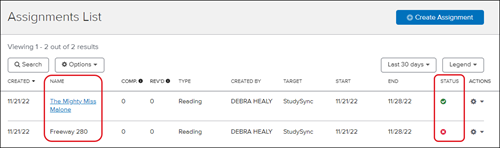
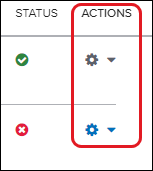
All inactive assignments will then show in the Assignments list. Active assignment titles will show blue with a green checkmark under Status. Inactiveassignment titles will show black with a red x icon under Status.
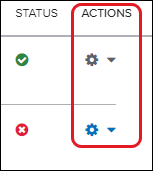
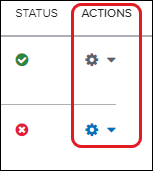
3. Click the Actions icon to the right of the assignment.
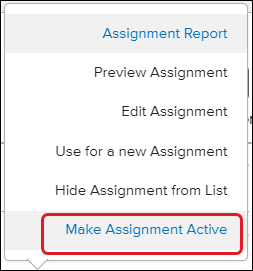
4. Click Make Assignment Active from the menu.
Edit an assignment:
1. From the Assignments tab, click the Actions icon.
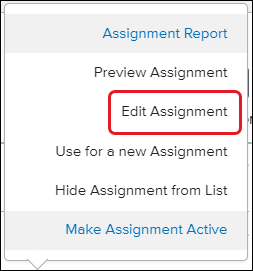
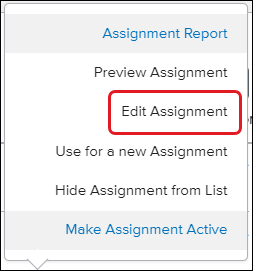
2. Select Edit Assignment from the menu.
3. Make desired changes and click Save Assignment at the bottom.
Reuse an assignment:
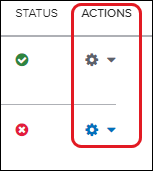
1. From the Assignments tab, click the Actions icon.
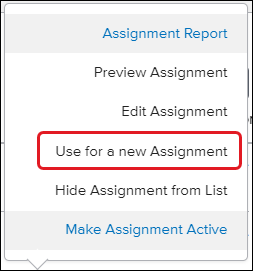
2. Click Use for a new Assignment from the menu.
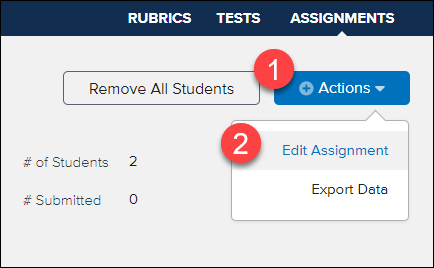
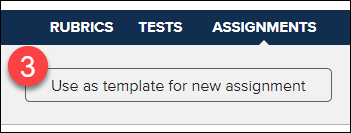
This option can also be selected by clicking on the assignment name and then Actions. Click Edit Assignment. Click the Use as template for new assignment button.
Deactivate an assignment:
1. From the Assignments tab, click the Actions icon.
2. Select Edit Assignment from the menu.
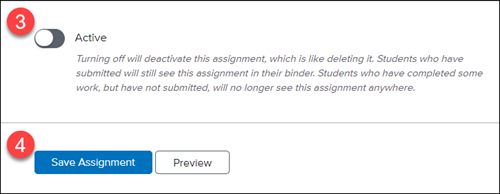
3. Scroll to the bottom of the page, toggle the Active button so it turns from green to gray.
4. Click Save Assignment.
Reopen an assignment for a student:
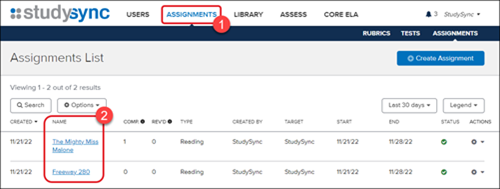
1. From the Assignments tab, click on the Assignment name.
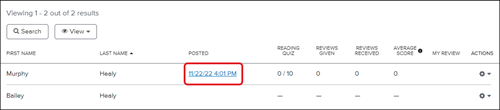
2. Click on the date and time for the student you would like to reopen the assignment for.
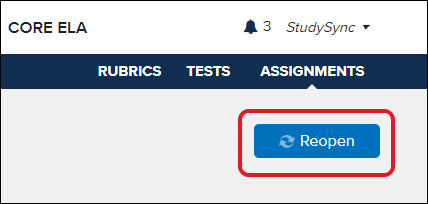
3. Click Reopen in the top-right.
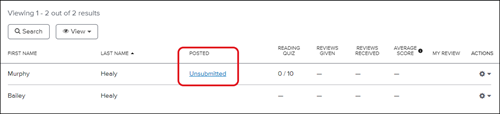
The Posted date and time will then switch to show resubmitted for that student.
Help us improve!
Let us know how we can improve our support information by providing feedback in this short survey.
Top
Regional Page Available
It looks like you're outside the United States. Do you want to see your regional version of this page?
Support Topics/Assessments & Reporting/Grades & Assignments
Context/Integration Type/SSO & Manual-Rostering
prek-12
2026-03-24T18:46:19.295-03:00
<h4>Topics covered in this article: </h4> <p><a href="#createcoreelaunitassignment">Create an assignment from a Core ELA Unit</a><br> <a href="#howtocreateassignmentfromlibrary">Create an assignment from the Library</a><br> <a href="#inactiveassignments">Find and reactivate an inactive assignment</a><br> <a href="#editanassignment">Edit an assignment</a><br> <a href="#resuseanassignment">Reuse an assignment</a><br> <a href="#deleteanassignment">Deactivate an assignment</a><br> <a href="#reopen">Reopen an assignment for a student</a><br> <br> </p> <h2><a name="createcoreelaunitassignment" id="createcoreelaunitassignment"></a>Create an assignment from a Core ELA Unit:</h2> <p>1. After launching StudySync, click on <strong>CORE ELA</strong> from the top menu.<br> <br> 2. Select the desired <strong>grade level</strong> in the gray menu bar.<br> <br> 3. Select the Unit by clicking on the <strong>Core ELA Unit</strong> button.<br> <br> <img alt="image.png" src="/content/dam/mhe/support/support-images/migrated/rtaImage-1721200986.jpeg" data-assetref="rtaImage-1721200986-1778783315088"><br> <br> 4. Select one of the menu options: <strong>Integrated Reading and Writing</strong>, <strong>Extended Writing Project</strong> <strong>and Grammar</strong>, <strong>ELL Resources</strong>, or <strong>End-of-Unit Assessment</strong>.<br> <br> <img alt="image.png" src="/content/dam/mhe/support/support-images/migrated/rtaImage-1721201104.jpeg" data-assetref="rtaImage-1721201104-1778783315089"><br> <br> 5. <strong>Expand</strong> a title on the right. Click <strong>Assign</strong>.<br> <br> <img alt="image.png" src="/content/dam/mhe/support/support-images/migrated/rtaImage-1721201109.jpeg" data-assetref="rtaImage-1721201109-1778783315089"><br> <br> 6. Complete the assignment configuration to suit instructional needs.<br> <br> 7. Click <strong>Create Assignment</strong> button at the bottom.<br> <br> <img alt="image.png" src="/content/dam/mhe/support/support-images/migrated/rtaImage-1721201140.jpeg" data-assetref="rtaImage-1721201140-1778783315089"><br> <br> </p> <h2><a name="howtocreateassignmentfromlibrary" id="howtocreateassignmentfromlibrary"></a>Create an assignment from the Library:</h2> <p>1. From the <strong>Library</strong> tab, search for the desired title you would like to assign.</p> <ul> <li>Detailed steps can be found in the <a href="/content/mheducation/us/en/prek-12/support/knowledge/studysync-library" target="_blank">StudySync - Library</a> article.</li> </ul> <div> </div> <div>2. Click on the <strong>image</strong>. <br> <br> 3. Click on the <strong>Actions</strong> button in the top-right.<br> <br> <img alt="image.png" src="/content/dam/mhe/support/support-images/migrated/rtaImage-1721201133.jpeg" data-assetref="rtaImage-1721201133-1778783315089"><br> <br> 4. Click on the assignment option you would like to assign. </div> <ul> <li>Options will vary by title.</li> </ul> <div> </div> <div><img alt="image.png" src="/content/dam/mhe/support/support-images/migrated/rtaImage-1721201159.jpeg" data-assetref="rtaImage-1721201159-1778783315089"><br> <br> 6. Complete the assignment configuration to suit instructional needs.<br> <br> 7. Click <strong>Create Assignment</strong> button at the bottom.<br> <br> <img alt="image.png" src="/content/dam/mhe/support/support-images/migrated/rtaImage-1721201152.jpeg" data-assetref="rtaImage-1721201152-1778783315090"><br> <br> </div> <h2><a name="inactiveassignments" id="inactiveassignments"></a>Find and reactivate an inactive assignment:</h2> <p>1. From the <strong>Assignments</strong> tab, click the <strong>Options</strong> button on the top-left.<br> <br> <img alt="image.png" src="/content/dam/mhe/support/support-images/migrated/rtaImage-1721201175.jpeg" data-assetref="rtaImage-1721201175-1778783315090"><br> <br> 2. Select the <strong>Show Inactive Assignments</strong> box.<br> <br> <img alt="image.png" src="/content/dam/mhe/support/support-images/migrated/rtaImage-1721199800.jpeg" data-assetref="rtaImage-1721199800-1778783315090"><br> <br> All inactive assignments will then show in the Assignments list. Active assignment titles will show blue with a green checkmark under Status. <strong>Inactive</strong> <strong>assignment</strong> titles will show <strong>black with a red x icon</strong> under <strong>Status</strong>.<br> <br> <img alt="image.png" src="/content/dam/mhe/support/support-images/migrated/rtaImage-1721199827.jpeg" data-assetref="rtaImage-1721199827-1778783315090"><br> <br> 3. Click the <strong>Actions</strong> icon to the right of the assignment.<br> <br> <img alt="image.png" src="/content/dam/mhe/support/support-images/migrated/rtaImage-1721199848.jpeg" data-assetref="rtaImage-1721199848-1778783315090"><br> <br> 4. Click <strong>Make Assignment Active</strong> from the menu.<br> <br> <img alt="image.png" src="/content/dam/mhe/support/support-images/migrated/rtaImage-1721199858.jpeg" data-assetref="rtaImage-1721199858-1778783315091"><br> <br> </p> <h2><a name="editanassignment" id="editanassignment"></a>Edit an assignment:</h2> <p>1. From the <strong>Assignments</strong> tab, click the <strong>Actions</strong> icon.<br> <br> <img alt="image.png" src="/content/dam/mhe/support/support-images/migrated/rtaImage-1721199902.jpeg" data-assetref="rtaImage-1721199902-1778783315091"><br> <br> 2. Select <strong>Edit Assignment</strong> from the menu.<br> <br> <img alt="image.png" src="/content/dam/mhe/support/support-images/migrated/rtaImage-1721199863.jpeg" data-assetref="rtaImage-1721199863-1778783315091"><br> <br> 3. Make desired changes and click <strong>Save Assignment</strong> at the bottom.<br> <br> </p> <h2><a name="resuseanassignment" id="resuseanassignment"></a>Reuse an assignment:</h2> <p>1. From the <strong>Assignments</strong> tab, click the <strong>Actions</strong> icon.<br> <br> <img alt="image.png" src="/content/dam/mhe/support/support-images/migrated/rtaImage-1721199902-1.jpeg" data-assetref="rtaImage-1721199902-1-1778783315091"><br> <br> 2. Click <strong>Use for a new Assignment</strong> from the menu.<br> <br> <img alt="image.png" src="/content/dam/mhe/support/support-images/migrated/rtaImage-1721199885.jpeg" data-assetref="rtaImage-1721199885-1778783315091"><br> <br> This option can also be selected by clicking on the <strong>assignment name</strong> and then <strong>Actions</strong>. Click <strong>Edit Assignment</strong>. Click the <strong>Use as template for new assignment</strong> button.<br> <br> <img alt="image.png" src="/content/dam/mhe/support/support-images/migrated/rtaImage-1721199921.jpeg" data-assetref="rtaImage-1721199921-1778783315091"> <img alt="image.png" src="/content/dam/mhe/support/support-images/migrated/rtaImage-1721199914.jpeg" data-assetref="rtaImage-1721199914-1778783315091"><br> </p> <h2><br> <a name="deleteanassignment" id="deleteanassignment"></a>Deactivate an assignment:</h2> <p>1. From the <strong>Assignments</strong> tab, click the <strong>Actions</strong> icon.<br> <br> <img alt="image.png" src="/content/dam/mhe/support/support-images/migrated/rtaImage-1721199902-2.jpeg" data-assetref="rtaImage-1721199902-2-1778783315092"><br> <br> 2. Select <strong>Edit Assignment</strong> from the menu.<br> <br> <img alt="image.png" src="/content/dam/mhe/support/support-images/migrated/rtaImage-1721199863-1.jpeg" data-assetref="rtaImage-1721199863-1-1778783315092"><br> <br> 3. Scroll to the <strong>bottom of the page</strong>, toggle the <strong>Active</strong> button so it turns from green to gray.<br> <br> 4. Click <strong>Save Assignment</strong>.<br> <br> <img alt="image.png" src="/content/dam/mhe/support/support-images/migrated/rtaImage-1721199931.jpeg" data-assetref="rtaImage-1721199931-1778783315092"><br> </p> <h2><br> <a name="reopen" id="reopen"></a>Reopen an assignment for a student:</h2> <p>1. From the <strong>Assignments</strong> tab, click on the <strong>Assignment name</strong>.<br> <br> <img alt="image.png" src="/content/dam/mhe/support/support-images/migrated/rtaImage-1721203010.jpeg" data-assetref="rtaImage-1721203010-1778783315092"><br> <br> 2. Click on the <strong>date and time</strong> for the student you would like to reopen the assignment for.<br> <br> <img alt="image.png" src="/content/dam/mhe/support/support-images/migrated/rtaImage-1721203001.jpeg" data-assetref="rtaImage-1721203001-1778783315093"><br> <br> 3. Click <strong>Reopen</strong> in the top-right.<br> <br> <img alt="image.png" src="/content/dam/mhe/support/support-images/migrated/rtaImage-1721203044.jpeg" data-assetref="rtaImage-1721203044-1778783315093"><br> <br> The <strong>Posted</strong> date and time will then switch to show resubmitted for that student.<br> <br> <img alt="image.png" src="/content/dam/mhe/support/support-images/migrated/rtaImage-1721203059.jpeg" data-assetref="rtaImage-1721203059-1778783315093"></p> dts StudySync Assignments: step-by-step guidance, requirements, and tips to help you complete this task successfully. 2025-11-20 Create and Manage StudySync Assignments StudySync Assignments: step-by-step guidance, requirements, and tips to help you complete this task successfully. Create, manage, and assess assignments within the StudySync platform.
Create, manage, and assess assignments within the StudySync platform.
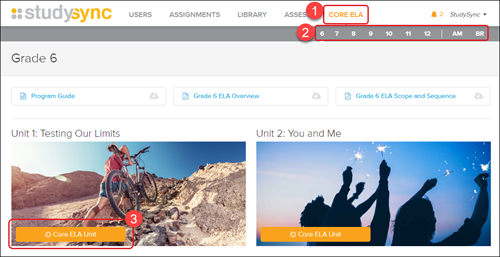
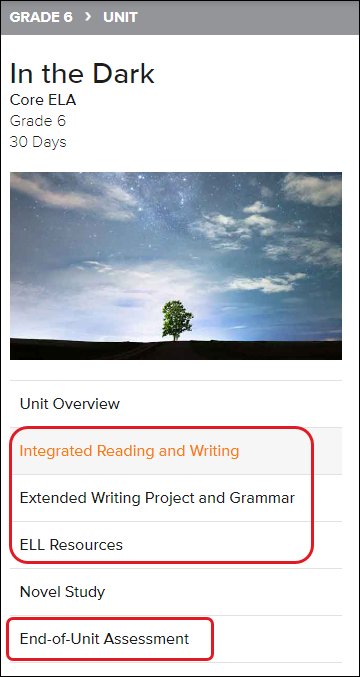
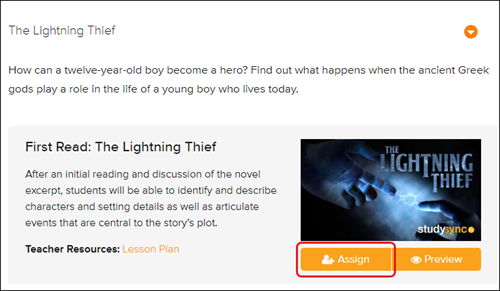
Topics covered in this article: Create an assignment from a Core ELA Unit Create an assignment from the Library Find and reactivate an inactive assignment Edit an assignment Reuse an assignment Deactivate an assignment Reopen an assignment for a student Create an assignment from a Core ELA Unit: 1. After launching StudySync, click on CORE ELA from the top menu. 2. Select the desired grade level in the gray menu bar. 3. Select the Unit by clicking on the Core ELA Unit button. 4. Select one of the menu options: Integrated Reading and Writing, Extended Writing Project and Grammar, ELL Resources, or End-of-Unit Assessment. 5. Expand a title on the right. Click Assign. 6. Complete the assignment configuration to suit instructional needs. 7. Click Create Assignment button at the bottom. Create an assignment from the Library: 1. From the Library tab, search for the desired title you would like to assign. Detailed steps can be found in the StudySync - Library article. 2. Click on the image. 3. Click on the Actions button in the top-right. 4. Click on the assignment option you would like to assign. Options will vary by title. 6. Complete the assignment configuration to suit instructional needs. 7. Click Create Assignment button at the bottom. Find and reactivate an inactive assignment: 1. From the Assignments tab, click the Options button on the top-left. 2. Select the Show Inactive Assignments box. All inactive assignments will then show in the Assignments list. Active assignment titles will show blue with a green checkmark under Status. Inactive assignment titles will show black with a red x icon under Status. 3. Click the Actions icon to the right of the assignment. 4. Click Make Assignment Active from the menu. Edit an assignment: 1. From the Assignments tab, click the Actions icon. 2. Select Edit Assignment from the menu. 3. Make desired changes and click Save Assignment at the bottom. Reuse an assignment: 1. From the Assignments tab, click the Actions icon. 2. Click Use for a new Assignment from the menu. This option can also be selected by clicking on the assignment name and then Actions. Click Edit Assignment. Click the Use as template for new assignment button. Deactivate an assignment: 1. From the Assignments tab, click the Actions icon. 2. Select Edit Assignment from the menu. 3. Scroll to the bottom of the page, toggle the Active button so it turns from green to gray. 4. Click Save Assignment. Reopen an assignment for a student: 1. From the Assignments tab, click on the Assignment name. 2. Click on the date and time for the student you would like to reopen the assignment for. 3. Click Reopen in the top-right. The Posted date and time will then switch to show resubmitted for that student.