illustrative math
5 steps to a 5 - ap test prep
impact social studies
arrive math
reveal math (k-12)
ap-edition
5-steps-to-a-5-test-prep
glencoe-health
teen-health
arrive-math
building-blocks
number-worlds
reading-laboratory
reading-mastery
mcgraw-hill-literacy
open-court-reading
reveal-math
illustrative-math
mcgraw-hill-math
inspire-science
mcgraw-hill-science
impact
mh-social-studies
asi-se-dice
mcgraw-hill-cte
level-up
instructor
Business Unit
Business Unit/PreK-12
Programs & Solutions
Programs & Solutions/AP Edition
Programs & Solutions/AP Edition/AP Precalculus
Context
Context/Education Level
Context/Education Level/High School
Context/Subject
Context/Subject/Science
Context/Integration Type
Context/Integration Type/Direct Login & Auto-Rostering
Programs & Solutions/AP Edition/AP Biology
Programs & Solutions/AP Edition/AP Music Theory
Context/Integration Type/SSO & Auto-Rostering
Programs & Solutions/Glencoe Health
Programs & Solutions/Glencoe Health/Glencoe Health 2022
Programs & Solutions/Open Court Reading
Programs & Solutions/Open Court Reading/Open Court Reading 2025
Programs & Solutions/Impact Social Studies
Programs & Solutions/Impact Social Studies/CA Impact 2019
Programs & Solutions/McGraw Hill Social Studies
Programs & Solutions/McGraw Hill Social Studies/FL Social Studies 2024 (K-12)
Context/Subject/World Languages
Programs & Solutions/Illustrative Math
Programs & Solutions/McGraw Hill CTE
Programs & Solutions/McGraw Hill CTE/CTE - Culinary Arts
Asset Format Type
Asset Format Type/Customer Support
Context/Curriculum Type
Context/Curriculum Type/Supplemental
Programs & Solutions/AP Edition/AP Statistics
Programs & Solutions/McGraw Hill Science
Programs & Solutions/McGraw Hill Science/TX Science 2025 (K-12)
Programs & Solutions/AP Edition/AP Public Speaking
Context/Subject/Health
Programs & Solutions/5 Steps to a 5 - AP Test Prep
Programs & Solutions/Asi Se Dice
Programs & Solutions/Asi Se Dice/Asi se Dice 2024
Support Topics
Support Topics/Tools & Product Integrations
Support Topics/Tools & Product Integrations/Tools & Resources
Programs & Solutions/Level Up
Programs & Solutions/Level Up/Level Up 9–12
Context/Curriculum Type/Career & Technical Education
Programs & Solutions/McGraw Hill Literacy
Programs & Solutions/McGraw Hill Literacy/McGraw Hill Literacy Soar!
Programs & Solutions/McGraw Hill CTE/CTE - Agriculture
Context/Subject/Math
Programs & Solutions/McGraw Hill Math
Programs & Solutions/McGraw Hill Math/Texas Math
Context/Curriculum Type/AP, Honors & Electives
Programs & Solutions/AP Edition/AP Chemistry
Context/Curriculum Type/Intervention
Programs & Solutions/Building Blocks
Programs & Solutions/Building Blocks/Building Blocks 2024
Programs & Solutions/McGraw Hill CTE/CTE - Computing and Technology
Programs & Solutions/Arrive Math
Support Topics/Classroom & Course Management
Support Topics/Classroom & Course Management/Plan & Present
Context/Integration Type/Direct Login & Manual-Rostering
Context/Curriculum Type/Core
Programs & Solutions/AP Edition/AP Language and Composition
Context/Subject/Literacy
Programs & Solutions/McGraw Hill CTE/CTE - Health Science
Programs & Solutions/AP Edition/AP History & Geography
Programs & Solutions/Inspire Science
Programs & Solutions/Inspire Science/Inspire Science 2020
Context/Subject/Visual & Performing Arts
Programs & Solutions/AP Edition/AP Computer Science
Context/Subject/Social Studies
Programs & Solutions/Reveal Math (K-12)
Programs & Solutions/Reveal Math (K-12)/CA Reveal Math (K-12)
Context/Education Level/Middle School
Programs & Solutions/McGraw Hill CTE/CTE - Early Childhood Education
Programs & Solutions/McGraw Hill Literacy/McGraw Hill Literacy Emerge!
Context/Education Level/Preschool
Programs & Solutions/AP Edition/AP African American Studies
Programs & Solutions/McGraw Hill Science/FL Science 2025 (K-12)
Programs & Solutions/McGraw Hill CTE/CTE - Business, Marketing, and Finance
Context/Education Level/Elementary School
Programs & Solutions/Number Worlds
Programs & Solutions/Number Worlds/Number Worlds 2024
Programs & Solutions/Level Up/Level Up K–5
Programs & Solutions/McGraw Hill Literacy/McGraw Hill Literacy Summit!
Personas
Personas/School Educator
Personas/School Educator/Classroom Teacher
Programs & Solutions/Reading Laboratory
Programs & Solutions/Reading Laboratory/SRA Reading Laboratory 2025
Programs & Solutions/AP Edition/AP Economics
Programs & Solutions/Building Blocks/Building Blocks PreK 2025
Programs & Solutions/AP Edition/AP Psychology
Programs & Solutions/McGraw Hill Science/TN Science (K-12)
Programs & Solutions/Teen Health
Programs & Solutions/Teen Health/Teen Health 2021
Programs & Solutions/McGraw Hill CTE/CTE - Criminal Justice
Programs & Solutions/Inspire Science/CA Inspire Science 2020
Programs & Solutions/Reading Mastery
Programs & Solutions/Reading Mastery/SRA Reading Mastery Transformations
Programs & Solutions/Level Up/Level Up 6–8
Context/Integration Type/SSO & Manual-Rostering
prek-12
2026-09-15T14:29:48.605-04:00
<h2 class="fs-5">Article Contents</h2> <p><a href="https://www.youtube.com/embed/xUkKrt_nsn4">View a video walkthrough</a></p> <p><a href="#access_presentation">Access Presentation</a></p> <p><a href="#presentation_tools">Presentation Tools</a></p> <p><a href="#toolbar">Annotation Toolbar</a></p> <p><a href="#delete_annotations">Delete Annotations</a></p> <p><a href="#reset_activities">Reset Activities</a></p> <p><a href="#teacher_notes">Teacher Notes</a></p> <p><a href="#edit_presentation">Edit Presentation</a></p> <p><a href="#sync_presentation">Sync Presentation to Additional Classes</a></p> <p> </p> <h3 class="fs-5"><span style="font-weight: normal; width: 11px; overflow: hidden; background-image: url("/libs/clientlibs/granite/richtext/resources/images/anchor.png"); background-position: left bottom; background-size: initial; background-repeat: no-repeat; background-attachment: initial; background-origin: initial; background-clip: initial; height: 12px;"><a id="access_presentation"></a></span>Access Presentation</h3> <p>Presentations are dependent on which program you are using and which lesson you are currently viewing. Presentations are not available for all programs or lessons.</p> <p>You can access the presentation from the <strong>Dashboard </strong>and the <strong>Course </strong>pages within the program.</p> <p>From the <strong>Dashboard </strong>(A), click the <strong>Launch Presentation</strong> button (B). If you do not see this button or it is grayed out, this means that the currently selected lesson does not have one available.</p> <p><img src="/content/dam/mhe/support/support-images/dts-k12-images/manage-ol-te-presentations/ol-te-presentations-1.jpg" data-assetref="ol-te-presentations-1-1789486977757"></p> <p>On the <strong>Course </strong>page (C), click the <strong>Present </strong>button (D).</p> <p><img src="/content/dam/mhe/support/support-images/dts-k12-images/manage-ol-te-presentations/ol-te-presentations-2.jpg" data-assetref="ol-te-presentations-2-1789487159670"></p> <p> </p> <h3 class="fs-5"><span style="font-weight: normal; width: 11px; overflow: hidden; background-image: url("/libs/clientlibs/granite/richtext/resources/images/anchor.png"); background-position: left bottom; background-size: initial; background-repeat: no-repeat; background-attachment: initial; background-origin: initial; background-clip: initial; height: 12px;"><a id="presentation_tools"></a></span>Presentation Tools</h3> <p style="margin-left: 40px;"><img src="/content/dam/mhe/support/support-images/dts-k12-images/manage-ol-te-presentations/ol-te-presentations-3.jpg" data-assetref="ol-te-presentations-3-1789487495273"></p> <ol class="list-type-alphabet-uppercase"> <li>Use the <strong>Expand Presentation Panel</strong> button to quickly navigate through available slides. From this same panel, you can also access the <strong>Switch to Edit Presentation</strong> button, making it easy to toggle between the active presentation player and the editing tools.<br> <br> <img src="/content/dam/mhe/support/support-images/dts-k12-images/manage-ol-te-presentations/ol-te-presentations-4.jpg" data-assetref="ol-te-presentations-4-1789487881170"><br> <br> </li> <li>The <strong>Presentation Menu</strong> button provides options to toggle on and off the Presentation and Resource Titles.<br> <br> <img src="/content/dam/mhe/support/support-images/dts-k12-images/manage-ol-te-presentations/ol-te-presentations-5.jpg" data-assetref="ol-te-presentations-5-1789487970415"><br> <br> </li> <li>Click the <strong>Resource </strong>arrows to navigate back and forth between the main presentation slides.<br> <br> </li> <li>* Click the <strong>Learning Tools</strong> button to open the eToolkit.<br> <br> </li> <li>* Click the <strong>Calculator </strong>button to open a separate calculator app.<br> <br> *These tools are only available for certain programs.<br> <br> </li> <li>Use the <strong>New Tab</strong> button to open the presentation in a separate browser tab, allowing you to navigate through the program simultaneously.<br> <br> </li> <li>Use the <strong>Full Screen</strong> button to toggle between full screen and regular view of the presentation.<br> <br> </li> <li>Click the <strong>Close Player</strong> button to navigate out of the presentation.<br> <br> </li> <li>The <strong>Contents </strong>panel provides access to the selected presentation slide's Table of Contents, as well as any Highlights, Notes, and Bookmarks that have been made.<br> <br> </li> <li>If the presentation slide has <strong>multiple pages</strong> within it, you can click the back-and-forth arrows to navigate through the different presentation pages. This is different from the Resource navigation.<br> <br> </li> <li>Click the <strong>Search </strong>(magnifying glass) icon to locate specific terms within the presentation.<br> <br> Click on the arrow to expand/collapse the different sections in the search panel. Click on a listed option to navigate to that presentation slide.<br> <br> <img src="/content/dam/mhe/support/support-images/dts-k12-images/manage-ol-te-presentations/ol-te-presentations-6.jpg" data-assetref="ol-te-presentations-6-1789488884007"><br> <br> </li> <li>The <strong>Font Size</strong> button makes the font within the presentation slide larger or smaller by dragging the slider back and forth.<br> <br> <img src="/content/dam/mhe/support/support-images/dts-k12-images/manage-ol-te-presentations/ol-te-presentations-7.jpg" data-assetref="ol-te-presentations-7-1789488986830"><br> <br> </li> <li>Use the <strong>Previous Location</strong> arrow to quickly return to the last page you visited. Note that this feature is only active for presentation slides that contain multiple pages.<br> <br> </li> <li>Use <strong>Teacher Options</strong> to access tools for clearing highlights and resetting all activities, as well as toggling <strong>Teacher Notes</strong> on and off.<br> <br> <img src="/content/dam/mhe/support/support-images/dts-k12-images/manage-ol-te-presentations/ol-te-presentations-8.jpg" data-assetref="ol-te-presentations-8-1789489213866"><br> <br> </li> <li>Click the <strong>Read Aloud</strong> speaker icon to have the presentation page narrated.</li> </ol> <p> </p> <h3 class="fs-5"><span style="font-weight: normal; width: 11px; overflow: hidden; background-image: url("/libs/clientlibs/granite/richtext/resources/images/anchor.png"); background-position: left bottom; background-size: initial; background-repeat: no-repeat; background-attachment: initial; background-origin: initial; background-clip: initial; height: 12px;"><a id="toolbar"></a></span>Annotation Toolbar</h3> <p>To access the annotation toolbar, you first need to highlight text within the presentation.</p> <p><img src="/content/dam/mhe/support/support-images/dts-k12-images/manage-ol-te-presentations/ol-te-presentations-9.jpg" data-assetref="ol-te-presentations-9-1789489675170"></p> <ol> <li>Click on the option to highlight, underline, box, or circle the selected text.<br> <br> </li> <li>Click on the preferred color box.<br> <br> A. Click the <strong>Add Annotation</strong> icon to add highlights, circles, boxes, or underline text.<br> <br> With the <strong>Quick Annotations </strong>box checked, it allows you to highlight, underline, box, or circle multiple selections of text without having to continually select the options from the toolbar each time.<br> <br> <img src="/content/dam/mhe/support/support-images/dts-k12-images/manage-ol-te-presentations/ol-te-presentations-10.jpg" data-assetref="ol-te-presentations-10-1789489919679"><br> <br> B. Click the <strong>Add Placemark </strong>icon to bookmark the selected text.<br> <br> C. Click the <strong>Add Note</strong> (notebook icon) to attach a note to the selected text.<br> <br> D. Click the <strong>speaker </strong>icon to have the selected text read aloud.<br> <br> E. Click the <strong>Close </strong>(x icon) button to exit the annotation toolbar.<br> <br> <strong>Annotation Legend:<br> <br> </strong>- <strong>Black solid underline</strong> indicates that the text has been bookmarked (placement).<br> <br> - <strong>Red dashed line</strong> indicates that there is a note attached.<br> <br> -<strong> Colored underline</strong> indicates that the text has been underlined using the Add Annotation option.<br> <br> - <strong>Colored box </strong>indicates that the text has been boxed using the Add Annotation option.<br> <br> - <strong>Colored circle</strong> indicates that the text has been circled using the Add Annotation option.<br> <br> - <strong>Solid color </strong>indicates that the text has been highlighted using the Add Annotation option.<br> <br> <img src="/content/dam/mhe/support/support-images/dts-k12-images/manage-ol-te-presentations/ol-te-presentations-25.jpg" data-assetref="ol-te-presentations-25-1789498077180"><br> <br> Each of the annotations that have been added to a presentation slide can be found by clicking on the <strong>Contents </strong>button.<br> <br> <img src="/content/dam/mhe/support/support-images/dts-k12-images/manage-ol-te-presentations/ol-te-presentations-11.jpg" data-assetref="ol-te-presentations-11-1789490520006"><br> <br> You then want to click on the corresponding icon on the panel.<br> <br> <img src="/content/dam/mhe/support/support-images/dts-k12-images/manage-ol-te-presentations/ol-te-presentations-12.jpg" data-assetref="ol-te-presentations-12-1789490617045"></li> </ol> <p> </p> <h3 class="fs-5"><span style="font-weight: normal; width: 11px; overflow: hidden; background-image: url("/libs/clientlibs/granite/richtext/resources/images/anchor.png"); background-position: left bottom; background-size: initial; background-repeat: no-repeat; background-attachment: initial; background-origin: initial; background-clip: initial; height: 12px;"><a id="delete_annotations"></a></span>Delete Annotations</h3> <p>To remove annotated text, click on it within the presentation, then click the<strong> trash can icon</strong> from the annotation toolbar.</p> <p>To delete notes, simply clear the text directly within the notepad.</p> <p><img src="/content/dam/mhe/support/support-images/dts-k12-images/manage-ol-te-presentations/ol-te-presentations-13.jpg" data-assetref="ol-te-presentations-13-1789494377740"></p> <p>They can also be removed by going to the <strong>Contents </strong>panel and clicking the <strong>trash can</strong> <strong>icon </strong>to the right of the listed annotation.</p> <p><img src="/content/dam/mhe/support/support-images/dts-k12-images/manage-ol-te-presentations/ol-te-presentations-14.jpg" data-assetref="ol-te-presentations-14-1789494589446"></p> <p>To clear the entire presentation resource or a specific presentation page of highlights, notes, and placemarks, you can click on the <strong>Teacher options</strong> button at the top right. Click <strong>Clear all highlights in this resource</strong> (the entire presentation) or <strong>Clear highlights on this page from the menu</strong>.</p> <p><img src="/content/dam/mhe/support/support-images/dts-k12-images/manage-ol-te-presentations/ol-te-presentations-15.jpg" data-assetref="ol-te-presentations-15-1789494757251"></p> <p> </p> <h3 class="fs-5"><span style="font-weight: normal; width: 11px; overflow: hidden; background-image: url("/libs/clientlibs/granite/richtext/resources/images/anchor.png"); background-position: left bottom; background-size: initial; background-repeat: no-repeat; background-attachment: initial; background-origin: initial; background-clip: initial; height: 12px;"><a id="reset_activities"></a></span>Reset Activities</h3> <p>If activities were completed within the presentation, they can be easily cleared by clicking on the Teacher options button. Click to <strong>Reset all activities in this resource</strong> (the entire presentation) or <strong>Reset activities on this page</strong>.</p> <p><img src="/content/dam/mhe/support/support-images/dts-k12-images/manage-ol-te-presentations/ol-te-presentations-21.jpg" data-assetref="ol-te-presentations-21-1789496276915"></p> <p> </p> <h3 class="fs-5"><span style="font-weight: normal; width: 11px; overflow: hidden; background-image: url("/libs/clientlibs/granite/richtext/resources/images/anchor.png"); background-position: left bottom; background-size: initial; background-repeat: no-repeat; background-attachment: initial; background-origin: initial; background-clip: initial; height: 12px;"><a id="teacher_notes"></a></span>Teacher Notes</h3> <p>The <strong>Teacher Notes</strong> are turned on by default. These are shown by a black bar with a + (plus) icon to the left. Click on the bar to open or close the teacher notes.</p> <p><img src="/content/dam/mhe/support/support-images/dts-k12-images/manage-ol-te-presentations/ol-te-presentations-22.jpg" data-assetref="ol-te-presentations-22-1789496436066"></p> <p>To turn the teacher notes off, click the <strong>Teacher options</strong> button. Click <strong>Teacher Notes</strong> on the menu so there is no longer a checkmark.</p> <p><img src="/content/dam/mhe/support/support-images/dts-k12-images/manage-ol-te-presentations/ol-te-presentations-23.jpg" data-assetref="ol-te-presentations-23-1789496594596"> <img src="/content/dam/mhe/support/support-images/dts-k12-images/manage-ol-te-presentations/ol-te-presentations-24.jpg" data-assetref="ol-te-presentations-24-1789496600373"></p> <p> </p> <h3 class="fs-5"><span style="font-weight: normal; width: 11px; overflow: hidden; background-image: url("/libs/clientlibs/granite/richtext/resources/images/anchor.png"); background-position: left bottom; background-size: initial; background-repeat: no-repeat; background-attachment: initial; background-origin: initial; background-clip: initial; height: 12px;"><a id="edit_presentation"></a></span>Edit Presentation</h3> <ol class="list-type-alphabet-uppercase"> <li>To make edits to the presentation, click the <strong>Expand Presentation Panel</strong> button on the launched presentation.<br> <br> <img src="/content/dam/mhe/support/support-images/dts-k12-images/manage-ol-te-presentations/ol-te-presentations-16.jpg" data-assetref="ol-te-presentations-16-1789495204374"><br> <br> </li> <li>Clicking the <strong>Edit Presentation</strong> button from the <strong>Dashboard </strong>or <strong>Course </strong>page will also open the<strong> Edit Presentation</strong> panel.<br> <br> <img src="/content/dam/mhe/support/support-images/dts-k12-images/manage-ol-te-presentations/ol-te-presentations-17.jpg" data-assetref="ol-te-presentations-17-1789495343215"><br> <br> The <strong>Edit Presentation</strong> panel includes all resources that are located within the lesson the presentation is for, making it easy to add or remove them from the presentation.<br> <br> </li> <li>Click the <strong>Presentation </strong>toggle to add or remove the resource from the presentation.<br> <br> </li> <li>Click the <strong>Move </strong>button on a resource to place the slide in a different location within the list of resources that are shown in the presentation.<br> <br> After clicking the <strong>Move </strong>button, click in the list of slides where you want to place the selected resource. You can also click and drag the resource to a new location in the list.<br> <br> Changes are saved automatically.<br> <br> <img src="/content/dam/mhe/support/support-images/dts-k12-images/manage-ol-te-presentations/ol-te-presentations-18.jpg" data-assetref="ol-te-presentations-18-1789495651345"></li> </ol> <p> </p> <h3 class="fs-5"><span style="font-weight: normal; width: 11px; overflow: hidden; background-image: url("/libs/clientlibs/granite/richtext/resources/images/anchor.png"); background-position: left bottom; background-size: initial; background-repeat: no-repeat; background-attachment: initial; background-origin: initial; background-clip: initial; height: 12px;"><a id="sync_presentation"></a></span>Sync Presentation to Additional Classes</h3> <p>If you have made adjustments to a lesson presentation and have multiple classes that use the same content, you can easily sync the presentation to all classes.</p> <ol> <li>Make preferred changes to the presentation.<br> <br> </li> <li>On the <strong>Course </strong>page for the lesson, click the <strong>Options </strong>button.<br> <br> </li> <li>Click <strong>Sync Presentation</strong> from the menu.<br> <br> <img src="/content/dam/mhe/support/support-images/dts-k12-images/manage-ol-te-presentations/ol-te-presentations-19.jpg" data-assetref="ol-te-presentations-19-1789495848211"><br> <br> </li> <li>Select the class(es) you want to sync the presentation to.<br> <br> </li> <li>Click the <strong>Sync </strong>button.<br> <br> <img src="/content/dam/mhe/support/support-images/dts-k12-images/manage-ol-te-presentations/ol-te-presentations-20.jpg" data-assetref="ol-te-presentations-20-1789495947622"></li> </ol> dts Explore the presentation player used to display lesson content and interactive media. 2026-09-15 Access, Navigate, and Customize Open Learning Presentations Explore the presentation player used to display lesson content and interactive media. Explore the presentation player used to display lesson content and interactive media.
Explore the presentation player used to display lesson content and interactive media.
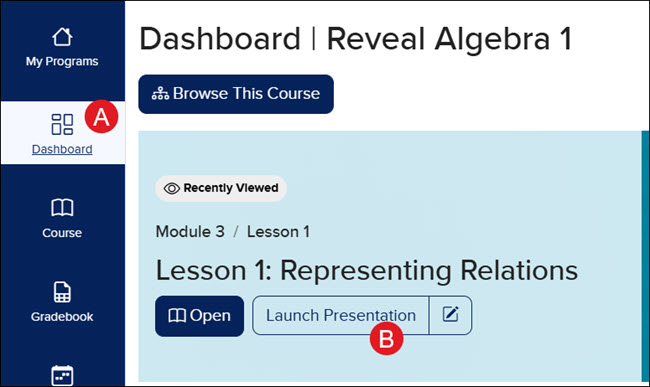
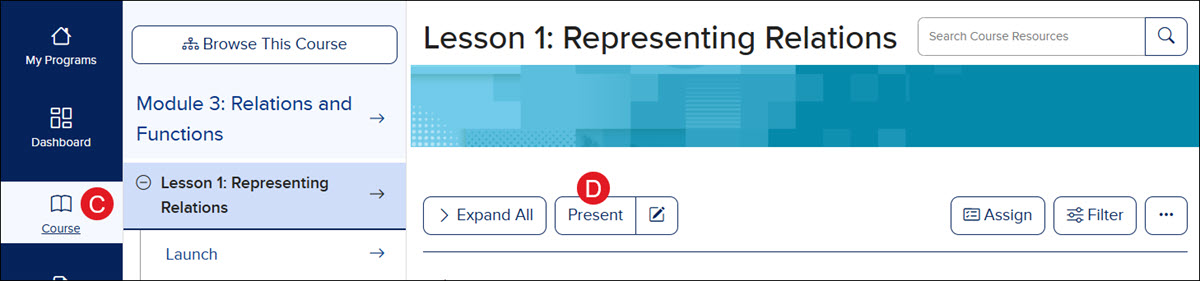
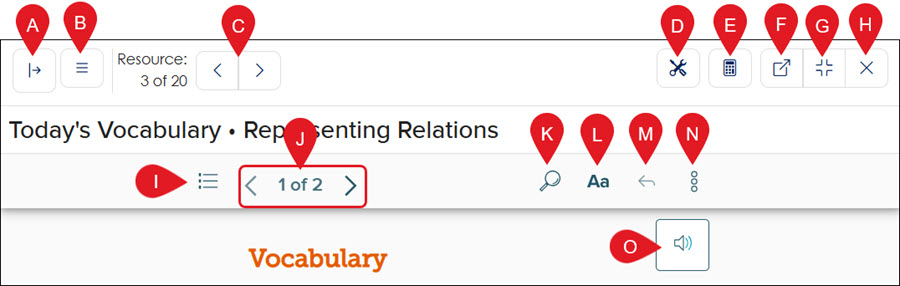
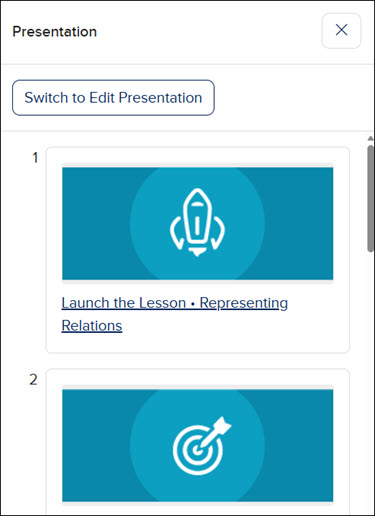
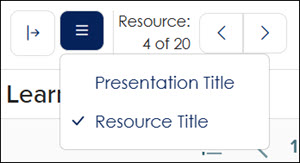
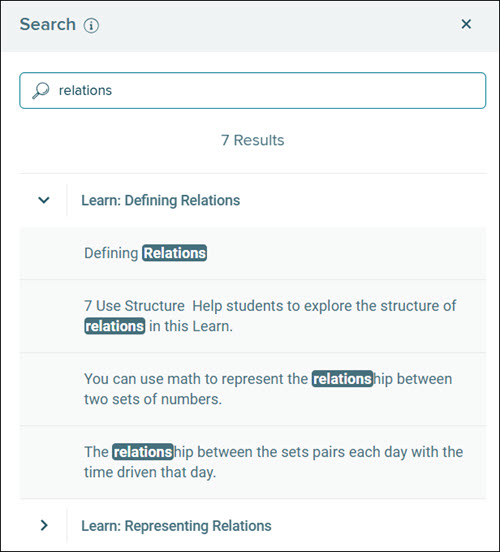
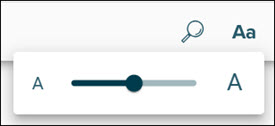
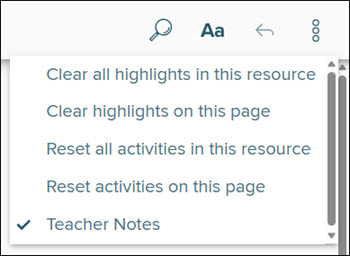
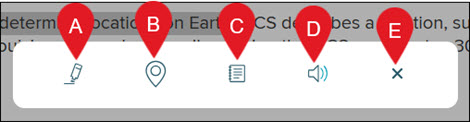
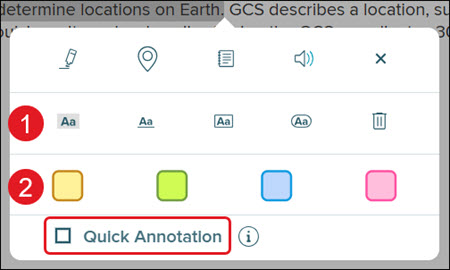
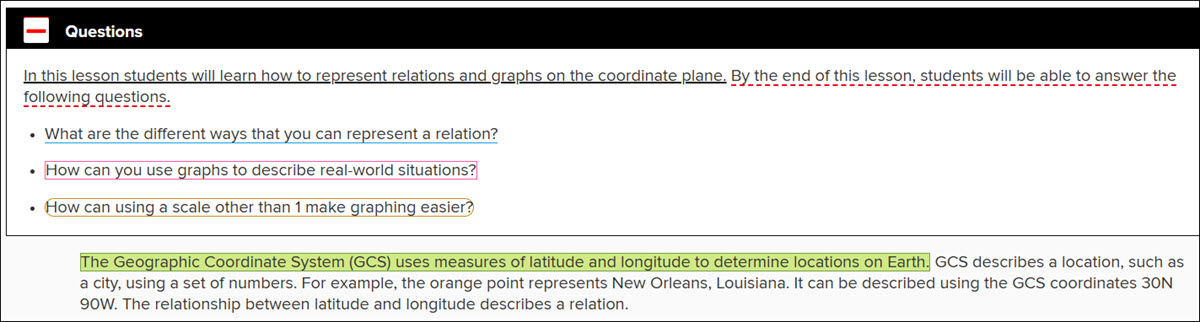
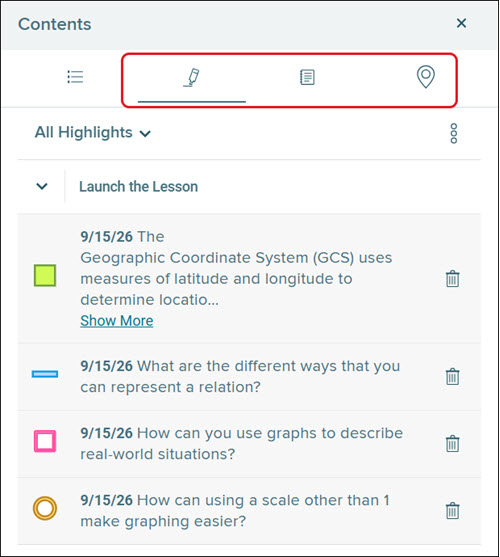
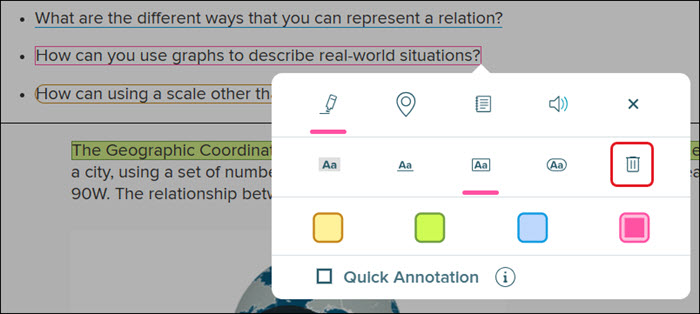
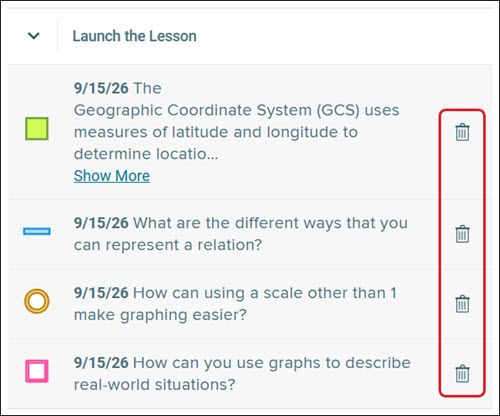
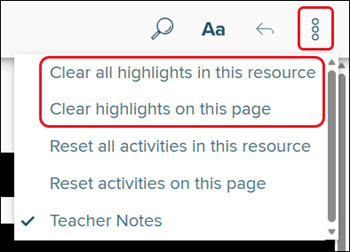
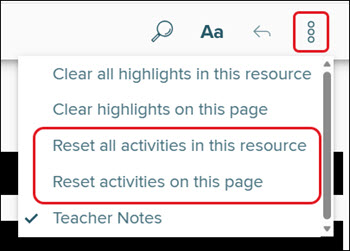
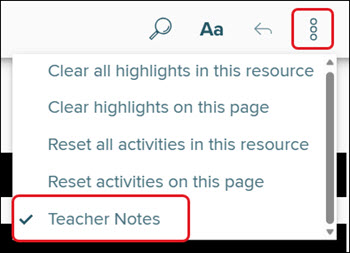
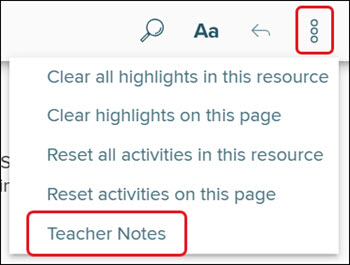
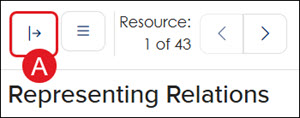
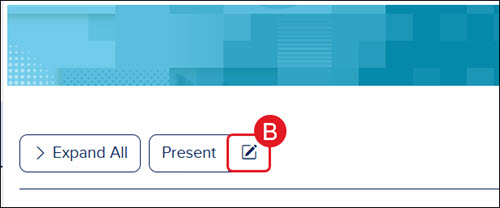
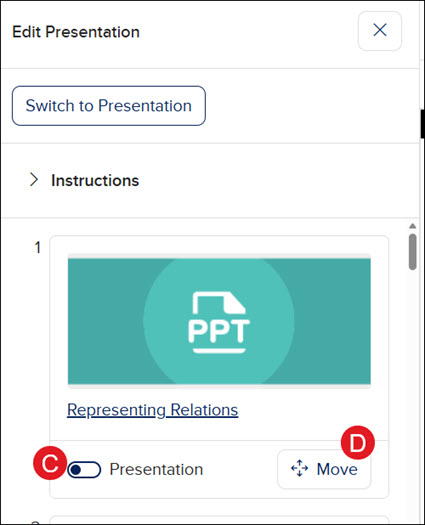
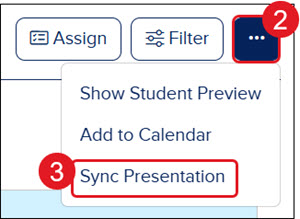
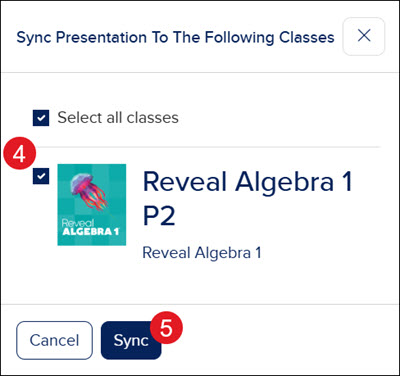
Article Contents View a video walkthrough Access Presentation Presentation Tools Annotation Toolbar Delete Annotations Reset Activities Teacher Notes Edit Presentation Sync Presentation to Additional Classes Access Presentation Presentations are dependent on which program you are using and which lesson you are currently viewing. Presentations are not available for all programs or lessons. You can access the presentation from the Dashboard and the Course pages within the program. From the Dashboard (A), click the Launch Presentation button (B). If you do not see this button or it is grayed out, this means that the currently selected lesson does not have one available. On the Course page (C), click the Present button (D). Presentation Tools Use the Expand Presentation Panel button to quickly navigate through available slides. From this same panel, you can also access the Switch to Edit Presentation button, making it easy to toggle between the active presentation player and the editing tools. The Presentation Menu button provides options to toggle on and off the Presentation and Resource Titles. Click the Resource arrows to navigate back and forth between the main presentation slides. * Click the Learning Tools button to open the eToolkit. * Click the Calculator button to open a separate calculator app. *These tools are only available for certain programs. Use the New Tab button to open the presentation in a separate browser tab, allowing you to navigate through the program simultaneously. Use the Full Screen button to toggle between full screen and regular view of the presentation. Click the Close Player button to navigate out of the presentation. The Contents panel provides access to the selected presentation slide's Table of Contents, as well as any Highlights, Notes, and Bookmarks that have been made. If the presentation slide has multiple pages within it, you can click the back-and-forth arrows to navigate through the different presentation pages. This is different from the Resource navigation. Click the Search (magnifying glass) icon to locate specific terms within the presentation. Click on the arrow to expand/collapse the different sections in the search panel. Click on a listed option to navigate to that presentation slide. The Font Size button makes the font within the presentation slide larger or smaller by dragging the slider back and forth. Use the Previous Location arrow to quickly return to the last page you visited. Note that this feature is only active for presentation slides that contain multiple pages. Use Teacher Options to access tools for clearing highlights and resetting all activities, as well as toggling Teacher Notes on and off. Click the Read Aloud speaker icon to have the presentation page narrated. Annotation Toolbar To access the annotation toolbar, you first need to highlight text within the presentation. Click on the option to highlight, underline, box, or circle the selected text. Click on the preferred color box. A. Click the Add Annotation icon to add highlights, circles, boxes, or underline text. With the Quick Annotations box checked, it allows you to highlight, underline, box, or circle multiple selections of text without having to continually select the options from the toolbar each time. B. Click the Add Placemark icon to bookmark the selected text. C. Click the Add Note (notebook icon) to attach a note to the selected text. D. Click the speaker icon to have the selected text read aloud. E. Click the Close (x icon) button to exit the annotation toolbar. Annotation Legend: - Black solid underline indicates that the text has been bookmarked (placement). - Red dashed line indicates that there is a note attached. - Colored underline indicates that the text has been underlined using the Add Annotation option. - Colored box indicates that the text has been boxed using the Add Annotation option. - Colored circle indicates that the text has been circled using the Add Annotation option. - Solid color indicates that the text has been highlighted using the Add Annotation option. Each of the annotations that have been added to a presentation slide can be found by clicking on the Contents button. You then want to click on the corresponding icon on the panel. Delete Annotations To remove annotated text, click on it within the presentation, then click the trash can icon from the annotation toolbar. To delete notes, simply clear the text directly within the notepad. They can also be removed by going to the Contents panel and clicking the trash can icon to the right of the listed annotation. To clear the entire presentation resource or a specific presentation page of highlights, notes, and placemarks, you can click on the Teacher options button at the top right. Click Clear all highlights in this resource (the entire presentation) or Clear highlights on this page from the menu. Reset Activities If activities were completed within the presentation, they can be easily cleared by clicking on the Teacher options button. Click to Reset all activities in this resource (the entire presentation) or Reset activities on this page. Teacher Notes The Teacher Notes are turned on by default. These are shown by a black bar with a + (plus) icon to the left. Click on the bar to open or close the teacher notes. To turn the teacher notes off, click the Teacher options button. Click Teacher Notes on the menu so there is no longer a checkmark. Edit Presentation To make edits to the presentation, click the Expand Presentation Panel button on the launched presentation. Clicking the Edit Presentation button from the Dashboard or Course page will also open the Edit Presentation panel. The Edit Presentation panel includes all resources that are located within the lesson the presentation is for, making it easy to add or remove them from the presentation. Click the Presentation toggle to add or remove the resource from the presentation. Click the Move button on a resource to place the slide in a different location within the list of resources that are shown in the presentation. After clicking the Move button, click in the list of slides where you want to place the selected resource. You can also click and drag the resource to a new location in the list. Changes are saved automatically. Sync Presentation to Additional Classes If you have made adjustments to a lesson presentation and have multiple classes that use the same content, you can easily sync the presentation to all classes. Make preferred changes to the presentation. On the Course page for the lesson, click the Options button. Click Sync Presentation from the menu. Select the class(es) you want to sync the presentation to. Click the Sync button.
dts
Customer Support, PreK-12, Classroom Teacher, Preschool, Elementary School, Middle School, High School, Direct Login & Auto-Rostering, Direct Login & Manual-Rostering, SSO & Auto-Rostering, SSO & Manual-Rostering, Core, Intervention, Supplemental, AP, Honors & Electives, Career & Technical Education, Literacy, Math, Science, Social Studies, Health, Visual & Performing Arts, World Languages, AP Biology, AP Chemistry, AP History & Geography, AP Psychology, AP Economics, AP African American Studies, AP Precalculus, AP Statistics, AP Computer Science, AP Language and Composition, AP Public Speaking, AP Music Theory, 5 Steps to a 5 - AP Test Prep, Glencoe Health 2022, Teen Health 2021, Arrive Math, Building Blocks 2024, Building Blocks PreK 2025, Number Worlds 2024, SRA Reading Laboratory 2025, SRA Reading Mastery Transformations, McGraw Hill Literacy Emerge!, McGraw Hill Literacy Summit!, McGraw Hill Literacy Soar!, Open Court Reading 2025, CA Reveal Math (K-12), Illustrative Math, Reveal Math (K-12), Texas Math, CA Inspire Science 2020, FL Science 2025 (K-12), Inspire Science 2020, TN Science (K-12), TX Science 2025 (K-12), CA Impact 2019, FL Social Studies 2024 (K-12), Impact Social Studies, Asi se Dice 2024, CTE - Health Science, CTE - Computing and Technology, CTE - Agriculture, CTE - Culinary Arts, CTE - Early Childhood Education, CTE - Criminal Justice, CTE - Business, Marketing, and Finance, Level Up K–5, Level Up 6–8, Level Up 9–12, Plan & Present, Tools & Resources