To register for a K-12 Connect section/class, you will first need to get the Section Web Address or the QR Code and the 20-character registration code for the class from your teacher.
1. In a web browser, enter the Section Web Address or scan the provided QR Code.
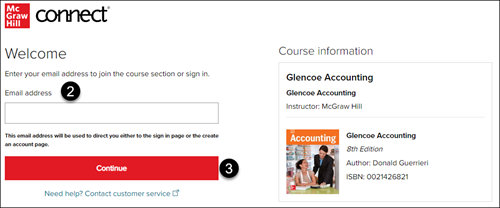
2. On the Welcome page, enter your student Email address. You should see the Course information with your Instructor's name and the content that you will be registering for to the right.
3. Click the Continue button.
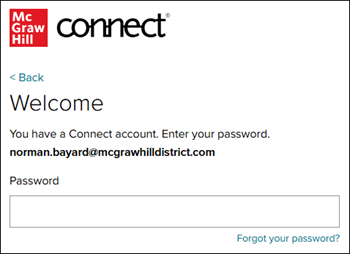
If you have an account already attached to the email address you entered, you will be prompted to enter the Password for that account.
If the email address you entered is not associated with an existing account, you will be prompted to create an account.
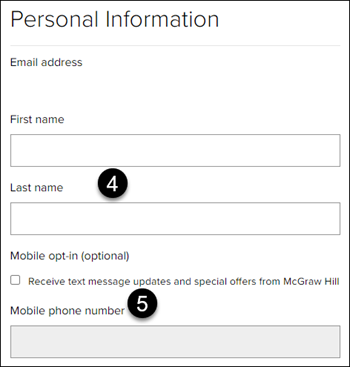
4. On the Create an account page, enter your First and Last Name.
5. Check the Mobile box if you want to receive text messages about Connect updates and offers. This is optional.
If you check this box, enter your Mobile phone number.
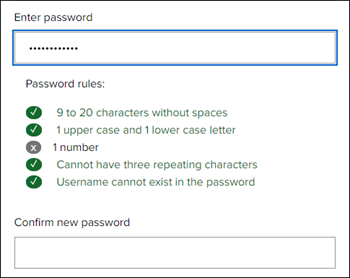
6. Enter the password you want for your account. Enter the password again in the Confirm new password field.
The password needs to meet the following requirements:
9 to 20 characters without spaces
1 upper and 1 lower case letter
1 number
Cannot have three repeating characters (ex: Connnect)
Username cannot exist in the password
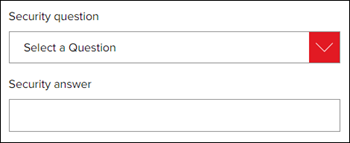
7. Select a Security question from the drop-down menu.
8. Enter the Security answer to the selected question.
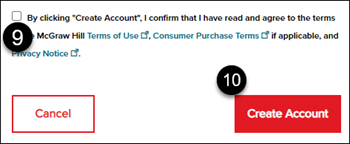
9. Check the box to confirm that you have read and agree to the terms of service.
10. Click the Create Account button.
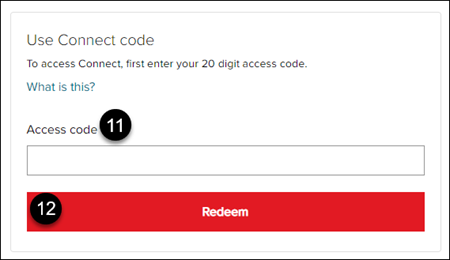
11. On the Course Access page, enter the 20-character Connect code that was provided by your teacher.
12. Click the Redeem button.
If you get an Access code error pop-up advising that the code you entered cannot be accepted for the Connect product, you will need to reach out to your teacher as they will need to give you a different code, or they have the wrong course attached to their teacher account.
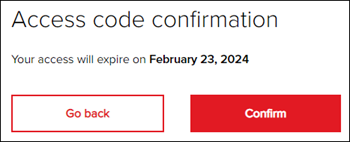
13. On the Access code confirmation page, click the Confirm button.
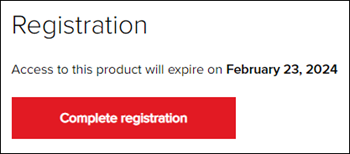
14. Click the Complete registration button.
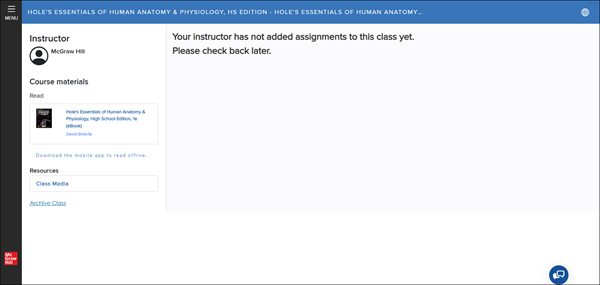
You will then be taken to your class page for the registered section.
Help us improve!
Let us know how we can improve our support information by providing feedback in this short survey.
Top
Regional Page Available
It looks like you're outside the United States. Do you want to see your regional version of this page?
Support Topics/User Guides & Account Management/Account Management
Context/Integration Type/SSO & Manual-Rostering
prek-12
2026-03-24T18:48:51.672-03:00
<p><a href="https://hub.mheducation.com/share/lkmvuwgbmw7f" target="_blank">View the demo in a separate tab.</a></p> <p><a href="https://hub.mheducation.com/share/k5acikkiyewf" target="_blank">View the Spanish version of the demo.</a></p> <p> </p> <p>To register for a K-12 Connect section/class, you will first need to get the <strong>Section Web Address</strong> or the <strong>QR Code</strong> and the <strong>20-character registration code</strong> for the class from your teacher.</p> <p> </p> <p>1. In a web browser, enter the <strong>Section Web Address </strong>or scan the provided <strong>QR Code</strong>.</p> <p>2. On the <strong>Welcome </strong>page, enter your student <strong>Email address</strong>. You should see the <strong>Course information</strong> with your Instructor's name and the content that you will be registering for to the right.</p> <p>3. Click the <strong>Continue</strong> button.</p> <p><img alt="image.png" src="/content/dam/mhe/support/support-images/migrated/rtaImage-622376903.jpeg" data-assetref="rtaImage-622376903-1778702727135"></p> <p>If you have an account already attached to the email address you entered, you will be prompted to enter the <strong>Password </strong>for that account.</p> <p><img src="/content/dam/mhe/support/support-images/migrated/rtaImage--2322564.jpeg" alt="" data-assetref="rtaImage--2322564-1778702727136"></p> <p>If the email address you entered is not associated with an existing account, you will be prompted to create an account.</p> <p>4. On the<strong> Create an account </strong>page, enter your <strong>First</strong> and <strong>Last Name</strong>.</p> <p>5. Check the <strong>Mobile box</strong> if you want to receive text messages about Connect updates and offers. This is optional.</p> <p>If you check this box, enter your <strong>Mobile phone number</strong>.</p> <p><img alt="image.png" src="/content/dam/mhe/support/support-images/migrated/rtaImage-622376932.jpeg" data-assetref="rtaImage-622376932-1778702727136"></p> <p>6. Enter the <strong>password </strong>you want for your account. Enter the password again in the <strong>Confirm new password</strong> field.</p> <p>The password needs to meet the following <strong>requirements</strong>:</p> <ul> <li>9 to 20 characters without spaces</li> </ul> <ul> <li>1 upper and 1 lower case letter</li> </ul> <ul> <li>1 number</li> </ul> <ul> <li>Cannot have three repeating characters (ex: Co<span><strong>nnn</strong></span>ect)</li> </ul> <ul> <li>Username cannot exist in the password</li> </ul> <p><img alt="image.png" src="/content/dam/mhe/support/support-images/migrated/rtaImage-622376930.jpeg" data-assetref="rtaImage-622376930-1778702727136"></p> <p>7. Select a <strong>Security question</strong> from the drop-down menu.</p> <p>8. Enter the <strong>Security answer</strong> to the selected question.</p> <p><img alt="image.png" src="/content/dam/mhe/support/support-images/migrated/rtaImage-622376945.jpeg" data-assetref="rtaImage-622376945-1778702727136"></p> <p>9. Check the box to <strong>confirm</strong> that you have read and agree to the terms of service.</p> <p>10. Click the <strong>Create Account </strong>button.</p> <p><img alt="image.png" src="/content/dam/mhe/support/support-images/migrated/rtaImage-622377181.jpeg" data-assetref="rtaImage-622377181-1778702727136"></p> <p>11. On the <strong>Course Access</strong> page, enter the 20-character <strong>Connect code</strong> that was provided by your teacher.</p> <p>12. Click the <strong>Redeem</strong> button.</p> <p><img alt="image.png" src="/content/dam/mhe/support/support-images/migrated/rtaImage-622377220.jpeg" data-assetref="rtaImage-622377220-1778702727136"></p> <p>If you get an <strong>Access code error </strong>pop-up advising that the code you entered cannot be accepted for the Connect product, you will need to reach out to your teacher as they will need to give you a different code, or they have the wrong course attached to their teacher account.</p> <p><img alt="image.png" src="/content/dam/mhe/support/support-images/migrated/rtaImage-622377273.jpeg" data-assetref="rtaImage-622377273-1778702727136"></p> <p>13. On the <strong>Access code confirmation</strong> page, click the <strong>Confirm </strong>button.</p> <p><img alt="image.png" src="/content/dam/mhe/support/support-images/migrated/rtaImage-622377228.jpeg" data-assetref="rtaImage-622377228-1778702727136"></p> <p>14. Click the <strong>Complete registration</strong> button.</p> <p><img alt="image.png" src="/content/dam/mhe/support/support-images/migrated/rtaImage-622377239.jpeg" data-assetref="rtaImage-622377239-1778702727136"></p> <p>You will then be taken to your class page for the registered section.</p> <p><img src="/content/dam/mhe/support/support-images/migrated/rtaImage--2329741.jpeg" alt="" data-assetref="rtaImage--2329741-1778702727136"></p> dts K-12 Connect How To Register For a Class: step-by-step guidance for Connect, including key requirements, tips, and troubleshooting where needed. 2025-12-17 How to Register for a K-12 Connect® Class K-12 Connect How To Register For a Class: step-by-step guidance for Connect, including key requirements, tips, and troubleshooting where needed. Learn how students register for a Connect® course using a class URL and access code.
Learn how students register for a Connect® course using a class URL and access code.
View the demo in a separate tab. View the Spanish version of the demo. To register for a K-12 Connect section/class, you will first need to get the Section Web Address or the QR Code and the 20-character registration code for the class from your teacher. 1. In a web browser, enter the Section Web Address or scan the provided QR Code. 2. On the Welcome page, enter your student Email address. You should see the Course information with your Instructor's name and the content that you will be registering for to the right. 3. Click the Continue button. If you have an account already attached to the email address you entered, you will be prompted to enter the Password for that account. If the email address you entered is not associated with an existing account, you will be prompted to create an account. 4. On the Create an account page, enter your First and Last Name. 5. Check the Mobile box if you want to receive text messages about Connect updates and offers. This is optional. If you check this box, enter your Mobile phone number. 6. Enter the password you want for your account. Enter the password again in the Confirm new password field. The password needs to meet the following requirements: 9 to 20 characters without spaces 1 upper and 1 lower case letter 1 number Cannot have three repeating characters (ex: Connnect) Username cannot exist in the password 7. Select a Security question from the drop-down menu. 8. Enter the Security answer to the selected question. 9. Check the box to confirm that you have read and agree to the terms of service. 10. Click the Create Account button. 11. On the Course Access page, enter the 20-character Connect code that was provided by your teacher. 12. Click the Redeem button. If you get an Access code error pop-up advising that the code you entered cannot be accepted for the Connect product, you will need to reach out to your teacher as they will need to give you a different code, or they have the wrong course attached to their teacher account. 13. On the Access code confirmation page, click the Confirm button. 14. Click the Complete registration button. You will then be taken to your class page for the registered section.
dts
Customer Support, PreK-12, School Student, School Parent, High School, Direct Login & Auto-Rostering, Direct Login & Manual-Rostering, SSO & Auto-Rostering, SSO & Manual-Rostering, AP, Honors & Electives, AP Connect, Getting Started & Orientation, Account Management