
School Research Library Training 

Whether you're new to creating research posts or just need a refresher, this training hub is your go-to resource. You'll find best practices for writing and formatting research content, along with step-by-step video guides to help you confidently publish research posts on mheducation.com

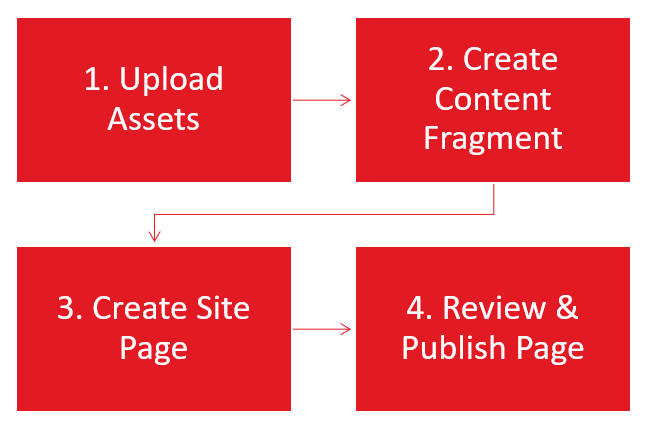
Process Overview: School Research Posting

Step 1: Upload Assets

Upload research assets such as PDFs or images into the DAM.

Step 2: Create Research Content Fragment

Create the research content fragment and publish it.

Step 3: Create Research Site Page

Create the research site page with the content fragment using a Workflow to generate the page automatically.

Step 4: Review & Publish Research Page

Review the site page and use Workflow to request publication. Note: you can schedule it for future publication in this step.

How Create a School Research Post in AEM

AEM Training Videos

  • Watch step-by-step videos with expert nariation.  
  • Use the "Guide Me" button in the bottom right corner of each video to launch step-by-step walkthroughs.
  • First-time users: it will prompt you to install the Scribe extension (quick and easy).

Still have questions? Email an AEM expert: DCMteam@mheducation.com (expect responses within 24 hours during standard business hours)
 

Click the arrow icon in the lower right corner of any video to launch a guided walkthrough. This will open a side panel with step-by-step instructions:

Uploading Research Assets to the DAM in AEM

Always start the Research Post creation process by uploading all supporting assets to the Digital Asset Manager aka DAM. These assets include Images and PDFs. 

Image Best Practices:

1.   Avoid text in images – it can be difficult to read for users who rely on screen readers or have visual impairments. It also doesn’t scale well for responsive designs, causing issues on various devices.

2.   When adding text in images – If text must be included for the image design purposes like logos, infographics or charts, it’s best to describe the text separately in the images alt text to remain compliant with Accessibility Web Standards. When loading your image in AEM use the Description field in the image properties to add alt text. Alt text should be brief yet clear enough to describe the purpose of the image or its content. Think of it as a summary.

  • Avoid Using “Image of…” or “Picture of…”: Screen readers already identify that.
  • Good example: for a chart image: “Bar chart comparing sales over the past 5 years.”

3.  Image File Name – all lowercase letters, use hyphen to replace spaces & no special characters.

Social & Main Image Specs:

Size: 617 x 347px

File size: >200KB

Format: JPG or PNG

Location: /content/dam/mhe/blog/[current-year]/image

Social Share Image: 

This is an image that displays when the blog is shared on social media and as the thumbnail when post is referenced on mheducation.com If no image is submitted, a default placeholder McGraw Hill logo will be used.

Main Image:

This will always appear full width across the post directly above the Body copy. 

Author Bio Image:

Design a square image (Aspect Ratio: 1:1 Square; 400x400 px; .jpg or .png or .webp) with the subject centered and enough margin around the edges so it looks good when styled as a circle using border-radius: 50%

File name format example: [first-name]-[last-name].jpg

  • all lowercase letters
  • hyphen between first and last name (no spaces or underscores)
  • no special characters (e.g., no accents, apostrophes, or punctuation)

Image file name format examples:

jane-smith.jpg

john-oconnor.png

PDF Best Practices:

File name format

  • all lowercase letters
  • hyphen between words (no spaces or underscores)
  • no special characters (e.g., no accents, apostrophes, or punctuation)

Optimize File Size for Web

Compress PDFs: Reduce file size by compressing images and optimizing the PDF content without sacrificing quality, to ensure faster loading times on the web.

Embed Fonts Efficiently: If embedding fonts, only embed the characters used in the document to save space.

Remove Unnecessary Elements: Eliminate unused objects, metadata, or redundant images that can increase the file size unnecessarily.

Test PDF for Accessibility: Adobe Acrobat Accessibility Checker: Use the built-in accessibility checker in Adobe Acrobat Pro to identify issues and fix them before publishing.

Create a Research Site Page

After creating a Research Content Fragment run a workflow that automatically builds the Research Report webpage. 

Reserach Report Publishing Process

After creating the Research Report site page, run a workflow to publish the page live. The workflow will automatically submit a reviewer request to the Digital Content Management (DCM) team. Once publication is approved an email with the live link will be sent. 

Creating an Author Bio Content Fragment

Do not duplicate existing speaker/authors in AEM. Only create a new Bio when one does not yet exist

Pro Tip: Bio images can be requested from Creative with these specs:

Design a square image (Aspect Ratio: 1:1 Square; 400x400 px; .jpg or .png or .webp) with the subject centered and enough margin around the edges so it looks good when styled as a circle using border-radius: 50%

File name format example: [first-name]-[last-name].jpg

  • all lowercase letters
  • hyphen between first and last name (no spaces or underscores)
  • no special characters (e.g., no accents, apostrophes, or punctuation)

Image file name format examples:

jane-smith.jpg

john-oconnor.png