Heart 3D Model: Top 5 Views
3D models within Anatomy & Physiology Revealed (APR) 4.0 allow students to explore the spatial relationships between structures by using a mouse or keyboard navigation. The heart 3D model in APR 4.0 is accessed by clicking the below icon in Module 15: Regional Anatomy, Module 7: Nervous, or Module 9: Cardiovascular.

If not yet familiar with how to navigate and interact with the 3D models in APR, please click on the help icon (indicated by yellow arrow) in the lower left corner, which will launch a tutorial explaining the functionality of the 3D model viewer.

The “Create link” icon is a quick way to create a customized bookmark to allow someone else to access the same exact location in APR 4.0.
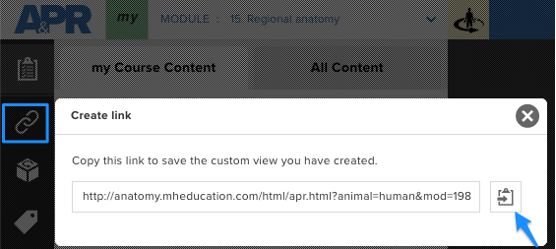
How do I use the “Create link” icon?
Once you have the location you’d like to share, click the clipboard icon (blue arrow) to copy the link to your clipboard. Paste this link into a document, presentation slide, website, or in your learning management system (LMS). Someone trying to access this link simply needs to first log into APR (since it is a password-protected website) or already have a browser tab open to APR, then click on the link to be taken to this same exact location in APR. This “Create link” feature works with the 3D model and in any other mode in APR such as dissection or histology.
Below are links to different views in the heart 3D model that may benefit your students as they learn and study heart anatomy.
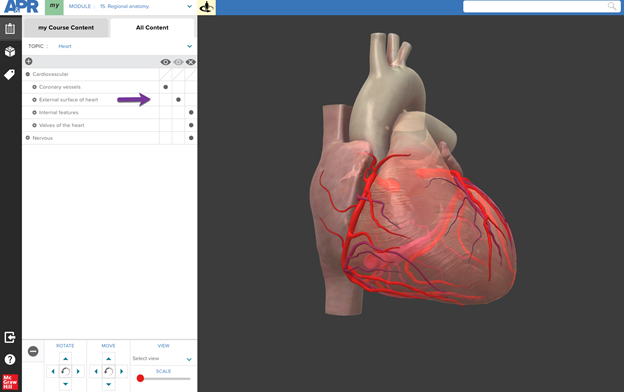
Anterior view of heart focused on coronary vessels
This view allows a student to observe the major coronary vessels of the heart. The external anatomy of the heart has been set to “Transparent” but could easily be changed to “Show”. With the 3D model, a student can tilt and rotate the heart to get an optimal view of each coronary vessel. The transparent setting of the heart 3D model makes it easier to see the branching of different vessels.
https://anatomy.mheducation.com/html/apr.html?animal=human&mod=4178
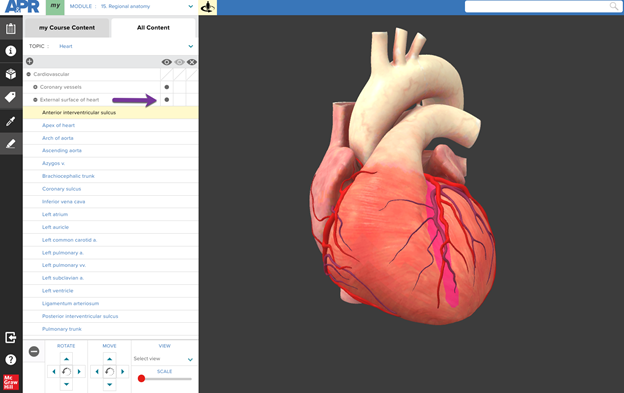
Anterior view of heart focused on external heart anatomy
By changing the visibility of the menu “External surface of heart” from Transparent to Show, the external heart anatomy is now visible. In this example, the anterior interventricular sulcus has been selected and highlighted in the 3D model using “Tag mode”. This allows a student to observe external heart surface features and how they relate to overlying coronary vessels. In this specific case, the student can understand the relationship between the anterior interventricular sulcus and the anterior interventricular branch of left coronary artery and great cardiac vein that lie in this sulcus.
https://anatomy.mheducation.com/html/apr.html?animal=human&mod=4137
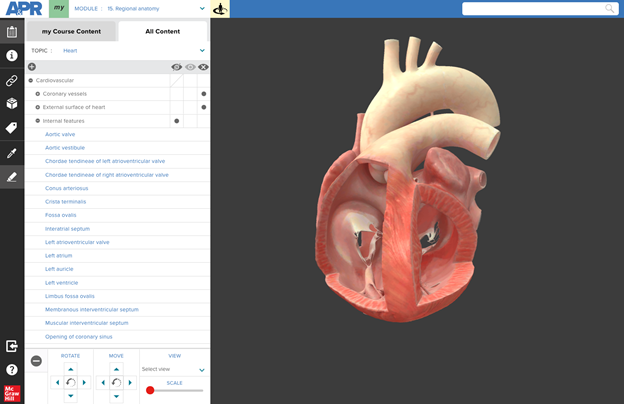
Anterior-lateral view of internal heart
In this view, only the internal features of the heart are visible, and the heart is rotated so a student can see into both ventricles simultaneously. This view allows the student to explore the internal anatomy of all four chambers.
https://anatomy.mheducation.com/html/apr.html?animal=human&mod=9879
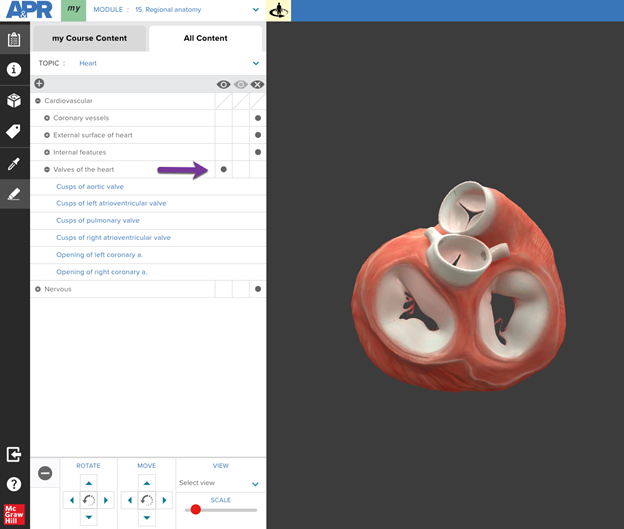
Superior view of heart valves
In this view, only the “Valves of the heart” menu has been set to “Show”. The heart model was then rotated to show the four heart valves from a superior view. The atria have been removed, which allows a student to observe the relationship between each of the heart’s four valves with the others around them. This view can be used to understand the difference between the two semilunar valves and two atrioventricular valves. A student can also zoom-in and rotate the model to identify the opening of the right and left coronary arteries in the ascending aorta.
https://anatomy.mheducation.com/html/apr.html?animal=human&mod=9880
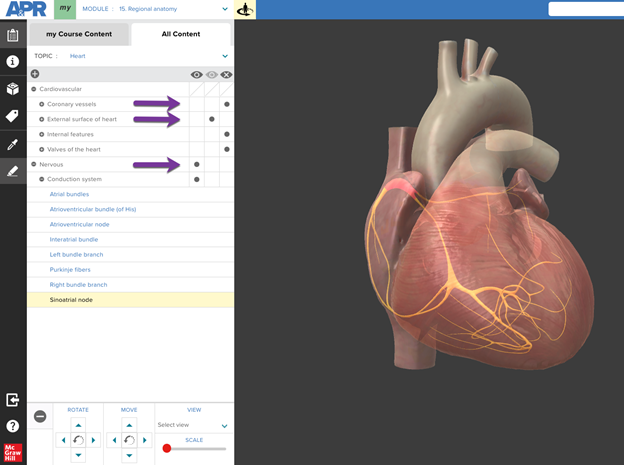
Conduction system of the heart
The conduction system of the heart can be viewed by setting the menu “Coronary vessels” to “Hide”, “External surface of heart” menu to “Transparent” and making sure the “Conduction system” menu is set to “Show”. This allows all the heart conduction system structures to be visible and identified.
https://anatomy.mheducation.com/html/apr.html?animal=human&mod=4142
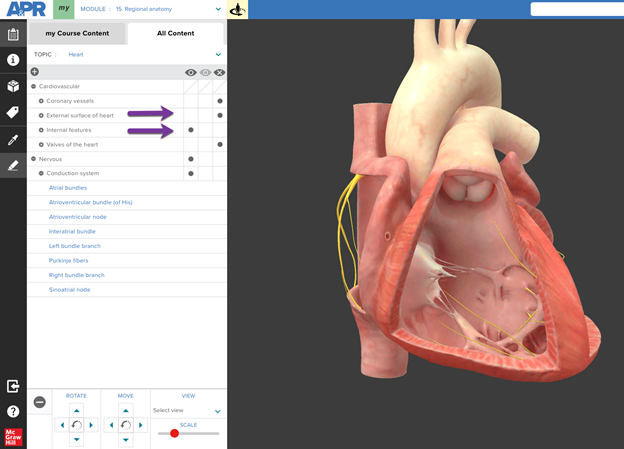
Another option for viewing the conduction system is to set “External surface of heart” menu to “Hide” and set “Internal features” to “Show”. This allows a student to observe the Purkinje fibers in each ventricle and better appreciate how these fibers are located within the myocardium.
https://anatomy.mheducation.com/html/apr.html?animal=human&mod=4144
How might you use the Heart 3D model in your course?
- Create an assignment using the Anatomy & Physiology Revealed Connect Assignment type. Any APR Connect Assignment can include an activity that uses one of the available 3D models.
- Learn more about the APR Connect Assignment here
- Use the “Create link” feature to bookmark an interesting view you have created with the 3D model. You can then share this link with your students or use it to quickly access this specific view of the 3D model during lecture or lab for demonstration purposes.
- Create an Active Learning Activity. A scavenger hunt makes APR even more engaging and fun. Give your students a specific task with the 3D model and ask them to copy their link and send it to you when they have completed the task. For example, you might tell them to find a view in the heart 3D model that will allow them to observe the septomarginal trabecula piercing the anterior papillary muscle.